FREE DINNER EBOOK! Get your copy!
  • Cookie Policy
  • GDPR Policy
  • Disclaimer
  • Terms Of Use
  • Visit my other site: Fun Cookie Recipes
easy meal kitchen
  • Home
  • Dinner
  • Desserts
  • Drinks
  • Appetizers
  • Contact
  • About
  • Privacy Policy
  • Home
  • Dinner
  • Desserts
  • Drinks
  • Appetizers
  • Contact
  • About
  • Privacy Policy
  • Cookie Policy
  • GDPR Policy
  • Disclaimer
  • Terms Of Use
Visit my other site: Fun Cookie Recipes

HOME / CATEGORIES /

Latest

- 1 cup (230g) unsalted butter, cut into cubes - 2 cups (400g) granulated sugar - 4 large eggs at room temperature - 1 teaspoon pure vanilla extract - 1 cup (125g) all-purpose flour - 1 cup (90g) unsweetened cocoa powder - 1/2 teaspoon fine sea salt - 1/2 teaspoon baking powder - 1 cup (150g) semi-sweet or dark chocolate chips - 1/2 cup (75g) chopped walnuts or pecans (optional) To make these fudgy brownies, you'll need simple, high-quality ingredients. Unsalted butter gives the best taste. It melts well and mixes smoothly with sugar. Granulated sugar sweetens and helps create that shiny top. Eggs add moisture and richness. Make sure they are at room temperature for the best results. Vanilla extract gives a nice flavor boost. All-purpose flour provides structure, while cocoa powder brings that deep chocolate taste. Sea salt balances sweetness. Baking powder helps the brownies rise a bit. Chocolate chips are a must for extra chocolate goodness. You can choose semi-sweet or dark chocolate, depending on your taste. If you like nuts, walnuts or pecans add a nice crunch. Gather these ingredients and get ready to make a treat that everyone will love! - First, preheat your oven to 350°F (175°C). This helps your brownies bake evenly. - Next, take a 9x13 inch (23x33 cm) baking pan. Grease it with butter or cooking spray. Then, line it with parchment paper. Leave some paper hanging over the sides. This makes it easy to lift the brownies out after baking. - In a medium saucepan, place 1 cup of cubed unsalted butter. Melt it over low heat. - Once melted, remove the pan from the heat. Stir in 2 cups of granulated sugar with a wooden spoon. Mix until smooth and shiny. - Let the butter-sugar mix cool for about 5 minutes. Then, whisk in 4 large eggs, one at a time. Make sure each egg is mixed well before adding another. Finally, mix in 1 teaspoon of vanilla extract. - In a separate bowl, sift together 1 cup of all-purpose flour, 1 cup of unsweetened cocoa powder, 1/2 teaspoon of fine sea salt, and 1/2 teaspoon of baking powder. This helps prevent lumps in your batter. - Gradually add the dry mix to the wet mix. Stir gently with a spatula until just combined. Be careful; overmixing can make the brownies tough. - Now, fold in 1 cup of chocolate chips and, if you want, 1/2 cup of chopped walnuts or pecans. Make sure they spread evenly in the batter. - Pour the thick batter into the prepared baking pan. Use a spatula to smooth it out into an even layer. - Bake in the preheated oven for 25-30 minutes. Check for doneness by inserting a toothpick into the center. It should come out with a few moist crumbs. Avoid overbaking to keep them fudgy! - Once baked, take the brownies out of the oven. Let them cool in the pan for 15 minutes. - Carefully lift the brownies out using the parchment paper. Place them on a wire rack to cool completely. - After cooling, cut into squares or rectangles. Enjoy these rich, chocolatey treats! To get the perfect fudgy texture, avoid overmixing the batter. Mix just until you see no dry flour. Overmixing makes brownies tough instead of chewy and fudgy. Use the toothpick test to check for doneness. When you insert a toothpick into the center, it should come out with a few moist crumbs. If it’s clean, you may have overbaked them. Using high-quality cocoa powder makes a big difference. It adds rich flavor and depth to the brownies. I love using Dutch-processed cocoa for its smooth taste. For chocolate chips, semi-sweet or dark chocolate chips work best. They melt beautifully and add extra richness to each bite. When serving, cut the brownies into even squares for a neat look. You can arrange them on a decorative platter. For a touch of elegance, dust them with powdered sugar. Pair your brownies with a scoop of creamy vanilla ice cream for a delicious contrast. Add a few fresh berries on the side for color and flavor. {{image_4}} You can boost the taste of your brownies in fun ways. One great option is to add extracts like mint or almond. Just a teaspoon can change the flavor! Another tasty idea is to swirl in peanut butter or caramel right before baking. This adds a creamy richness that melts in your mouth. If you need gluten-free brownies, swap the all-purpose flour for a gluten-free blend. Many brands work well in recipes. For vegan brownies, replace the eggs with flax eggs or unsweetened applesauce. You can use dairy-free chocolate chips to keep it vegan and still delicious. You can make holiday-themed fudgy brownies too! Add spices like cinnamon or nutmeg for a festive touch. You can also mix in seasonal fruits like pumpkin or mashed bananas. These changes make each batch unique and perfect for any time of year. To keep your fudgy brownies fresh, wrap them tightly. Use plastic wrap or foil. Place them in an airtight container. Store them in the fridge for up to a week. If you want to keep them longer, freezing works great! To freeze, cut the brownies into squares. Wrap each square in plastic wrap. Then, place the wrapped brownies in a freezer bag. They can last up to three months in the freezer. When it comes to reheating, you have options. You can use the oven or the microwave. For the oven, preheat it to 350°F (175°C). Place the brownies on a baking sheet. Heat them for about 10 minutes. This will warm them up while keeping them fudgy. If you're in a hurry, the microwave works too. Place a brownie on a microwave-safe plate. Heat it for about 10-15 seconds. Check to make sure it’s warm but not hot. Enjoy the gooey goodness right away! Fudgy brownies can last for a week in the fridge. In the freezer, they can stay fresh for three months. Always check for signs of spoilage. If you see mold or an off smell, it's best to toss them. To keep your brownies fresh, use good storage methods. This helps maintain their rich taste and texture. Enjoy your delicious treats! To make fudgy brownies from scratch, follow these steps: - Preheat your oven to 350°F (175°C). - Grease a 9x13 inch baking pan and line it with parchment paper. - Melt 1 cup of unsalted butter in a saucepan. - Stir in 2 cups of granulated sugar until smooth. - Cool the mixture, then add 4 large eggs and 1 teaspoon of vanilla extract. - In another bowl, sift 1 cup of flour, 1 cup of cocoa powder, 1/2 teaspoon of salt, and 1/2 teaspoon of baking powder. - Combine dry and wet ingredients, then fold in 1 cup of chocolate chips. - Pour the batter into the pan and bake for 25-30 minutes. This will yield rich, fudgy brownies you’ll love. Fudgy brownies have more fat and less flour than cakey ones. Fudgy ones use more butter and chocolate. Cakey brownies rely on more flour and baking powder. This difference creates texture. If you want fudgy brownies, stick to the recipe's fat ratio. Yes, you can use unsweetened cocoa powder instead of chocolate. In fact, this recipe already calls for 1 cup of cocoa powder. This gives the brownies a rich chocolate flavor. Just remember to adjust the sugar if you use sweetened cocoa. If your brownies are too dry, check the baking time. Overbaking is a common cause. Try to bake for less time next time. You can also add a bit more butter or chocolate chips for moisture. This will help keep them fudgy. Absolutely! You can add nuts to your brownie batter. Chopped walnuts or pecans work well. Just fold in 1/2 cup of nuts after mixing the batter. This adds crunch and flavor to your fudgy brownies. To check if brownies are done, use a toothpick. Insert it into the center of the brownies. If it comes out with a few moist crumbs, they are done. If it comes out clean, they may be overbaked. Keep a close eye during the last few minutes! You learned how to make fudgy brownies from scratch, starting with key ingredients. I shared simple steps to prep, mix, and bake. Tips helped you master texture, flavor, and presentation. We also discussed fun variations and storage methods. Enjoying brownies is easy when you follow these steps. Get creative and share with friends! For the best results, trust the process and have fun in your kitchen. Happy baking!

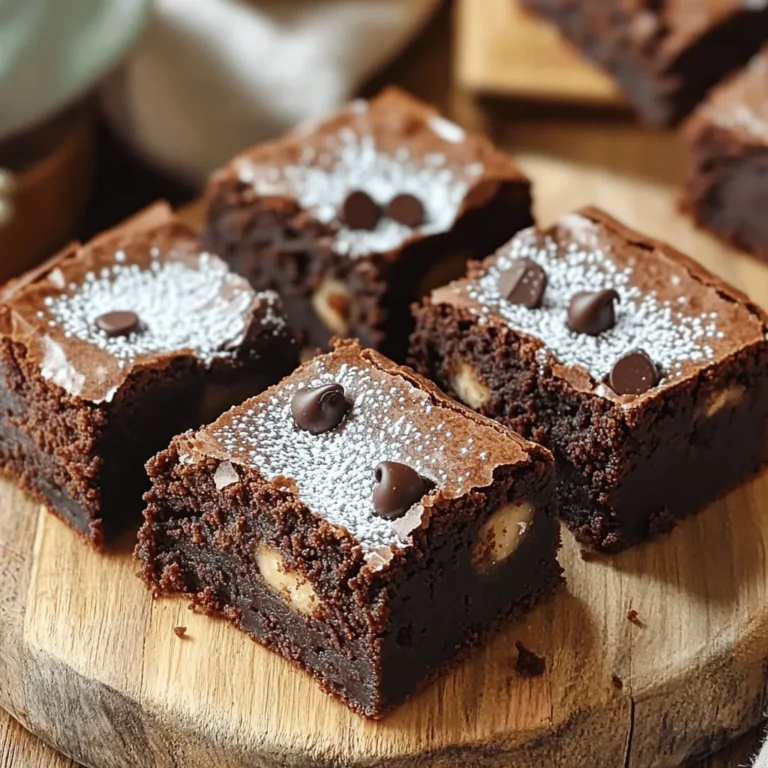
Fudgy Brownies Irresistible Chocolate Delight Recipe

- 2 cups cooked rice (preferably day-old for optimal texture) - 2 medium chicken breasts, diced into bite-sized pieces - 1 cup frozen mixed vegetables (carrots, peas, and corn) - 1 small onion, finely diced - 3 cloves garlic, minced - 1/4 cup low-sodium soy sauce (or regular, to taste) - 2 tablespoons sesame oil - 1 tablespoon oyster sauce (optional, for an added depth of flavor) - 2 green onions, sliced (for garnish) - 2 large eggs, lightly beaten - Salt and pepper to taste I always recommend using day-old rice for this dish. It gives the best texture. Fresh rice can be too sticky. The frozen mixed vegetables are a great time-saver. They add color and nutrition without the fuss. You can change the soy sauce. Low-sodium keeps it healthy, while regular soy sauce adds more salt. The oyster sauce adds a nice touch but is not a must. If you want a gluten-free meal, use tamari instead of soy sauce. For a vegetarian option, skip the chicken and add tofu instead. You can also use vegetable broth in place of the chicken for more flavor. If you are egg-free, you can leave out the eggs. The dish will still taste great without them. 1. Start with 2 cups of cooked rice. Day-old rice works best. It helps the rice stay firm and not mushy. 2. Dice 2 medium chicken breasts into bite-sized pieces. This makes cooking even easier. 3. Measure 1 cup of frozen mixed vegetables. You can use a mix of carrots, peas, and corn. 4. Finely dice 1 small onion and mince 3 cloves of garlic. These add great flavor. 5. In a small bowl, whisk together 1/4 cup of low-sodium soy sauce, 2 tablespoons of sesame oil, and 1 tablespoon of oyster sauce if you like. Add a pinch of salt and pepper to taste. 1. Layer the cooked rice evenly at the bottom of the crockpot. Spread it out flat for best results. 2. Place the diced chicken over the rice. Distribute it evenly to ensure it cooks well. 3. Sprinkle the frozen mixed vegetables on top of the chicken. Add the diced onion and minced garlic next. 4. Pour the sauce mixture over everything in the crockpot. This will give your dish a lot of flavor. 5. Gently stir the ingredients with a spatula or spoon. Make sure the sauce covers everything well. 6. Cover the crockpot and cook on low for about 4 hours. The chicken should be cooked through, and all flavors will blend nicely. 1. About 20 minutes before serving, push the rice mixture to one side of the crockpot. 2. Pour the 2 beaten eggs into the empty side. Scramble them gently until just set. 3. Fold the eggs into the fried rice mixture. Stir well to combine everything. 4. Taste the dish and adjust seasoning if needed. More salt or pepper can enhance the flavor. 5. Serve hot, garnished with sliced green onions. This adds a nice color and extra taste. Enjoy your delicious crockpot chicken fried rice! To get great texture in your chicken fried rice, always use day-old rice. Fresh rice can be too sticky. Spread the rice evenly in the crockpot. This helps it cook well. Layer the chicken on top, so it cooks evenly. Avoid stirring too much during cooking. Stirring can break the rice and make it mushy. When you add eggs, push the rice to one side. This allows the eggs to cook properly. Taste is key to a delicious dish. Start with the soy sauce and sesame oil. These add a nice depth of flavor. If you want to make it richer, add oyster sauce. Always taste before serving. You can add more salt or pepper if needed. If you like a bit of heat, try adding red pepper flakes. This can spice things up without changing the base flavor. Feel free to adjust these ingredients to suit your taste. One mistake is using uncooked rice. This can lead to a hard texture. Another error is overloading the crockpot. Too many ingredients can lead to uneven cooking. Make sure to layer the ingredients properly. Avoid cooking on high heat for too long. This can dry out the chicken. Lastly, don’t forget to taste as you go. This ensures your dish turns out just right. {{image_4}} You can make this dish without chicken. Just leave out the meat. Use extra veggies instead. Try adding bell peppers, broccoli, or mushrooms for a hearty mix. You can also swap soy sauce for a vegan version. This keeps the flavor but makes it plant-based. If you want to change the protein, shrimp or tofu work great. For shrimp, add it in the last hour of cooking. This keeps it tender and juicy. For tofu, use firm tofu and cubed it. Add it with the other ingredients at the start. Each choice brings its own taste and texture. Adding spices or herbs can boost flavor. Try ginger for a warm note. You can also add chili flakes for heat. Fresh herbs like cilantro or basil give a fresh twist. Always taste as you go. This way, you can adjust to your liking and create a unique dish. To store leftovers, let the chicken fried rice cool first. Then, transfer it to an airtight container. Make sure to keep it in the fridge. This meal stays fresh for up to three days. If you have a lot, divide it into smaller portions to save space. When you’re ready to eat, reheat the rice in the microwave. Place a portion in a bowl and cover it with a damp paper towel. Heat it for about 1-2 minutes. Stir halfway through to ensure even heating. You can also reheat it on the stove. Add a splash of water to a pan, then heat over low. Stir until hot. To freeze, portion the chicken fried rice into freezer-safe bags or containers. Make sure to remove as much air as possible. Label them with the date. It can last up to three months in the freezer. When ready to eat, thaw it overnight in the fridge. Then, reheat as mentioned above. This way, you always have a quick meal ready! No, you should not use uncooked rice. It needs water and time to cook. If you use uncooked rice, the dish will turn out dry. Stick to cooked rice for the best results. To avoid mushy rice, use day-old rice. It has a firmer texture. Spread the cooked rice evenly in the crockpot. This helps it cook well without absorbing too much moisture. You can serve Chicken Fried Rice with a simple salad. A side of steamed broccoli pairs well too. For extra flavor, offer soy sauce or hot sauce on the side. These options make the meal even better. This blog post covered the key elements for making chicken fried rice. We explored the must-have ingredients, cooking steps, and tips for the best texture. I shared substitutions for dietary needs and delicious variations. You learned how to store leftovers and reheat them well. In closing, mastering chicken fried rice allows for creativity and fun. You've got the tools to enjoy this dish any way you like! Now, grab your ingredients and start cooking!

Crockpot Chicken Fried Rice Easy and Delicious Meal

- 2 cups rolled oats - 1/2 cup almond or peanut butter - 1/3 cup honey or maple syrup - 1/2 cup chopped nuts (almonds, walnuts, pecans) - 1/4 cup mini chocolate chips or dried fruits - 1/2 teaspoon ground cinnamon You can swap almond butter with sunflower seed butter for a nut-free option. For sweeteners, use agave syrup or coconut sugar for vegan choices. If you need gluten-free oats, make sure to pick oats labeled gluten-free. This way, you avoid cross-contamination with gluten products. These easy swaps allow you to make the bars fit your diet. Choose ingredients that suit your taste and needs. In a medium bowl, combine the rolled oats, chopped nuts, mini chocolate chips, and ground cinnamon if you like. Use a spatula or wooden spoon to mix well. Make sure everything is evenly spread out. Good mixing helps the bars taste great and stay together. Next, take a small saucepan and set it over low heat. Add the almond butter and honey or maple syrup. Stir the mixture until it melts and is smooth. Keep the heat low. High heat can change the texture and make it hard to mix later. Once the nut butter mixture is ready, remove it from the heat. Add the vanilla extract and salt to this mix. Stir well to combine everything. Pour the warm mixture over the dry ingredients in the bowl. Use a spatula to fold the dry with the wet. This helps coat the oats evenly and forms a cohesive mixture. Now, prepare a 9x9 inch baking dish by lining it with parchment paper. Leave some paper hanging over the sides to help lift the bars out later. Transfer the mixture into the lined dish. Use another piece of parchment paper to press down firmly. This step is key to making sure the bars hold together. Finally, refrigerate the pressed mixture for at least 2 hours. This chilling time helps the bars firm up. To check for firmness, press lightly on the mixture. If it holds its shape, it’s ready to cut. Enjoy your homemade no-bake oatmeal bars! To cut your no-bake oatmeal bars well, use a sharp knife. A sharp knife helps you get clean edges. Start with a chilled bar, as this makes cutting easier. If the bars are too sticky, warm the knife slightly under hot water. Just dry it off before cutting. Lifting the bars from the dish can be tricky. Use the overhang of the parchment paper. Pull gently to lift the whole slab out. This way, you avoid breaking the bars. Place them on a cutting board for easier slicing. You can boost flavor and texture by adding toppings. Nuts like almonds or walnuts add crunch. You can also drizzle honey or chocolate on top for sweetness. These extras make each bite more exciting. Try different mix-ins to change things up. Dried fruits like cranberries or apricots add natural sweetness. You can also use seeds like sunflower or pumpkin for added nutrition. Feel free to get creative based on what you like! When serving, arrange the bars neatly on a platter. You can stack them or lay them side by side. This makes them look more inviting. For a nice touch, sprinkle more chopped nuts on top. A drizzle of honey adds shine and sweetness. These small details make your bars look gourmet and appealing to everyone. {{image_4}} To make vegan no-bake oatmeal bars, substitute almond butter with sunflower seed butter. Use maple syrup instead of honey. These swaps keep the bars tasty while being plant-based. You can add flavor by mixing in ingredients like: - Chopped dried fruits (dates or apricots) - Coconut flakes - Sunflower seeds These add-ins bring extra sweetness and texture. Feel free to experiment! To ensure your no-bake bars are gluten-free, choose certified gluten-free oats. This step is key, as regular oats may contain gluten. If you need extra binding, try adding a bit of ground flaxseed mixed with water. This acts like glue, helping to hold the bars together. For flavor, you can try different nut butters. Cashew butter or hazelnut spread works great. Each choice adds a unique taste. Seasonal spices can elevate your bars too. Adding pumpkin spice in fall or cinnamon in winter brings warmth. You could even mix in cocoa powder for a chocolate twist. To keep your no-bake oatmeal bars fresh, use airtight containers. This helps prevent air and moisture from spoiling them. Store the bars in the fridge right after they set. Refrigeration slows down spoilage and keeps flavors strong. These bars last up to one week in the fridge. For longer storage, you can freeze them. Wrap each bar in plastic wrap, then place them in a freezer bag. They can last for up to three months in the freezer. Check for changes in smell or texture to spot spoilage. If the bars smell off or feel sticky, it’s best to toss them. To keep them fresh, make sure to seal the container tightly after each use. Yes, you can easily make these bars nut-free. Substitute almond butter with sunflower seed butter or soy nut butter. Both options provide a similar creamy texture. For the nuts, replace them with seeds like pumpkin or sunflower seeds. This keeps the taste great while ensuring safety for nut allergies. To boost the protein in your bars, try adding ingredients like chia seeds or hemp seeds. These seeds mix well with oats and add extra nutrition. You can also include some protein-rich powder like pea or whey protein. Just remember to adjust the wet ingredients slightly if you add powder. Crumbly bars usually result from not pressing the mixture down enough. Make sure to pack the mixture tightly in the dish. Also, if you don’t use enough nut butter or sweetener, the bars may fall apart. Check the ratio of dry to wet ingredients to avoid this issue. Yes! You can add protein powder to the mixture. Start with 1/4 cup and mix it with the dry ingredients. When you combine the wet and dry ingredients, make sure to stir well. This helps the protein powder blend in smoothly. To check if the bars are set, gently press the top with your fingers. They should feel firm and not sticky. If they still feel soft, give them more time in the fridge. Once set, you can cut them into squares or rectangles easily. You learned how to make no-bake oatmeal bars step-by-step. From key ingredients to fun variations, these bars are easy and adaptable. You can change nut butters or add nuts for flavor. Storing them right ensures they stay fresh. Keep in mind, you can make them nut-free or higher in protein. These bars are not just tasty; they fit many diets. So get creative and enjoy your delicious creations!

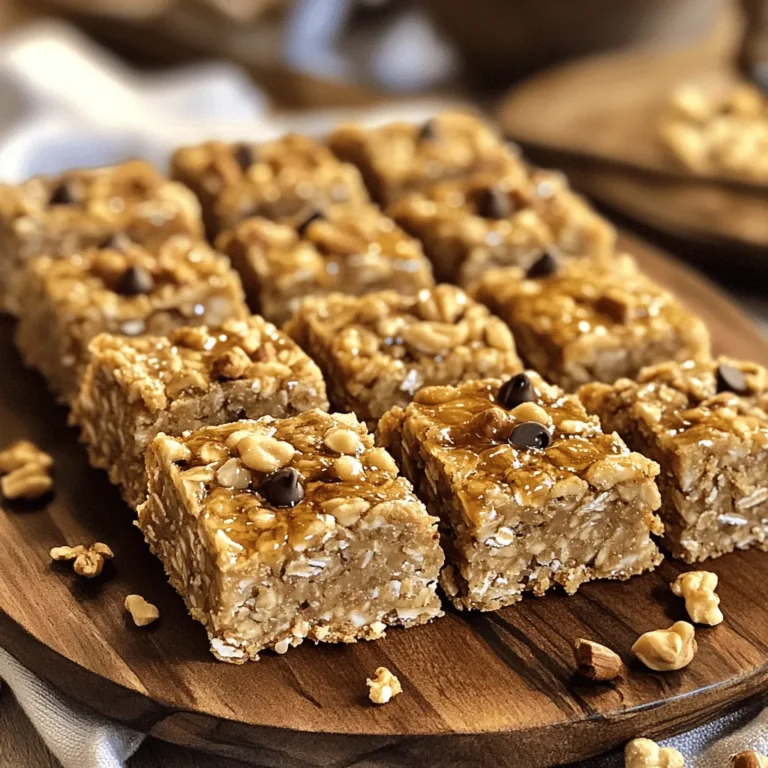
No-Bake Oatmeal Bars Simple and Quick Recipe

- 1 lb ground beef - 1 medium head of cauliflower, riced - 1 red bell pepper, diced - 1 small onion, finely chopped - 3 cloves garlic, minced When you choose ground beef, look for lean cuts. This keeps the dish light and tasty. Riced cauliflower serves as a great low-carb base. It’s easy to make and adds a nice texture. Dice the red bell pepper for a sweet crunch. Onions and garlic are essential for building flavor. - 1 tablespoon chili powder - 1 teaspoon cumin - ½ teaspoon smoked paprika - 2 tablespoons soy sauce Chili powder gives heat and depth. Cumin adds an earthy flavor, while smoked paprika gives a light smokiness. Soy sauce brings everything together with a savory touch. These spices make the beef really pop! - 2 green onions, sliced (for garnish) - Fresh cilantro leaves (for garnish) - Optional lime wedges Garnishes not only make your dish look pretty but also add flavor. Green onions add a fresh bite, and cilantro gives a bright note. Lime wedges provide a zesty kick when squeezed over the top. Enjoy customizing your bowl! {{ingredient_image_2}} To rice cauliflower, first, remove the leaves and stem. Cut the head into smaller pieces. You can use a food processor with a grating blade. If you don’t have one, a box grater works too. Grate until you get fine rice-sized pieces. For even texture, try to keep the pieces consistent. If they are too chunky, they won’t cook well. You want a nice, fluffy texture! In a large skillet, warm olive oil on medium-high heat. Add the finely chopped onion and minced garlic. Sauté for about 2 minutes until the onions turn soft and fragrant. Next, add the ground beef. Use a wooden spoon to break it apart. Cook until it is browned, which usually takes about 5 to 7 minutes. If there’s extra fat, drain it off to keep the dish light. Now, sprinkle in chili powder, cumin, smoked paprika, and soy sauce. Mix well and add salt and pepper as needed. Let it cook for another 2 to 3 minutes. This step helps all the flavors blend together. In a separate pan, add a splash of olive oil. Heat it over medium heat. Sauté the riced cauliflower for about 4 to 5 minutes until it is tender. Lightly season with salt and pepper to bring out its flavor. To put it all together, grab some bowls. Start by layering the sautéed riced cauliflower in each bowl. Then, generously spoon the crispy chili ground beef over the top. For an extra touch, garnish with diced red bell pepper, sliced green onions, and fresh cilantro leaves. This adds color and flavor, making your bowls look and taste amazing! To achieve a crispy texture with the ground beef, follow these steps: - Browning Ground Beef: Use a large skillet over medium-high heat. Add olive oil and let it heat up. Then, add the ground beef without crowding the pan. This helps it brown evenly. Stir often to break it up. Cook until it is nice and brown, about 5 to 7 minutes. - Cooking Cauliflower: For the riced cauliflower, sauté it in a separate pan. Use medium heat and add a bit of olive oil. Cook for about 4 to 5 minutes until it’s tender but not mushy. This keeps a good bite and texture. To make your chili ground beef cauliflower bowls burst with flavor, consider these tips: - Enhancing with Spices: Besides chili powder, try adding a pinch of cumin and smoked paprika. This will deepen the flavor profile. A splash of soy sauce adds a savory kick, too. - Balancing Flavors: Taste as you cook. Adjust the salt and pepper to balance the spices. If it feels too spicy, consider adding a bit of sugar to mellow it out. Serving your bowls nicely can make a big difference. Here are some ideas: - Visually Appealing Bowls: Use colorful dishes to make the food pop. Layer the riced cauliflower at the bottom and top it with the beef mixture. Add a sprinkle of diced red bell pepper for a vibrant touch. - Choosing Dishware: Opt for wide, shallow bowls for a great presentation. This allows you to show off the layers of colors and textures. Consider adding lime wedges on the side for a fresh finish. Pro Tips Cauliflower Rice Consistency: Ensure your riced cauliflower is not too wet; it should be fluffy and light for the best texture. Beef Browning: For extra flavor, allow the beef to sear without stirring too much at first, creating a nice crust that enhances the dish. Adjusting Heat: If you prefer a spicier dish, feel free to add red pepper flakes or fresh chopped chili peppers when seasoning the beef. Fresh Herbs: Adding fresh herbs like cilantro at the end not only brightens the flavor but also adds a pop of color to your bowls. {{image_4}} You can swap ground beef for turkey or chicken. Use 1 pound of ground turkey or chicken. These proteins are leaner but still tasty. They will soak up the spices well. If you want a vegetarian option, try using lentils or black beans. Cook them the same way as the beef. They provide great protein and flavor. You can control the spice level easily. For a milder dish, reduce the chili powder to 1/2 tablespoon. You can also add more soy sauce for flavor without heat. If you love spice, increase the chili powder to 2 tablespoons. You can also add a pinch of cayenne pepper for extra kick. Other spices like paprika or garlic powder can enhance the flavor without adding heat. Feel free to add more veggies to your bowls. Diced zucchini, carrots, or spinach work well. You can also use seasonal veggies like bell peppers in summer or squash in fall. Just sauté them until tender, then mix with the beef or serve on top. This adds color and nutrition to your meal. Store your crispy chili ground beef cauliflower bowls in the fridge right away. Use airtight containers for best results. This helps keep the flavors fresh and the texture nice. Let the dish cool to room temperature before sealing. Do not stack hot food in the fridge as it can raise the temperature. You can freeze these bowls if you want to save some for later. First, let the dish cool completely. Use freezer-safe containers or heavy-duty freezer bags. Remove as much air as possible to prevent freezer burn. Label each container with the date. When ready to eat, thaw in the fridge overnight. Reheat in a microwave or on the stove, stirring often for even heat. In the fridge, the dish lasts about three to four days. If frozen, it can last up to three months. Check for signs of spoilage before eating. Look for off smells, unusual colors, or any signs of mold. If anything seems off, it is best to discard it. Yes, you can use frozen cauliflower rice. It saves time and requires no prep. Just heat it in a pan with a splash of olive oil. Cook it for about 5 minutes until tender. Frozen cauliflower rice is a great option for busy days or quick meals. To reheat leftovers, the stovetop is best. Heat a skillet over medium heat. Add a splash of water to keep moisture. Heat the beef and cauliflower mix until warm. Stir often to avoid sticking. You can also use a microwave. Place the bowl in the microwave. Cover it with a microwave-safe lid. Heat it in short bursts, stirring in between. Yes, this recipe is great for meal prep. Cook the beef and cauliflower ahead of time. Store them separately in airtight containers. This keeps the textures fresh. You can portion them into bowls for quick meals. Add fresh garnishes like cilantro just before eating. This way, you enjoy a delicious meal all week! In this article, we explored delicious chili ground beef bowls, including key ingredients like ground beef, riced cauliflower, and spices. I shared steps to prepare, cook, and assemble your dish, as well as helpful tips to enhance flavor and presentation. Remember, you can customize the protein and spice levels to suit your taste. The storage section offered you ways to keep leftovers fresh. Now, it’s time to enjoy your flavorful creation. Happy cooking!

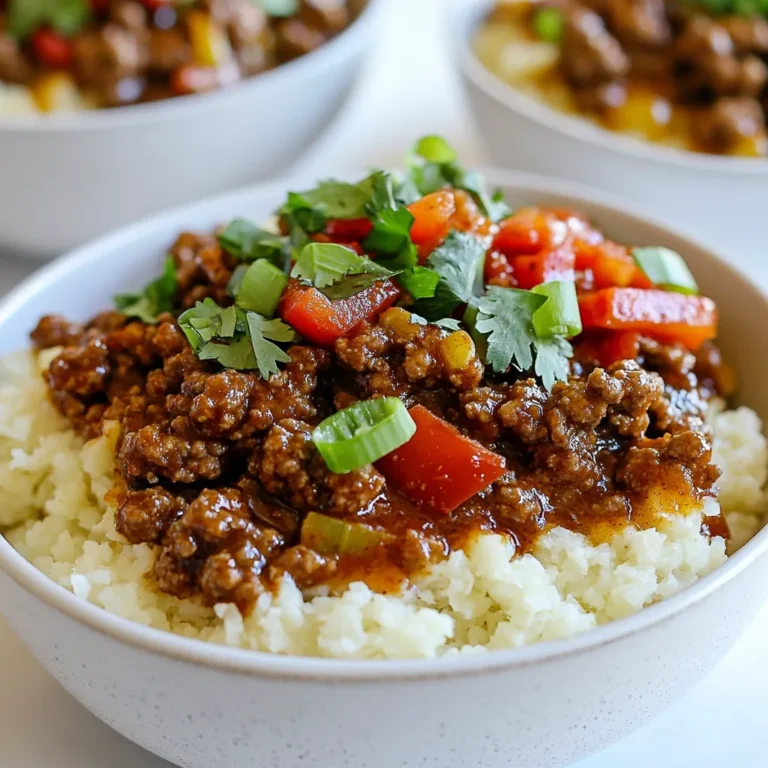
Crispy Chili Ground Beef Cauliflower Bowls Delight

To create Hot Honey Chicken Biscuits, you need these ingredients: - 2 cups all-purpose flour - 1 tablespoon baking powder - 1 teaspoon salt - ½ teaspoon baking soda - ½ cup unsalted butter, cold and cut into small cubes - ¾ cup buttermilk, chilled - 1 lb boneless, skinless chicken thighs - 1 teaspoon garlic powder - 1 teaspoon paprika - 1 teaspoon freshly ground black pepper - ½ cup hot honey (store-bought or homemade) - Fresh parsley, finely chopped for garnish These ingredients come together to make a delicious and satisfying dish. Each part plays a role. For example, flour and baking powder create the biscuit structure. Buttermilk keeps the biscuits moist and tender. Chicken thighs add flavor and protein. The spices bring warmth and depth. Hot honey ties it all together with its sweet heat. When you gather these ingredients, you set the stage for a great meal. Use fresh parsley to add a pop of color and freshness to the dish. The combination of flavors in this recipe is sure to impress everyone. Mixing Dry Ingredients Start by taking a large mixing bowl. Add 2 cups of all-purpose flour, 1 tablespoon of baking powder, 1 teaspoon of salt, and ½ teaspoon of baking soda. Whisk these ingredients together well. This step ensures the dry ingredients mix evenly. Incorporating Cold Butter Next, take ½ cup of cold, unsalted butter. Cut it into small cubes. Add the cubes to the flour mix. Use your fingertips or a pastry cutter to blend the butter with the flour. You want the mixture to look like coarse crumbs. Some pea-sized pieces of butter should remain. This helps keep the biscuits flaky. Creating the Well for Buttermilk Now, create a well in the center of your dry mix. Pour in ¾ cup of chilled buttermilk. This helps to moisten the dough without overmixing. Kneading and Cutting Biscuits Gently stir the mix with a fork until just combined. The dough will look shaggy. Transfer it to a floured surface. Knead it a few times until it comes together. Pat the dough into a rectangle about 1 inch thick. Use a round biscuit cutter to cut out biscuits. Place them on a baking sheet lined with parchment paper, leaving space between each. Preheating Oven and Baking Time Preheat your oven to 450°F (230°C). Bake the biscuits for 12-15 minutes. Look for a golden brown top. Once baked, remove them from the oven and let them cool slightly. Preparing and Cooking Chicken Thighs While the biscuits bake, season 1 pound of boneless, skinless chicken thighs. Use 1 teaspoon of garlic powder, 1 teaspoon of paprika, and 1 teaspoon of black pepper. In a skillet over medium heat, add a bit of vegetable oil. When hot, add the chicken. Cook for about 6-7 minutes on each side. Check with a meat thermometer for doneness; it should read 165°F (74°C). Remove the chicken and let it rest. Heating Hot Honey In a small saucepan, warm up ½ cup of hot honey over low heat. Stir it for about 2-3 minutes until it’s slightly thin. Optional Cayenne Pepper For extra heat, whisk in a pinch of cayenne pepper. This is optional, but it adds a nice kick. Layering the Chicken and Biscuits Slice each biscuit in half. Place a piece of the cooked chicken between the biscuit halves. Drizzle the warm hot honey over the chicken. Presentation Tips For a beautiful look, sprinkle fresh parsley on top of each biscuit sandwich. It adds color and flavor. Serve the biscuits on a large platter, with extra hot honey on the side for guests. A few sprigs of parsley can make it even more inviting. Avoiding Overmixing Mixing is key but too much can ruin your biscuits. When you add the buttermilk, use a gentle touch. Stir until just combined. The dough should look shaggy, not smooth. This will help keep your biscuits soft and flaky. How to Get Flaky Layers To achieve those perfect flaky layers, keep your butter cold. When you mix the butter into the flour, leave small chunks. These bits melt during baking, making layers. Also, fold the dough gently when shaping. This method helps create those lovely layers we all crave. Using a Meat Thermometer The best way to know your chicken is ready is with a meat thermometer. Insert it into the thickest part of the chicken. It should read 165°F (74°C) for safety and juiciness. This ensures that every bite is perfect. Choosing the Right Cut of Chicken For this recipe, I prefer boneless, skinless chicken thighs. They stay juicy and tender. If you want a leaner option, chicken breasts work too. Just remember to adjust cooking time to avoid dryness. Making Homemade Hot Honey You can easily make hot honey at home. Simply warm honey in a small pan and add red pepper flakes or cayenne. This gives it a spicy kick. Adjust the amount to suit your taste. Adjusting Heat Levels If you love spice, add more heat! For milder honey, use less chili. You can also mix in some apple cider vinegar for a tangy twist. Play around until you find your perfect balance. {{image_4}} You can switch out chicken thighs for chicken breasts. Chicken breasts are leaner and cook faster. Just cut them into smaller pieces to help them cook evenly. If you want a plant-based option, use tofu. Press and cube the tofu, then season it like the chicken. Cook it until it's golden and crispy. Another fun option is to use fried chicken. You can buy it or make it at home. It adds a crunchy texture and a rich flavor. Just sandwich it between the biscuits with hot honey for a tasty treat! If you're looking for different sauces, try maple syrup or barbecue sauce. Maple syrup adds sweetness without heat. You can mix it with a little hot sauce for a sweet and spicy combo. For a lighter option, use a yogurt-based sauce. Mix plain yogurt with honey and a squeeze of lemon. This makes a creamy, tangy sauce that pairs well with the biscuits. To make this recipe gluten-free, you can use gluten-free flour. Make sure to choose a blend that works for baking. This way, you get the same fluffy biscuits without the gluten. For dairy-free options, try almond milk or coconut milk for the buttermilk. Just mix the milk with a little vinegar or lemon juice. This will create a similar tangy flavor, perfect for your biscuits! Best Storage Practices Store your leftover hot honey chicken biscuits in the fridge. Place them in an airtight container. This keeps them fresh for about 2-3 days. If you want to keep them longer, consider freezing them. Wrap each biscuit tightly in plastic wrap, and then place them in a freezer bag. They can last for up to 3 months in the freezer. Recommended Containers Use glass or plastic containers with tight lids for the fridge. For freezing, use freezer bags or heavy-duty aluminum foil. This helps avoid freezer burn and keeps them tasty. Oven vs. Microwave Reheating The oven is best for reheating biscuits. Preheat your oven to 350°F (175°C). Place the biscuits on a baking sheet. Heat for about 10-15 minutes. This keeps them crispy. If using a microwave, place the biscuit on a microwave-safe plate. Heat for 15-30 seconds. This is quicker but may make them soft. How to Maintain Crispness To keep biscuits crispy, use the oven. If you must use the microwave, cover the biscuits with a damp paper towel. This helps them stay moist but can soften them. For extra crispness, you can pop them in a hot skillet for a minute after microwaving. To make hot honey, you need just a few simple items. Here’s what you will need: - ½ cup hot honey (store-bought or homemade) - Optional: a pinch of cayenne pepper for extra heat Start by warming the hot honey in a small saucepan over low heat for 2-3 minutes. You can add cayenne pepper if you want more spice. Stir well to blend the flavors. This sweet and spicy mix will elevate your chicken biscuits to the next level. Yes, you can make biscuit dough ahead of time. Here are some tips to help you: - Prepare the dough and cut out the biscuits. - Place the cut biscuits on a baking sheet and freeze them for about 30 minutes. - Once frozen, transfer the biscuits to a zip-top bag for longer storage. When you’re ready to bake, simply preheat your oven and bake the frozen biscuits. You may need to add a few extra minutes to the baking time. Hot honey chicken biscuits pair well with many sides. Here are some tasty options: - Coleslaw for crunch and freshness - Sweet potato fries for a sweet touch - A simple green salad for balance - Macaroni and cheese for comfort These sides will add flavor and variety to your meal, making it even more enjoyable. Hot Honey Chicken Biscuits are a tasty treat you can make at home. You learned about the key ingredients, from flour to spices and hot honey. The step-by-step guide made cooking simple, covering biscuit dough, chicken prep, and assembly. Finally, I shared tips for perfect biscuits and chicken, plus fun variations and storage info. Now, you can impress guests or enjoy a cozy meal. Try this recipe, and enjoy every bite of your delicious creation!

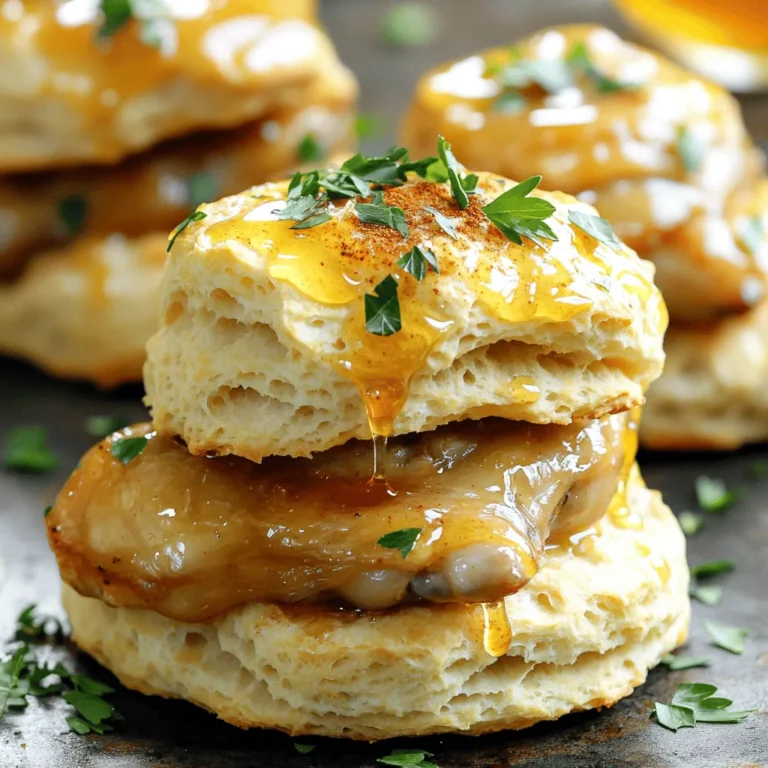
Hot Honey Chicken Biscuits Tasty and Simple Recipe

- 1 pound beef sirloin, thinly sliced - 2 cups broccoli florets - 1 red bell pepper, sliced - 1 large carrot, julienned - 1 cup snap peas - 4 cloves garlic, minced - 1 tablespoon fresh ginger, grated - 3 tablespoons soy sauce - 2 tablespoons sesame oil - 1 tablespoon hoisin sauce - 1 teaspoon red pepper flakes - Salt and pepper to taste - 3 green onions, chopped - Sesame seeds (optional) Gathering the right ingredients makes all the difference in your Minute Beef Veggie Stir Fry. You want fresh flavors that pop. For the beef, sirloin is my go-to choice. It's tender and cooks up nicely. Slice it thin against the grain for the best texture. Next, grab some veggies. Broccoli adds crunch and color. The red bell pepper gives sweetness. Carrots bring vibrant orange, and snap peas add a nice snap. These veggies not only taste great but also look pretty on the plate. Now, let’s talk aromatics. Garlic and ginger are key players here. They give the dish a warm, fragrant base. The soy sauce and hoisin sauce add depth and umami. Sesame oil brings a nutty flavor that ties everything together. Lastly, don’t forget the seasonings. Red pepper flakes add heat, and green onions add freshness when sprinkled on top. If you like, add sesame seeds for a little crunch. With these ingredients, you're ready to create a meal that's quick, colorful, and full of flavor! To start, take one pound of beef sirloin and slice it thinly against the grain. Place the beef in a medium bowl. Add one tablespoon of soy sauce and a pinch of black pepper. Mix it well to coat the beef evenly. Let it sit while you prepare the vegetables. This marinating step adds great flavor to the beef. Grab your wok or a large non-stick skillet. Pour in one tablespoon of sesame oil and turn the heat to medium-high. Wait until the oil shimmers. This means it is hot enough for cooking. Careful not to let it smoke, as that can burn the oil. Once the oil is ready, add the marinated beef in a single layer. Sear the beef for about two to three minutes. Look for a nice brown crust on the beef. After browning, set the beef aside on a plate. In the same pan, add the remaining tablespoon of sesame oil. Stir in four minced garlic cloves and one tablespoon of grated fresh ginger. Sauté for about 30 seconds. This will fill your kitchen with a wonderful aroma. Next, toss in two cups of broccoli florets, one sliced red bell pepper, one julienned carrot, and one cup of snap peas. Stir-fry these vegetables for three to four minutes. They should be bright and tender-crisp. Now, return the seared beef to the pan. Pour in the remaining two tablespoons of soy sauce and one tablespoon of hoisin sauce. Sprinkle one teaspoon of red pepper flakes for heat. Stir everything together until well combined. Cook for an additional two minutes. This step allows the flavors to meld beautifully. Once everything is cooked, transfer the stir fry to a serving dish. Garnish with three finely chopped green onions and sprinkle with sesame seeds if you like. This adds a nice touch to your dish. Enjoy your meal hot! - Choosing the right cut of beef for tenderness: I recommend beef sirloin for this stir fry. It cooks quickly and stays tender. Thinly slice it against the grain. This makes each bite easy to chew. - Ensuring vegetables are cut uniformly for even cooking: Cut your vegetables into similar sizes. This helps them cook evenly. For example, slice your bell pepper and carrot into thin strips. Keep the broccoli florets small, too. This way, everything cooks at the same time. - Suggestions for adding additional spices: Want extra flavor? Try adding minced chili or a dash of cumin. These spices boost the taste without overpowering the dish. - Optional ingredients for extra flavor or nutrition: You can add mushrooms or baby corn for more veggies. Fresh herbs like basil or cilantro can brighten the dish. They add great flavor and color too. - Best sides to serve with the stir fry: Serve your stir fry hot over steamed rice or noodles. Both options soak up the sauce well. You can also add a side of spring rolls for crunch. - Ideal presentations with rice or noodles: For an appealing look, place the rice or noodles on the plate. Then, top them with the stir fry. Finish with green onions and sesame seeds for a pop of color. Enjoy! {{image_4}} You can easily swap the beef for other meats. Chicken, shrimp, or tofu are great choices. For chicken, use thinly sliced breast or thigh. Shrimp cooks quickly and adds a nice flavor. Tofu is a great plant-based option. Use firm tofu and press it to remove extra moisture. This helps it brown well. You can mix up the veggies based on what you have. Bell peppers, zucchini, or mushrooms work well. Seasonal veggies like asparagus in spring or squash in fall add great taste. Just remember to cut them to similar sizes. This helps them cook evenly and look nice in the dish. Making your own stir fry sauce is easy and fun. Combine soy sauce, hoisin sauce, and a splash of vinegar. Add a bit of sugar for sweetness. If you like it spicy, toss in chili paste or fresh peppers. Adjust the spice to what you enjoy. Taste as you go to find your perfect mix. To keep your stir fry fresh, store it in a clean, airtight container. Make sure it cools down before sealing. This helps keep the flavors intact. Refrigerate your leftovers right away. They stay good for about 3 to 4 days. If you see any signs of spoilage, toss it out. When reheating your stir fry, use a skillet or microwave. For the skillet, heat it over medium heat. Add a splash of water or broth to keep it moist. Stir often until it’s hot. If using a microwave, cover it loosely. Heat in short bursts, stirring in between, until it’s warm. This method helps keep your beef tender and veggies crisp. Yes, you can freeze this stir fry! It’s best to freeze it in portions. Use freezer-safe bags or containers to avoid freezer burn. Make sure to remove as much air as possible before sealing. For best results, use it within 2 to 3 months. To thaw, place it in the fridge overnight. You can also use the microwave for a quick thaw. After thawing, reheat as mentioned above for the best texture. Yes, you can prepare some ingredients in advance. Cut the beef and veggies ahead. Store them in separate containers in the fridge. This way, you save time when you’re ready to cook. Marinate the beef for about 30 minutes for better flavor. If you need a soy sauce substitute, try tamari, coconut aminos, or liquid aminos. These options work well for gluten-free diets. They provide a similar salty flavor without wheat. To add heat, increase the red pepper flakes. You can also add fresh chili peppers or chili paste. If you like garlic, try spicy garlic sauce for an extra kick. Taste as you go to find your perfect level of spice. You can use frozen vegetables, but there are some pros and cons. Frozen veggies are quick and easy. They are often pre-cut and ready to use. However, they may lose some crunch compared to fresh veggies. Fresh vegetables have better texture and flavor when cooked. If you use frozen, cook them a minute less to keep some crispness. This blog post covered a simple and flavorful beef stir fry recipe. We discussed the key ingredients, cooking steps, and added helpful tips. You can easily customize the dish with alternative meats or vegetables. Storing and reheating leftovers was also addressed. Remember, stir frying is quick and fun. With practice, you can master this dish and make it your own. Enjoy cooking and sharing your tasty stir fry!

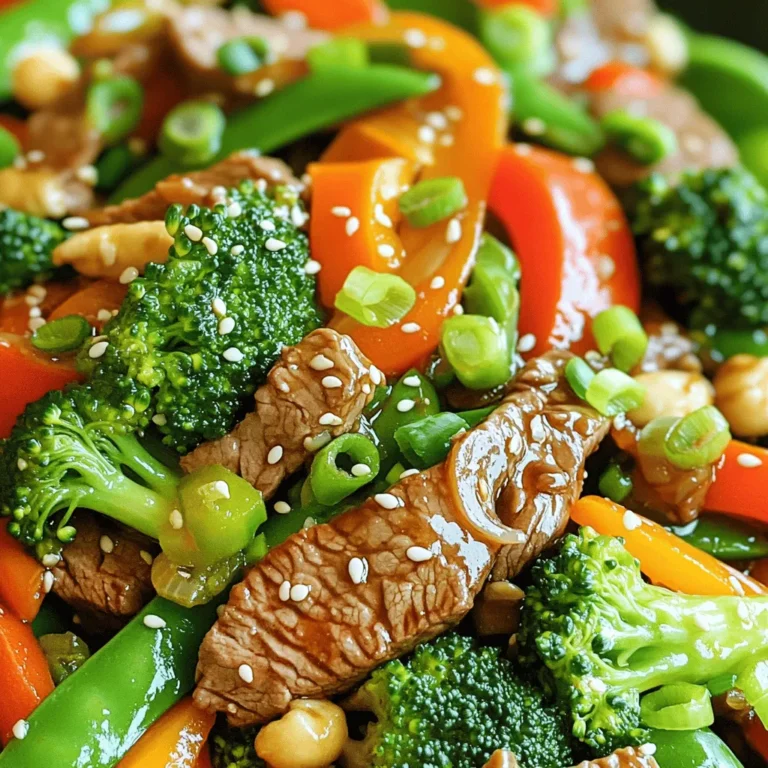
Minute Beef Veggie Stir Fry Quick and Flavorful Meal

- 1 pound boneless, skinless chicken breasts, cut into 1-inch cubes - 1 tablespoon extra virgin olive oil - 1 medium onion, finely chopped - 3 cloves garlic, minced - 2 medium carrots, peeled and diced - 2 celery stalks, diced - 4 cups low-sodium chicken broth - 1 can (14 oz) diced tomatoes, with juice - 1 cup kale or Swiss chard, stems removed and roughly chopped - 1 tablespoon Italian seasoning blend - ½ teaspoon red pepper flakes (optional for heat) - Sea salt and freshly ground black pepper to taste - 1 cup canned cannellini beans, drained and rinsed - Fresh basil leaves, for garnish - Grated Parmesan cheese, for serving - Red pepper flakes for heat - Fresh herbs and cheese for garnish - Large pot or Dutch oven - Cutting board and knives - Measuring cups and spoons This blend of ingredients creates a rich and satisfying soup. The chicken adds protein, while the vegetables offer texture and color. The broth ties everything together, making each bite warm and delicious. Don't forget the optional red pepper flakes for a kick! Using fresh herbs and cheese as a topping makes the soup even better. Prepare your kitchen tools before you start. Having everything ready helps you cook smoothly. {{ingredient_image_2}} Start by heating extra virgin olive oil in a large pot. Use medium heat until the oil shimmers. Then, add the diced chicken. Season it with a pinch of sea salt and black pepper. Cook for 5 to 7 minutes. Stir the chicken often until it is nicely browned. After browning, remove the chicken and set it aside on a plate. This step adds a deep flavor to the soup. Now, add chopped onions, diced carrots, and celery to the same pot. Sauté the mixture for about 5 minutes. Stir regularly until the veggies soften and the onion turns translucent. This builds a great base for your soup. Next, add minced garlic and sauté for one more minute. Garlic brings a rich aroma that enhances the dish. Carefully pour in the low-sodium chicken broth. Stir to mix everything well. Bring the mixture to a rolling boil. Then, add the canned diced tomatoes with their juice. Return the browned chicken to the pot. Also, add Italian seasoning and red pepper flakes if you like heat. Once boiling, reduce the heat to a gentle simmer. Cover the pot and let it cook for 15 to 20 minutes. This allows all the flavors to meld together nicely. After 20 minutes, stir in chopped kale or Swiss chard along with the cannellini beans. Cook for another 5 minutes. This helps the greens become tender but still colorful. Taste the soup and adjust the seasoning with sea salt and freshly ground black pepper. Ladle the hot soup into bowls. Garnish with fresh basil leaves for flavor. Serve each bowl with a sprinkle of grated Parmesan cheese on top. Enjoy your hearty Tuscan Chicken Soup! - To keep your chicken juicy, cook it until it's just browned. Don’t overcook it. - When sautéing your veggies, stir them often. This helps them stay crisp and bright. - To boost flavor, try adding a pinch of smoked paprika or thyme. They add depth. - Pair this soup with warm crusty bread. A side salad also complements the dish well. - Serve the soup in deep bowls for a hearty look. It feels cozy and inviting. - Garnish with fresh basil and a sprinkle of Parmesan. This adds color and flavor. Pro Tips Use Fresh Herbs: Fresh basil adds a vibrant flavor to the soup. Add it just before serving to maintain its aroma and taste. Adjust the Heat: If you prefer a spicier soup, feel free to increase the amount of red pepper flakes or even add a dash of hot sauce. Customize Your Greens: Don't have kale or Swiss chard? Spinach or collard greens can be excellent substitutes that provide similar nutrition. Leftover Magic: This soup tastes even better the next day, making it perfect for meal prep. Store leftovers in the fridge for up to three days. {{image_4}} For a twist on Tuscan Chicken Soup, try different proteins. You can use turkey or sausage instead of chicken. Both options add unique flavors. You can also customize the veggies. Swap in zucchini, bell peppers, or spinach. Each change brings new tastes to the soup. Making this soup gluten-free is easy. Just ensure your broth is gluten-free. Use gluten-free noodles for extra heartiness if you like. For a vegan version, replace chicken with chickpeas or lentils. Use vegetable broth instead of chicken broth. You can skip the cheese or use a vegan alternative. To add an international flair, try new herbs or spices. For a Mexican twist, add cumin and cilantro. For Indian flavors, use curry powder and fresh ginger. You can find regional variations of Tuscan Chicken Soup, too. In some places, they add lemon zest for brightness. Others may include different beans or even grains like farro. Each region has its own take, making it fun to explore. To store leftover soup, let it cool first. Pour the soup into an airtight container. Seal the container and place it in the fridge. Enjoy the soup within 3 to 4 days for best taste. For freezing, use freezer-safe containers or zip-top bags. Leave some space at the top for expansion. The soup can last up to 3 months in the freezer. When ready to eat, move the soup to the fridge overnight to thaw. Reheat in a pot over medium heat. Stir often to keep it from sticking. You can also use the microwave. Heat in short bursts and stir in between. This helps keep the flavors strong and the texture nice. You can serve this soup with many sides. Here are some great options: - Crusty bread: A warm, fresh loaf pairs well with the soup. - Salad: A simple green salad adds freshness. Try a Caesar or garden salad. - Cheese: Offer a cheese plate with Italian cheeses like mozzarella or Parmigiano-Reggiano. - Olive oil: Drizzle high-quality olive oil on the bread for extra flavor. Yes, you can! Here’s how to adapt the recipe for a slow cooker: - Brown the chicken: Start by browning the chicken in a pan, then add it to the slow cooker. - Add veggies: Place all the chopped vegetables and spices in the slow cooker. - Pour in liquids: Add the chicken broth and tomatoes last. - Cook time: Set your slow cooker on low for 6-8 hours or high for 3-4 hours. - Add greens: Stir in the kale and beans during the last 30 minutes of cooking. Tuscan chicken soup lasts about 3-4 days in the fridge. Here are some tips: - Cool down: Let the soup cool to room temperature before storing. - Use airtight containers: This keeps the soup fresh and prevents spills. - Check for spoilage: If it smells off or looks different, discard it. Yes, you can add beans for extra protein and fiber. The best beans to use are: - Cannellini beans: They are creamy and blend well with the soup. - Chickpeas: These can add a nice texture and flavor. - Black beans: They offer a different taste and are hearty. To incorporate them, just add the drained beans in the last few minutes of cooking. This blog post covers making Tuscan Chicken Soup from start to finish. We discussed key ingredients, including chicken and veggies, and reviewed essential equipment. The step-by-step guide ensures perfect preparation and cooking. I shared tips for enhancing flavor and different variations for dietary needs. Proper storage and reheating methods keep your soup tasting fresh. In summary, this soup is easy to make, nutritious, and customizable. Try different ingredients to find your favorite version! Enjoy your cooking adventure!

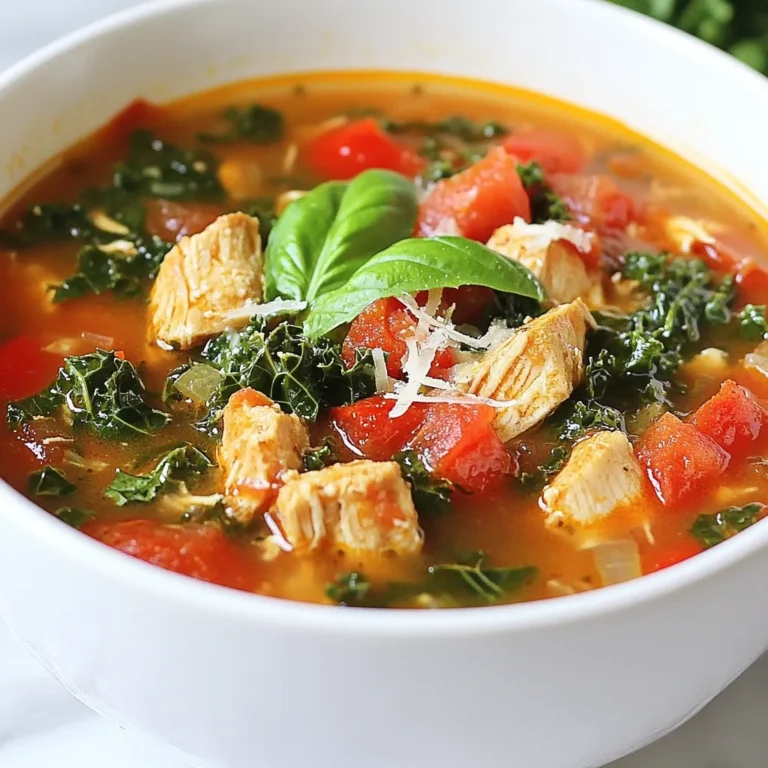
Tuscan Chicken Soup Hearty and Flavorful Meal Idea

- 2 cups rolled oats - 2 apples, peeled and diced - 1 cup almond milk The main ingredients form the base of our oatmeal apple breakfast bake. Rolled oats give it a hearty texture. They soak up the flavor and become soft. The diced apples add natural sweetness and a nice crunch. Almond milk keeps it dairy-free and creamy. - 1/2 cup pure maple syrup - 1/4 cup unsweetened applesauce - 2 teaspoons ground cinnamon - 1 teaspoon pure vanilla extract Sweeteners give our bake a lovely taste. Pure maple syrup adds rich flavor. Unsweetened applesauce keeps it moist and sweet without added sugar. Ground cinnamon brings warmth, while vanilla extract adds a touch of sweetness. - 1/4 teaspoon ground nutmeg - 1/2 cup chopped nuts (walnuts or pecans) - 1/4 cup raisins or dried cranberries - A pinch of salt Additional ingredients enhance the dish. Ground nutmeg adds a warm spice. Chopped nuts provide crunch and healthy fats. Raisins or dried cranberries add chewy sweetness. A pinch of salt balances the flavors. This mix of ingredients makes a wholesome breakfast bake. You can customize it to suit your taste. First, preheat your oven to 375°F (190°C). This step gets the oven ready for baking. Next, grease a 9x9 inch baking dish. Use cooking oil or butter to prevent sticking. In a large bowl, combine the rolled oats, diced apples, chopped nuts, raisins, ground cinnamon, ground nutmeg, and a pinch of salt. Stir the mixture well. Make sure the dry ingredients and fruits mix evenly. In a separate bowl, whisk together the almond milk, maple syrup, unsweetened applesauce, and pure vanilla extract. Mix until the mixture is smooth. Pour this wet mixture over the dry ingredients. Gently mix until everything is well combined. Ensure the oats are nicely coated. Now, transfer the combined mixture into the greased baking dish. Spread it out evenly with a spatula. Place the baking dish in the preheated oven. Bake for 30-35 minutes. The top should turn golden brown, and the oats should set nicely. To make your oatmeal bake perfect, ensure the oats are well-coated with the wet mixture. This helps them absorb the flavors. Mix gently but thoroughly. If you prefer a softer texture, adjust the baking time. Bake it for 30 minutes for a creamier bite. For a firmer texture, let it bake for 35 minutes. Keep an eye on the color; it should be golden brown. Serving your oatmeal bake warm makes it even more inviting. Drizzle extra maple syrup on top for a sweet touch. A sprinkle of ground cinnamon adds a lovely aroma. I love to add a dollop of creamy yogurt beside it. Fresh apple slices make the plate look bright and fresh. This simple touch enhances both the look and taste. Oats and apples pack a punch of nutrition. Oats are great for heart health and provide fiber. They help you feel full longer, which is perfect for breakfast. Apples add vitamins and antioxidants. They also bring natural sweetness to the dish without extra sugar. Eating this bake can start your day on a healthy note. {{image_4}} You can switch up the nuts or dried fruits. This makes each bake unique. Try using pecans instead of walnuts. They add a nice crunch. Dried cherries or apricots also work well. You can even mix in some coconut flakes for extra flavor. Adding spices like ginger or cardamom gives warmth to the dish. A little ginger adds a zing. Cardamom brings a sweet, floral note. Experiment with what you love! If you want a dairy-free option, swap almond milk for oat or coconut milk. Both options will keep your bake creamy. If you want to cut sugar, use mashed bananas or a sugar alternative. Maple syrup is sweet, but you can use agave nectar too. These swaps keep the taste great while meeting your needs. Serve your oatmeal bake warm. Pair it with yogurt for creaminess. A splash of milk can also enhance the dish. Fresh fruit like sliced strawberries or bananas adds color and freshness. For more sweetness, drizzle extra maple syrup on top. These additions make your breakfast a true delight! To keep your oatmeal apple breakfast bake fresh, store it in the fridge. First, let it cool completely. Then, cut it into squares and place them in an airtight container. This helps prevent moisture loss. Your bake will stay good for up to five days. For best taste, enjoy it within the first three days. Freezing is a great way to save any extra oatmeal bake. After cooling, wrap each square in plastic wrap. Then, place them in a freezer-safe bag or container. Be sure to label the bag with the date. Your bake can last in the freezer for three months. When you’re ready to eat, let it thaw in the fridge overnight. Reheating oatmeal bake is simple. You can use the oven or microwave. For the oven, preheat it to 350°F (175°C). Place the squares on a baking sheet and heat for about 10-15 minutes. This keeps the texture nice. In the microwave, heat each square for 30-60 seconds. Add a splash of milk to keep it moist. Enjoy your tasty morning treat! Yes, you can prepare the oatmeal bake a day ahead. To do this, follow these steps: - Mix the dry ingredients and wet ingredients as instructed. - Combine them in your baking dish. - Cover the dish with plastic wrap or foil. - Store it in the fridge overnight. This way, you save time in the morning. Just pop it in the oven and bake it fresh! You can use quick oats, but the texture will change. Quick oats cook faster and become softer. They may make the bake less chewy. If you prefer a heartier dish, stick to rolled oats. Cooking time may also vary. Keep an eye on it while baking. The oatmeal bake lasts for about 4 to 5 days in the fridge. Store it in an airtight container to keep it fresh. If you want to keep it longer, freeze it. It can last for about 3 months in the freezer. Just thaw it in the fridge before reheating. This blog post covers a simple and delicious oatmeal bake with apples and nuts. You learned about the key ingredients, step-by-step instructions, and how to customize and store it. Baking is a fun way to enjoy healthy ingredients while nourishing your body. Try making this dish your own by experimenting with flavors and toppings. You will enjoy the warm, tasty results, and your family will love it too. Enjoy your cooking adventure!

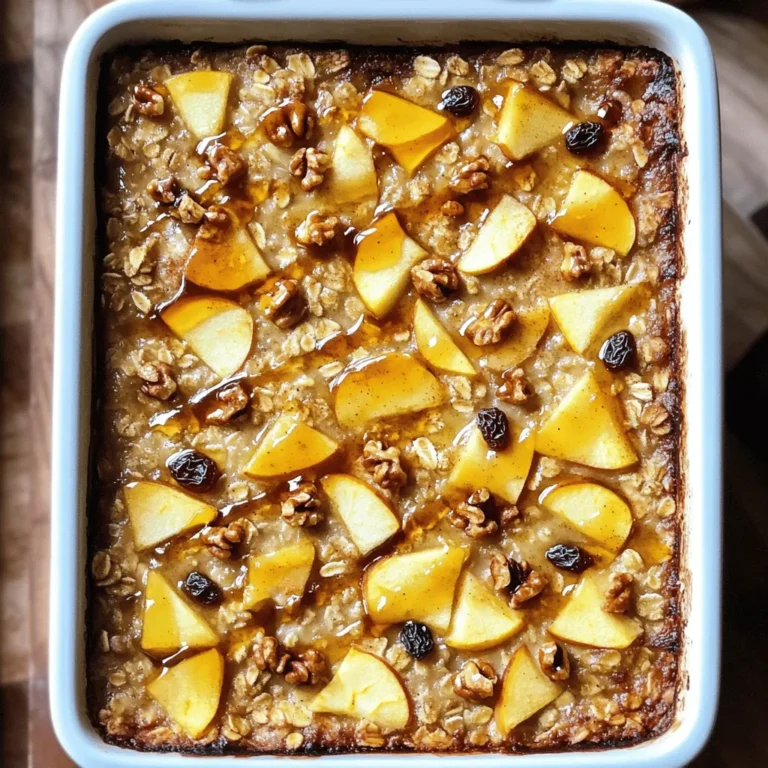
Oatmeal Apple Breakfast Bake Satisfying Morning Treat

- 1 cup old-fashioned rolled oats - 1/2 cup natural peanut butter - 1/3 cup honey or maple syrup - 1/2 cup ground flaxseed - 1/4 cup mini dark chocolate chips - 1/4 cup unsweetened shredded coconut - 1 teaspoon pure vanilla extract - A pinch of sea salt These ingredients create a tasty snack that fuels your day. Each one plays a key role. The oats provide fiber, while peanut butter adds protein. Honey or maple syrup sweetens the mix. Ground flaxseed boosts the nutrients, and chocolate chips give a treat. Coconut adds flavor and texture, making each bite fun. The vanilla extract brings everything together, while a pinch of sea salt enhances the taste. - Calories: Each energy bite has about 100 calories. - Protein: They contain around 3 grams of protein. - Carbohydrates: Each bite has about 13 grams of carbs. - Fats: They offer about 5 grams of healthy fats. - Fiber: Each bite includes about 2 grams of fiber. This snack is not just tasty; it also gives you energy. The balance of protein, fats, and carbs makes it a great choice for any time. Enjoying these bites can help keep you full and satisfied. 1. In a large mixing bowl, combine 1 cup of old-fashioned rolled oats, 1/2 cup of natural peanut butter, 1/3 cup of honey (or maple syrup), 1/2 cup of ground flaxseed, and 1 teaspoon of pure vanilla extract. 2. Use a spatula or your hands to mix these ingredients well. You want a sticky dough. If it feels dry, add a bit more peanut butter or honey. 1. With clean hands, scoop out about one tablespoon of the mixture. 2. Roll it into a small ball. Repeat until you shape all the mixture into bites. You should get about 20 energy bites. 1. Chilling helps the bites firm up. Place them on a baking sheet lined with parchment paper. 2. Chill in the fridge for at least 30 minutes. 3. Once chilled, transfer the bites to an airtight container. Store them in the fridge for up to one week. They make a great grab-and-go snack! - Adjusting ingredient ratios for texture: If your mixture feels too dry, add more peanut butter or honey. This will help create a softer and stickier dough. On the other hand, if it’s too wet, add more oats or flaxseed. - Flavor enhancements: You can add spices like cinnamon for warmth or a pinch of sea salt to boost flavor. Try adding a bit of cocoa powder for a chocolatey twist. You can also mix in nuts or seeds for an extra crunch. - Presentation ideas: Serve your energy bites in a colorful bowl. You can sprinkle some extra shredded coconut on top for a nice look. This makes them more appealing for guests and family. - Pairing with beverages: These bites pair well with milk, almond milk, or herbal tea. The creamy drink balances the chewiness of the bites. Enjoy them as a snack or a quick breakfast treat! {{image_4}} You can easily switch ingredients in this recipe. If you want a different nut butter, try almond or cashew. Sunflower seed butter also works well. Each nut butter gives a unique taste. For sweeteners, honey is great, but maple syrup is a good choice too. You can use agave syrup for a vegan option. Each option will change the flavor slightly, so feel free to experiment. Want to spice things up? Adding a pinch of cinnamon can give a warm, cozy flavor. If you love chocolate, mix in some cocoa powder for a richer taste. You can also add different mix-ins. Try chopped nuts for crunch or chia seeds for extra fiber. Dried fruits like raisins or cranberries can add sweetness. Each mix-in will change the bites' texture and taste, making them your own unique snack. To keep your oatmeal peanut butter energy bites fresh, use an airtight container. This protects them from air and moisture. Glass containers work great, but plastic ones are fine too. Always choose a container that seals well. If you want to freeze them, wrap each bite in plastic wrap. Then, place them in a freezer-safe bag or container. This helps prevent freezer burn and keeps them tasty. In the fridge, your energy bites will stay fresh for about one week. They make a great snack during busy days. Look for signs of spoilage, like a strange smell or a change in texture. If they feel dry or sticky, it's best to toss them. Always check before you enjoy! Can I make these energy bites Vegan? Yes, you can make these energy bites vegan. Just replace the honey with maple syrup. This simple swap keeps the bites sweet while remaining plant-based. How long do they take to prepare? They take about 15 minutes to prepare. After mixing, chill them in the fridge for at least 30 minutes. In total, you’ll spend around 45 minutes making these tasty bites. Are these energy bites gluten-free? Yes, these energy bites can be gluten-free. Use certified gluten-free oats to ensure no cross-contamination happens. This way, everyone can enjoy them worry-free. Can I customize the mix-ins or flavors? Absolutely! You can add nuts, seeds, or dried fruit. You can also swap in different nut butters or sweeteners. Feel free to get creative and make them your own! This blog post covered how to make tasty oatmeal peanut butter energy bites. You learned about the simple ingredients needed and found step-by-step instructions for making them. I shared tips to improve your bites and variations to keep things fresh. Remember, these snacks are easy to store and enjoy! Experiment with different flavors and mix-ins for a fun twist. Now, you can create your own healthy treats that are both delicious and satisfying. Enjoy your energy bites and the boost they bring to your day!

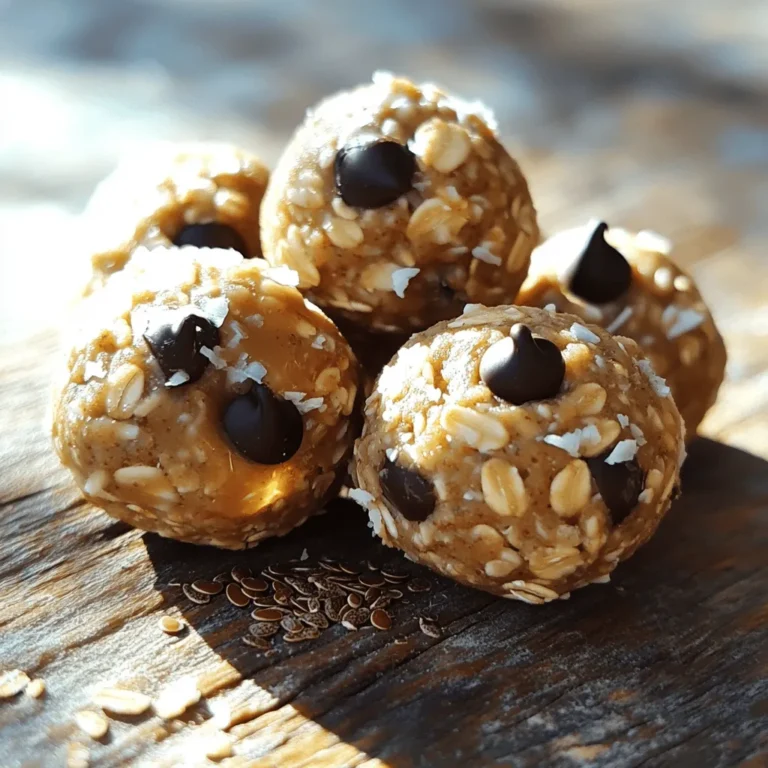
Oatmeal Peanut Butter Energy Bites Quick and Easy Recipe

- 12 oz cheese tortellini - 1 lb shrimp, peeled and deveined - 2 cups fresh spinach, packed - 1 cup heavy cream - 1 cup chicken broth To make creamy shrimp spinach tortellini, you need some key items. Cheese tortellini gives us a soft base. Shrimp adds a nice protein. Fresh spinach brings color and health. Heavy cream makes the dish rich and smooth. Chicken broth gives flavor and depth. - 2 cloves garlic, finely minced - 1 cup cherry tomatoes, halved - 1 teaspoon Italian seasoning - 1 tablespoon extra virgin olive oil - Freshly grated Parmesan cheese, for garnish Seasonings make the dish shine. Garlic gives a strong, savory taste. Cherry tomatoes add sweetness and a pop of color. Italian seasoning brings warmth and depth. Extra virgin olive oil adds richness. Finally, Parmesan cheese is the best topping for a creamy finish. Each of these ingredients works together to create a dish that is not just tasty but also bright and colorful. When you gather these items, you set the stage for a delightful meal that is both comforting and satisfying. - First, bring a large pot of salted water to a boil. - Once boiling, add 12 ounces of cheese tortellini. - Cook them for about 3 to 5 minutes until they float. - Drain the tortellini in a colander and set aside. - While the tortellini cooks, heat 1 tablespoon of olive oil in a large skillet. - Add 2 cloves of finely minced garlic to the skillet. - Sauté the garlic for 1 minute until it smells good. - Next, add 1 pound of peeled and deveined shrimp. - Season with salt, black pepper, and 1 teaspoon of Italian seasoning. - Cook the shrimp for 2 to 3 minutes until they turn pink and opaque. - Now, add 1 cup of halved cherry tomatoes to the skillet. - Stir gently and cook for another 2 minutes until the tomatoes soften. - Carefully pour in 1 cup of chicken broth and let it simmer. - After simmering, add 1 cup of heavy cream and stir well. - Allow the sauce to thicken for about 5 minutes. - Add 2 cups of fresh spinach to the skillet, stirring until it wilts. - Gently fold in the cooked tortellini, coating each piece well. - Use a spatula to mix everything together carefully. - Taste your dish and adjust seasoning with more salt and pepper if needed. - Serve the creamy shrimp spinach tortellini hot, garnished with fresh Parmesan cheese. To boost the taste of creamy shrimp spinach tortellini, try adding more garlic or Italian seasoning. You can also mix in a squeeze of fresh lemon juice for brightness. Tasting your dish as you cook is very important. This way, you can adjust the salt and pepper to fit your liking. Don't be afraid to experiment! For a lovely look, plate the tortellini in shallow bowls. Sprinkle extra grated Parmesan cheese on top, and add a few fresh spinach leaves for color. A light drizzle of olive oil adds shine and flavor. Your dish will not only taste great but also look stunning! Use medium heat when cooking shrimp to get them just right. This way, they cook evenly without burning. Cook shrimp until they turn pink and opaque, which takes about 2-3 minutes. Overcooking shrimp can make them tough and chewy. Keep an eye on them to ensure they stay tender. {{image_4}} You can mix in different greens to switch things up. Kale or arugula can add a nice bite. These greens cook well and fit into the creamy sauce. You can also try bell peppers or zucchini for more color and crunch. Just chop them up and toss them in along with the shrimp. If you want to swap shrimp, chicken works great too. Simply cube the chicken and cook it the same way as the shrimp. Tofu is a good option for a plant-based meal. It absorbs flavors well and adds protein. For seafood lovers, try scallops or crab. Both bring their unique taste and texture to the dish. You can play with different sauces for a new twist. Alfredo sauce can give a rich flavor, while pesto adds a fresh herb taste. Don't forget to try new herbs, like basil or dill. They can brighten up the dish and add depth. Experimenting with these options makes your creamy shrimp spinach tortellini even more fun! Store leftover creamy shrimp spinach tortellini in an airtight container. This keeps the dish fresh for up to three days. Make sure to let it cool before sealing. Keep it in the fridge right after serving. This prevents bacteria growth and keeps flavors intact. To reheat, use the stove or microwave. If using the stove, add a splash of chicken broth or cream. This helps restore the creamy texture. Stir gently to warm it evenly. If using the microwave, heat in short bursts. Stir in between to avoid hot spots. To freeze creamy shrimp spinach tortellini, use a freezer-safe container. Ensure the dish cools completely first. Freeze it for up to three months. Label the container with the date for easy tracking. When ready to eat, thaw in the fridge overnight. For reheating, use a pot on low heat. Add a little chicken broth or cream for creaminess. Stir gently until heated through. Enjoy this delightful dish even after freezing! Creamy shrimp spinach tortellini lasts about 3 to 4 days in the fridge. Store it in an airtight container. Make sure to let it cool before sealing it up. This keeps the flavors fresh. Yes, you can make this dish ahead of time. Prepare the tortellini and sauce, then store them separately. When you are ready to eat, heat the sauce and mix in the tortellini. This helps maintain the best texture. You can make this dish lighter by using low-fat cream or half-and-half instead of heavy cream. You might also swap out the cheese tortellini for whole grain or vegetable-based options. This reduces calories and adds nutrients. Yes, you can use frozen shrimp. Just make sure to thaw them before cooking. Place them in the fridge overnight or run them under cold water for a quick thaw. This keeps the shrimp tender and juicy. Pair this dish with a fresh green salad or garlic bread. A light vinaigrette complements the creamy sauce well. You can also add a glass of white wine for a perfect dinner pairing. This blog post shared a tasty recipe for creamy shrimp spinach tortellini. You learned about key ingredients like cheese tortellini, shrimp, and fresh spinach, along with simple steps to cook them. We discussed tips for enhancing flavor and presented fun variations. Remember, you can switch proteins or use different vegetables to mix things up. In the end, this dish is easy to prepare and great for any meal. Enjoy your cooking and the delicious results!

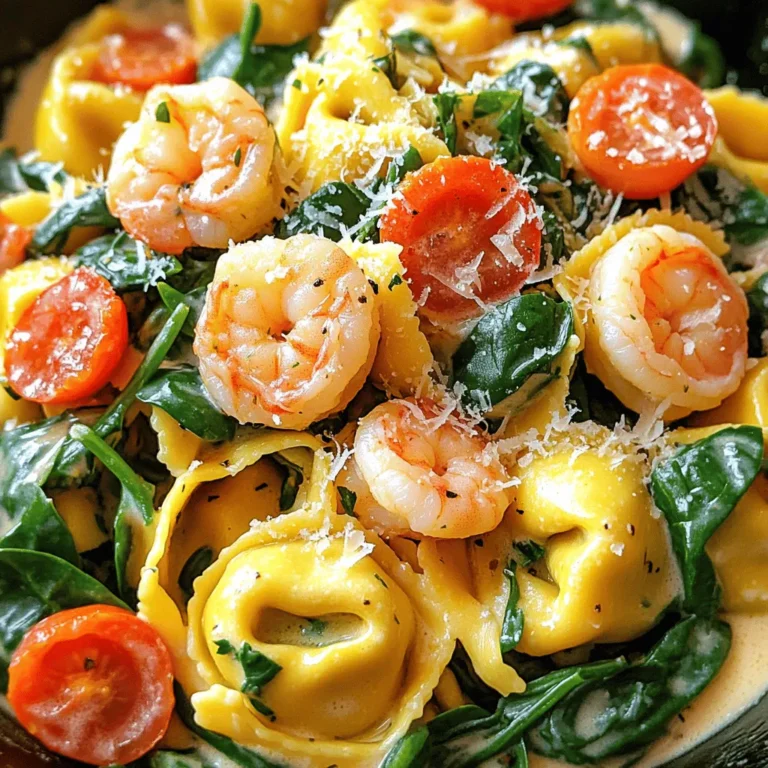
Creamy Shrimp Spinach Tortellini Flavorful Dinner Treat

PREV 1 … 9 10 11 … 18 NEXT
easy meal kitchen

explore

DessertsDinnerAppetizersDrinks

Our Policies

  • Cookie Policy
  • Copyright Policy
  • Disclaimer
  • GDPR Policy
  • Terms Of Use
Back to Top
  • About
  • Contact Us
  • Privacy Policy
© 2025 easy meal kitchen