FREE DINNER EBOOK! Get your copy!
  • Cookie Policy
  • GDPR Policy
  • Disclaimer
  • Terms Of Use
  • Visit my other site: Fun Cookie Recipes
easy meal kitchen
  • Home
  • Dinner
  • Desserts
  • Drinks
  • Appetizers
  • Contact
  • About
  • Privacy Policy
  • Home
  • Dinner
  • Desserts
  • Drinks
  • Appetizers
  • Contact
  • About
  • Privacy Policy
  • Cookie Policy
  • GDPR Policy
  • Disclaimer
  • Terms Of Use
Visit my other site: Fun Cookie Recipes

HOME / CATEGORIES /

Latest

- 2 cups cottage cheese (either low-fat or regular) - 1 cup cooked quinoa - 1 bell pepper, diced (any color) - 1 medium zucchini, grated - 1 cup fresh spinach, chopped - 1/2 medium onion, finely diced - 2 cloves of garlic, minced - 1 teaspoon dried oregano - 1 teaspoon dried basil - Salt and pepper, to taste - 1 cup shredded mozzarella cheese - 2 large eggs - Olive oil, for greasing You can use low-fat cottage cheese for a lighter dish. For a vegan option, swap cottage cheese with tofu and eggs with a flaxseed mix. This keeps the protein high while catering to dietary needs. Using fresh herbs in place of dried can enhance flavors too. {{ingredient_image_2}} - Preheat the oven to 375°F (190°C). - Grease a 9x9-inch baking dish with olive oil. - In a large bowl, mix 2 cups of cottage cheese and 1 cup of cooked quinoa. - Add in 1 diced bell pepper, 1 grated zucchini, 1 cup of chopped spinach, 1/2 diced onion, and 2 cloves of minced garlic. - Stir until everything is well mixed. - Sprinkle in 1 teaspoon of dried oregano, 1 teaspoon of dried basil, and season with salt and pepper. - Mix again to blend the flavors. - In another bowl, whisk 2 large eggs until frothy. - Fold the eggs into the cottage cheese mix gently. - Pour the mixture into the greased baking dish. - Spread it out evenly with a spatula. - Top with 1 cup of shredded mozzarella cheese. - Bake for 30-35 minutes. - Check if the top is golden brown and the center is set. It should not jiggle when shaken. Mix your ingredients well but avoid overdoing it. Overmixing can make the bake dense. A gentle fold keeps it light. Once baked, let it cool for a few minutes before slicing. This cooling time helps the layers hold together. If you slice too soon, it may fall apart. To boost flavor, try adding fresh herbs like thyme or chives. Fresh herbs bring bright notes that dried herbs can't match. Dried herbs work well too, but they take time to release their flavor. Use them wisely to balance your dish. Fresh garlic can also make a big impact on taste. For a beautiful presentation, serve generous wedges of the bake on a colorful plate. Pair it with a fresh salad for a nice crunch. A drizzle of balsamic glaze adds a sweet touch. Garnish with chopped parsley or basil for extra color. These small details make your dish stand out. Pro Tips Use Fresh Ingredients: Opt for fresh vegetables whenever possible to enhance the flavor and nutritional value of your dish. Experiment with Herbs: Feel free to add other herbs like thyme or rosemary for an extra layer of flavor that complements the dish. Adjust the Cheese: If you're a cheese lover, try adding a blend of cheeses such as feta or cheddar for a unique taste. Store Properly: Keep leftovers in an airtight container in the fridge for up to 3 days. Reheat in the oven for the best texture. {{image_4}} Want to up the protein in your High Protein Veggie Cottage Cheese Bake? You can easily add different legumes. Chickpeas, lentils, or black beans work well. These legumes add protein and fiber, making your dish hearty. You can also incorporate lean meats or seafood. Grilled chicken or shrimp can add a tasty twist. Just make sure to cook them first, and then mix them into your bake. Experimenting with different cheeses can change the flavor of your bake. Try cheddar or feta for a new taste. Each cheese offers a unique texture and flavor, keeping it interesting. Changing up the vegetables used is another fun way to vary your dish. Use mushrooms, broccoli, or even sweet potatoes for a different texture and taste. This way, you can match your bake to the seasons or your pantry. For gluten-free options, stick to the ingredients listed in the recipe. Quinoa is naturally gluten-free, so you're already on track. Just be sure to check labels on any packaged items. If you want to make vegetarian vs. vegan modifications, swap the cottage cheese with a plant-based version. You can also replace the eggs with flaxseed meal or a commercial egg replacer. This way, everyone can enjoy the bake! Store leftovers in the fridge. Use an airtight container to keep the dish fresh. It will last up to three days. Make sure it cools down before sealing. This helps prevent moisture buildup inside the container. You can reheat in the oven or microwave. The oven gives a nice crispy top. Preheat it to 350°F (175°C) and heat for about 15 minutes. For a quick option, use the microwave. Heat for one to two minutes. Check if it’s hot all the way through. To freeze portions, cut the bake into squares. Wrap each piece tightly in plastic wrap. Then place them in a freezer bag. This keeps them fresh for up to three months. For thawing, move the squares to the fridge overnight. Reheat using the oven or microwave as mentioned above. This keeps the taste and texture just right. To make this dish vegan, replace cottage cheese and eggs. Use silken tofu in place of cottage cheese. Blend the tofu until smooth for a creamy texture. For eggs, use a mixture of ground flaxseed and water. Combine 1 tablespoon of flaxseed with 2.5 tablespoons of water to make one egg substitute. Let it sit for a few minutes until it thickens. This mix binds the ingredients without eggs. Yes, you can prep this dish in advance. Make the mixture the night before and store it in the fridge. This allows the flavors to blend. On baking day, just pour it into the dish and top with cheese. You can also bake it ahead and reheat it later. Just make sure to cool it before storing. Each serving has about 250 calories. It contains 20 grams of protein, which is great for muscle health. The dish also has a good amount of fiber from the veggies and quinoa. Keep in mind that the values may change based on your ingredient choices. For a more precise count, use a nutrition calculator. You can use frozen vegetables for this recipe. They are convenient and save time. Just make sure to thaw and drain them before mixing. This avoids excess water in the bake. Fresh veggies add crunch, but frozen will work well, too. Choose a mix of your favorites for extra flavor. This blog post shared a simple yet tasty recipe using basic ingredients. You learned about using cottage cheese, quinoa, fresh veggies, and a blend of seasonings. I provided steps for prepping, baking, and serving your dish. Also, there are helpful tips for storage and reheating, with a nod to dietary adaptations. Remember, you can switch ingredients based on your needs. So, get creative, enjoy the cooking process, and savor your delicious meal!

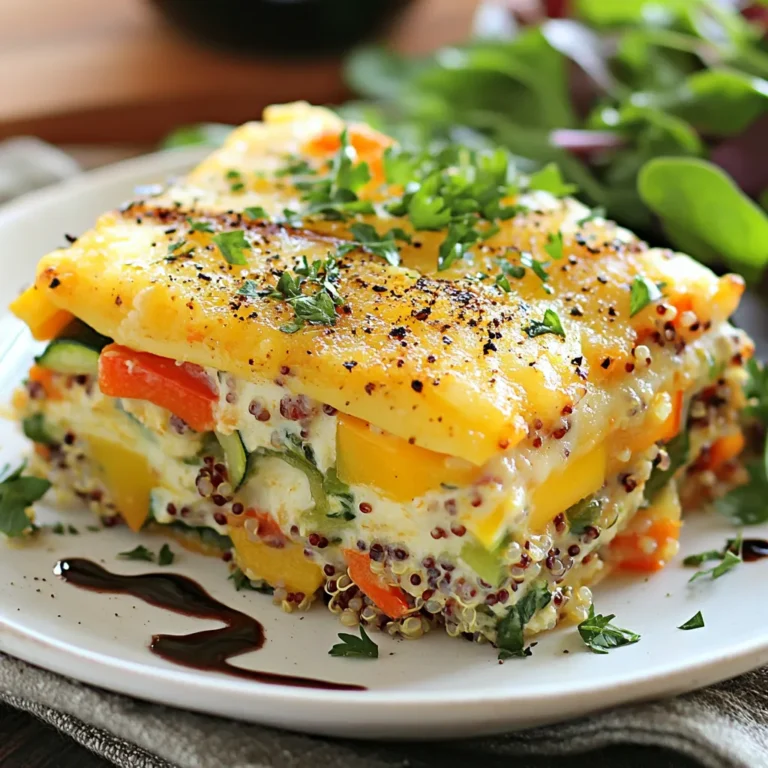
High Protein Veggie Cottage Cheese Bake Delight

- 2 boneless, skinless chicken breasts - 1 cup cooked jasmine rice - 1/2 cup honey BBQ sauce - 1 tablespoon olive oil - 1 teaspoon garlic powder - 1 teaspoon smoked paprika - 1 cup mixed bell peppers, sliced - 1/2 cup red onion, thinly sliced - Salt and pepper to taste - 2 green onions, chopped - Sesame seeds For this Honey BBQ Chicken Rice Bowl, we start with simple ingredients. The chicken breasts are key. They are lean and cook up tender. You will also need jasmine rice for a lovely base. This rice brings a nice aroma and texture that pairs well with the chicken. The honey BBQ sauce is where the magic happens. It adds sweetness and a smoky taste. Olive oil helps keep the chicken moist and golden brown. For seasoning, garlic powder and smoked paprika bring depth. They create a rich flavor that makes each bite special. Next, we add color and crunch with bell peppers and red onion. These vegetables not only taste great but also brighten up your bowl. You can use any colors of bell peppers you like. Just remember to slice them thin for even cooking. At the end, we garnish with green onions and sesame seeds. These toppings add a fresh pop and a little crunch. Each ingredient plays its part in making this dish a hit! {{ingredient_image_2}} To start, mix the honey BBQ sauce, olive oil, garlic powder, smoked paprika, salt, and pepper in a bowl. This creates a tasty marinade. Take your boneless chicken breasts and coat them well with the marinade. Make sure every surface is covered. Then, place the chicken in the fridge for at least 30 minutes. This helps the flavor soak in. Next, preheat your grill or grill pan over medium heat. Once it’s hot, take the chicken from the fridge. Don’t forget to save some marinade for later! Place the chicken on the grill. Cook it for about 6 to 7 minutes on each side. You want it to reach an internal temperature of 165°F (75°C). This means it’s fully cooked. After cooking, brush the chicken with the reserved marinade. This adds a nice caramelized touch. While the chicken grills, it's time to sauté the veggies. Heat some olive oil in a pan over medium heat. Add the sliced bell peppers and red onion. Cook them for about 5 to 7 minutes, stirring often. You want them tender and slightly caramelized. This adds extra flavor to your dish. Now, let’s put it all together! Start with a base of cooked jasmine rice in each bowl. Next, add the sautéed bell peppers and onion for a burst of color. Then, place the grilled chicken strips on top of the veggies and rice. Drizzle a bit more honey BBQ sauce over everything to enhance the flavor. Lastly, for a fun touch, sprinkle chopped green onions and sesame seeds on top. Enjoy your delicious creation! Make sure the chicken reaches an internal temperature of 165°F (75°C). This step is key for safety and flavor. Use a meat thermometer for accurate readings. After cooking, let the chicken rest for a few minutes. This helps the juices stay in the meat, making it moist and tender. Slice it only after resting for easier serving. Sauté the bell peppers and red onion until they are tender and caramelized. This adds depth and sweetness. You can mix different vegetables like zucchini or carrots. Feel free to experiment! Each mix brings a new flavor and color to your bowl. Use colorful plates for serving. This makes the meal look fresh and inviting. A wedge of lime on the side adds a nice burst of flavor. Garnish with green onions and sesame seeds for a pop of color and crunch. This little touch makes your dish stand out and more enjoyable. Pro Tips Marinating Time: For the best flavor, marinate the chicken for at least 1 hour or overnight if possible. This allows the spices to penetrate the meat more deeply. Grill Temperature: Preheat your grill properly to ensure a good sear on the chicken, which will help lock in moisture and flavor. Resting the Chicken: Always let the chicken rest for a few minutes after grilling. This helps the juices redistribute, making the meat more tender and juicy. Vegetable Variations: Feel free to use other vegetables like zucchini or asparagus for a different flavor profile. Just make sure to cut them into similar sizes for even cooking. {{image_4}} You can easily swap out chicken for shrimp or tofu. Shrimp cooks fast and adds a nice touch. Just grill or sauté them like you would the chicken. Tofu is a great plant-based option. Press the tofu to remove water, then marinate it like the chicken. Both options bring a new taste to your rice bowl. Feel free to experiment with different BBQ sauces or marinades. You might try a spicy BBQ sauce for heat. A honey mustard sauce can add a tangy twist. Each sauce gives a unique flavor that can change your bowl. Mix and match to find your favorite combination! If you want a change from jasmine rice, try brown rice or quinoa. Brown rice has a nutty flavor and is heartier. Quinoa is a protein-rich option that cooks quickly. Both grains will give your dish a new texture while keeping it healthy. Store any leftovers in an airtight container in the fridge. This keeps the chicken fresh and tasty for up to three days. Make sure to cool the food before storing it away. For the best taste, reheat the rice bowl in the microwave or on the stovetop. If using a microwave, place a damp paper towel over the bowl to keep moisture in. Heat for one to two minutes, stirring halfway through. On the stovetop, warm it on low heat, stirring often. You can freeze the chicken and rice separately for longer storage. Wrap the chicken tightly in plastic wrap, then place it in a freezer bag. For the rice, use a freezer-safe container. When ready to eat, thaw in the fridge overnight. Reheat as usual, and enjoy! The recommended marinating time is at least 30 minutes. This time allows the chicken to soak up the honey BBQ sauce. The longer you marinate, the deeper the flavor. If you can, try to marinate for up to two hours. This helps make the chicken tender and juicy. Yes, but jasmine rice is preferred for its aroma and texture. Jasmine rice adds a subtle, sweet flavor that pairs well with honey BBQ. Regular rice can work, but it may lack the same depth of taste. If you have it, stick with jasmine for the best results. Here are some great side dish and drink suggestions: - Side dishes: Steamed broccoli, corn on the cob, or a fresh salad. - Drinks: Iced tea, lemonade, or a light beer work well. These options enhance the meal and make it more enjoyable. Making a Honey BBQ Chicken Rice Bowl is simple and tasty. We covered the key ingredients, including chicken, rice, and vegetables. I shared step-by-step instructions for marinating, grilling, and assembling your bowl. Tips on cooking, presentation, and variations help you make this dish your own. Storage advice ensures your leftovers stay fresh. Enjoy making this wholesome meal. It’s a great choice for busy days or special occasions. Now, gather your ingredients and get cooking!

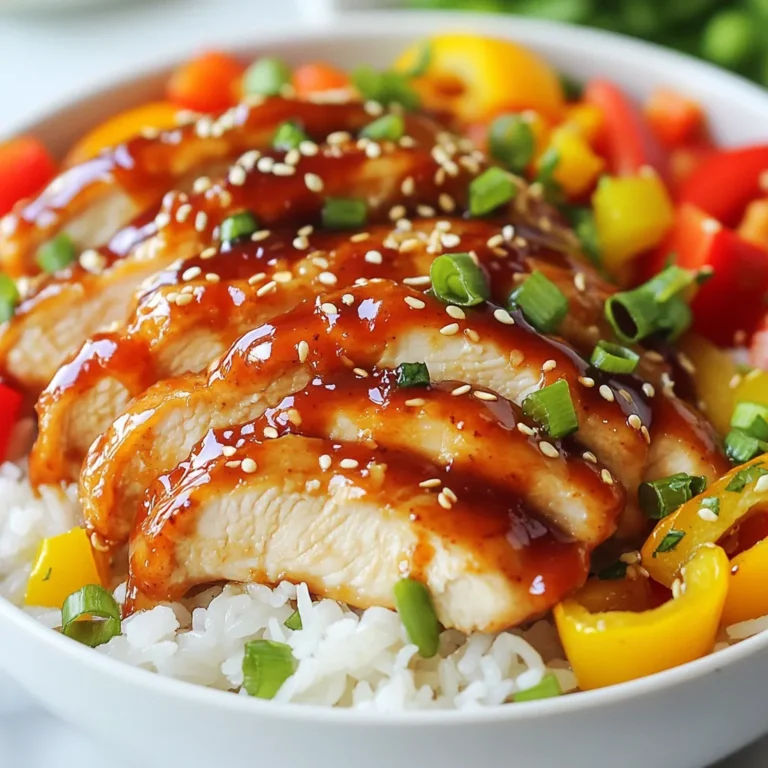
Honey BBQ Chicken Rice Bowl Flavorful and Simple Meal

- 2 medium zucchini, diced - 1 large sweet potato, peeled and cut into 1-inch cubes - 1 red bell pepper, chopped - 1 small onion, finely diced - 2 cloves garlic, minced - 1 teaspoon ground cumin - 1 teaspoon smoked paprika - 1 tablespoon extra virgin olive oil - Salt and freshly ground pepper to taste - Fresh parsley for garnish You can change the veggies based on what you have. Try yellow squash or carrots instead of zucchini. For a sweet twist, use butternut squash in place of sweet potato. If you want to mix up the spices, chili powder or curry powder can add a fun kick. When picking zucchini, look for firm ones with smooth skin. Avoid those with soft spots. For sweet potatoes, choose ones that feel heavy for their size and have smooth, unblemished skin. Fresh parsley should be bright green and not wilted. Always feel free to smell it; fresh herbs should have a strong, pleasant scent! {{ingredient_image_2}} Start by gathering your ingredients. You will need: - 2 medium zucchini, diced - 1 large sweet potato, peeled and cut into 1-inch cubes - 1 red bell pepper, chopped into bite-sized pieces - 1 small onion, finely diced - 2 cloves garlic, minced - 1 teaspoon ground cumin - 1 teaspoon smoked paprika - 1 tablespoon extra virgin olive oil - Salt and freshly ground pepper to taste - Fresh parsley, chopped, for garnish Next, prepare your vegetables. Wash the zucchini and cut it into small pieces. Peel the sweet potato and cut it into cubes. Chop the red bell pepper and finely dice the onion. Mince the garlic to release its strong flavor. Now, let's discuss the cooking sequence. Heat the extra virgin olive oil in a large skillet over medium heat. The oil should shimmer, indicating that it’s ready. First, add the diced onion and sauté for about 3-4 minutes. Stir occasionally until the onion turns soft and translucent. Then, mix in the minced garlic for about 1 minute. This helps to build a great base of flavor. When sautéing, keep the heat at medium to avoid burning. This ensures that your veggies cook evenly and develop a nice flavor without getting charred. Stir often to prevent sticking and to allow even cooking. To achieve perfect caramelization, add the cubed sweet potato next. Season it with ground cumin, smoked paprika, salt, and pepper. Stir well to coat the sweet potato with all the spices. Cook for about 10 minutes until the sweet potato starts to soften but is not fully cooked. This step is key for building flavor. Once the sweet potato is partially soft, add the diced zucchini and chopped red bell pepper. Continue to sauté for another 6-8 minutes. You want those veggies to be tender and lightly caramelized. This adds a depth of flavor that makes this dish truly special. After cooking, taste your dish. Adjust the seasoning with more salt or pepper if needed. This step is vital to balance the flavors. For garnish, sprinkle freshly chopped parsley over the skillet. This adds color and freshness to the dish. Serve the skillet directly from the pan for a rustic look, or plate it onto individual dishes. A little extra parsley on top can enhance the visual appeal and make it even more inviting. To get nice, even cooking, cut the vegetables to the same size. This helps everything cook at the same pace. Start with the sweet potato, as it takes longer to soften. After about 10 minutes, add the zucchini and bell pepper. They cook quicker, so this timing works well. Stir the mix often to avoid burning. For extra protein, try adding cooked chicken or beans. This makes the dish heartier. You can also boost flavor by mixing in fresh herbs. Basil or thyme can add a lovely twist. Just sprinkle them in during the last few minutes of cooking for the best taste. One mistake is overcooking the veggies. They should be soft but still have a bit of crunch. Taste as you go to find the right texture. Another mistake is skipping seasoning. Use salt and pepper generously. Seasoning makes all the difference in flavor. Always taste before serving to ensure it’s just right. Pro Tips Use Fresh Ingredients: The flavor of your dish greatly improves with fresh vegetables. Opt for seasonal and locally sourced produce when possible. Cut Uniformly: To ensure even cooking, make sure to cut your sweet potatoes, zucchini, and bell peppers into uniform sizes. This helps them cook at the same rate. Adjust Seasoning: Always taste your dish before serving. Adjust the seasoning with salt, pepper, or additional spices to enhance the flavor profile to your liking. Experiment with Herbs: Feel free to add other fresh herbs like basil or cilantro for a different flavor twist. They can add freshness and complexity to your dish. {{image_4}} You can easily change the taste of this dish. Try different spice mixes to find your favorite. For a warm touch, use cayenne pepper. If you want a smoky flavor, add chipotle powder. Experiment with herbs like thyme or oregano for a fresh twist. Adding cheese can also change the flavor. Try feta for a tangy kick, or sprinkle mozzarella for creaminess. Goat cheese melts well, giving a rich taste. This dish is great for many diets. To make it vegan, skip the cheese and use vegetable broth. For a gluten-free option, ensure your spices are certified gluten-free. If you want to cut carbs, swap sweet potatoes for cauliflower. Both options give a similar texture and taste. You can also add in more leafy greens like kale or spinach for extra nutrition. Seasonal veggies can bring new life to the dish. In summer, add fresh corn or cherry tomatoes. These ingredients add sweetness and color. In autumn, consider using butternut squash instead of sweet potatoes. It gives a nice, nutty flavor. Also, feel free to mix in seasonal herbs like sage or rosemary to enhance the taste. This dish can adapt to your local harvest, making it fresh and exciting! To keep your Zucchini Sweet Potato Skillet fresh, use airtight containers. Glass containers work great since they don’t stain or hold smells. If you use plastic, choose BPA-free options. Before sealing, let the dish cool to room temperature. This helps avoid sogginess. Store the skillet in the fridge for up to three days. To reheat, use a skillet or microwave. If you use a skillet, add a touch of oil over medium heat. Stir the veggies often until hot. This keeps the dish from getting mushy. In the microwave, heat in 30-second bursts. Stir between each burst for even heating. You can freeze this dish before or after cooking. If you freeze before cooking, place the raw, chopped veggies in a freezer bag. Remove as much air as possible. If you freeze after cooking, let it cool first. Store in a freezer-safe container. Use within three months for the best taste. When ready to eat, thaw overnight in the fridge before reheating. You can pair Zucchini Sweet Potato Skillet with many tasty sides. Here are some ideas: - Quinoa for a healthy grain option. - Grilled chicken for added protein. - A fresh green salad for crunch. - Crusty bread to soak up the flavors. These sides make the meal more filling and fun. To add heat, try these simple spice ideas: - Add a pinch of cayenne pepper. - Use diced jalapeños for fresh heat. - Sprinkle red pepper flakes on top. - Stir in some hot sauce while cooking. These options will give your dish a tasty kick! Yes, you can make it ahead! Here are some tips: - Chop the veggies a day before. - Cook the dish and cool it down. - Store it in an airtight container in the fridge. - Reheat on the stove or in the microwave. This way, you can enjoy it anytime without extra work! This guide covered how to make a tasty Zucchini Sweet Potato Skillet. You learned about the best ingredients, cooking steps, and seasoning tips. Remember to choose fresh veggies and spices for the best flavor. Don't be afraid to mix in your favorite proteins or seasonal vegetables. With the right techniques, you can avoid common mistakes and enjoy a perfect dish. Prepare ahead and store leftovers properly to keep them fresh. Now, go cook and enjoy this delightful recipe!

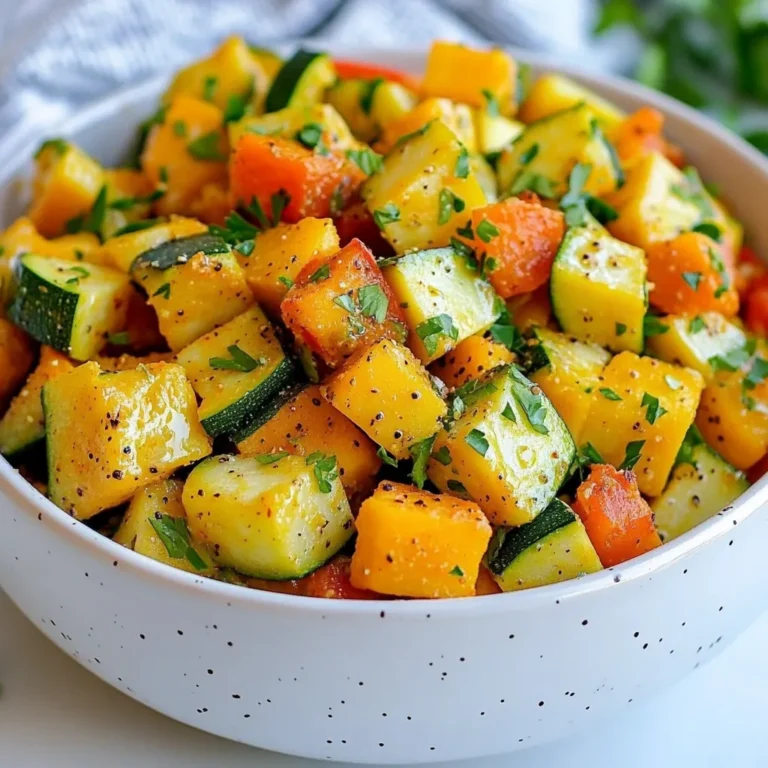
Zucchini Sweet Potato Skillet Flavorful Simple Dish

- 4 bone-in, skin-on chicken thighs - 1 lb baby potatoes, halved - 3 tablespoons olive oil, divided - 1 tablespoon fresh rosemary, finely chopped - 1 tablespoon fresh thyme, finely chopped - 4 cloves garlic, minced - 1 teaspoon paprika - Zest of 1 lemon - Juice of 1 lemon - Salt and pepper to taste When making roasted chicken thighs and potatoes, the right ingredients are key. The chicken thighs should have skin and bones. This keeps the meat juicy and full of flavor. Baby potatoes add a nice texture and taste. They roast well and soak up the seasoning. Olive oil is essential for coating the chicken and potatoes. It helps everything crisp up in the oven. Fresh herbs, like rosemary and thyme, bring a bright flavor to the dish. They make each bite feel special. For seasoning, garlic gives a rich taste. Paprika adds a hint of smokiness. Lemon zest and juice brighten up the meal. Salt and pepper ensure all flavors shine. These ingredients combine to create a flavorful meal that will impress everyone. {{ingredient_image_2}} 1. Preheat the oven to 425°F (220°C). This heat helps the chicken skin get crispy and golden. 2. Prepare the potatoes by halving them. In a bowl, mix the potatoes with 2 tablespoons of olive oil, minced garlic, fresh rosemary, fresh thyme, paprika, lemon zest, salt, and pepper. Toss well until the potatoes are nicely coated. - How to season chicken thighs: Take your chicken thighs and place them in a bowl. Generously sprinkle salt and pepper on all sides. Then, drizzle 1 tablespoon of olive oil and the lemon juice over them. Rub the mix into the chicken to ensure every bite is flavorful. - Importance of marinating: Marinating adds depth to the flavor. It helps the chicken absorb all the tasty ingredients, making it more delicious. 1. Arranging everything in the baking dish: Get a large oven-proof dish. On one side, place the seasoned potatoes, spreading them out. On the other side, lay the chicken thighs skin side up. Leave space between them for even cooking. 2. Cooking time and temperature: Roast the chicken and potatoes for 35-40 minutes. The chicken should reach an internal temperature of 165°F (74°C). The skin will be golden, and the potatoes will be tender. 3. Recognizing when it’s done: Check that the chicken skin is crispy and golden brown. The potatoes should look golden and feel soft when pierced with a fork. To get that crispy chicken skin, you need a high temperature. I always roast at 425°F (220°C). This heat helps the skin turn golden and crunchy. Avoid overcrowding the baking dish. If the chicken thighs touch, they won’t crisp up. Give them space to breathe! To check if your potatoes are done, poke them with a fork. They should feel soft inside. Make sure to cut your baby potatoes in half. This helps them cook evenly. Toss them well in the oil and herbs to coat every piece. It makes a big difference in flavor. You can add more flavor with herbs and spices. Try adding oregano or sage for a twist. Fresh herbs make a big impact. Using lemon adds brightness. Zest the lemon before juicing it. The zest gives a strong lemony taste. Squeeze the juice over the chicken for extra moisture and zing. Pro Tips Pat the Chicken Dry: Ensuring the chicken skin is dry before seasoning helps achieve that crispy texture when roasting. Use Fresh Herbs: Fresh herbs like rosemary and thyme add a vibrant flavor that dried herbs cannot replicate, making your dish more aromatic. Let It Rest: Allowing the chicken to rest after roasting is crucial; it keeps the meat juicy and enhances overall flavor. Check Potatoes for Doneness: Test the potatoes with a fork; they should be tender and golden brown, ensuring they complement the chicken perfectly. {{image_4}} You can switch things up by using different cuts of chicken. Bone-in, skin-on thighs give great flavor. However, you can try chicken legs or breasts. Just remember, cooking time may change. For the potatoes, baby potatoes are perfect. They roast nicely and stay tender. But you can also use Yukon Gold or red potatoes. Each type gives a unique taste and texture to the dish. To add more flavor, include extra vegetables like carrots or green beans. They roast well and soak up the chicken's juices. Plus, they make the meal colorful and healthy! You can also experiment with other herbs. Try oregano or basil if you want a different twist. Each herb brings its own unique taste, changing the whole dish. If you want a hands-off approach, use a slow cooker. Combine the chicken and potatoes with seasonings, and let them cook low and slow. This method keeps everything juicy and flavorful. Grilling is another great option. Marinate the chicken and potatoes, then place them on the grill. This adds a smoky flavor that takes the dish to another level. Just be sure to monitor the cooking time! To cool leftovers properly, let them sit at room temperature for 30 minutes. This step helps prevent condensation in the storage container. After cooling, place the chicken and potatoes in airtight containers. Glass or plastic containers with tight lids work best. Ensure you use separate containers for easy access later. When reheating chicken and potatoes, the oven is the best choice. Preheat your oven to 350°F (175°C) and place the food in a baking dish. Cover it with foil to keep moisture in. Heat for about 20-25 minutes. This method keeps your meal juicy and flavorful. Always check the internal temperature. It should reach 165°F (74°C) before serving. Yes, you can freeze roasted chicken and potatoes. First, make sure they are completely cooled. Then, wrap them tightly in plastic wrap. Place wrapped food in a freezer bag for extra protection. To thaw, move them to the fridge overnight. Reheat as described above for the best results. This way, you can enjoy this tasty meal later! It takes about 35 to 40 minutes to cook chicken thighs at 425°F. This high heat helps the skin get crispy and the meat stays juicy. Use a meat thermometer to check if the internal temperature is 165°F. This ensures safe eating and great flavor. Yes, you can use boneless chicken thighs. They cook faster than bone-in thighs. You should reduce the cooking time to about 25 to 30 minutes. Boneless thighs may be less juicy since they lack the bone. The flavor will still be good, but they might be drier. You can serve many tasty sides with roasted chicken thighs and potatoes. Here are some great options: - Steamed green beans - Roasted carrots - A fresh garden salad - Creamy coleslaw These sides add color and flavor. They balance the meal nicely. You can also enjoy bread or a light soup as a starter. This article covered how to create a delicious roasted chicken thigh dish with baby potatoes. You learned about key ingredients, seasoning, and step-by-step cooking instructions. The tips helped you achieve crispy skin and perfectly cooked potatoes. You also explored variations, storage ideas, and common questions. Cooking can be simple and fun. Try different herbs or vegetables to make it your own. Enjoy your meal and share it with others!

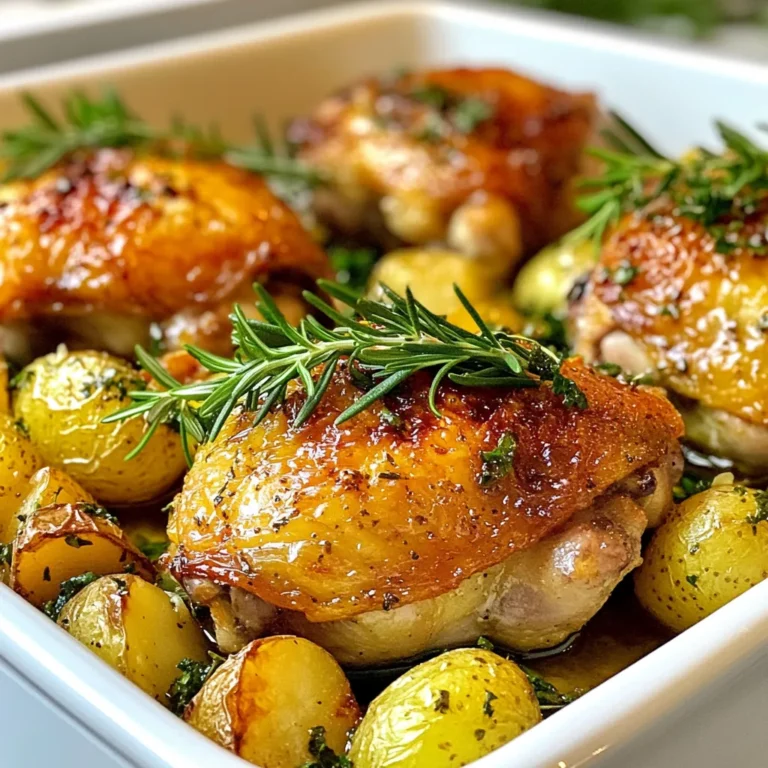
Roasted Chicken Thighs and Potatoes Flavorful Meal

When making Lemon Pecorino Crusted Chicken, gather these tasty ingredients: - 4 boneless, skinless chicken breasts - 1 cup breadcrumbs - 1 cup grated Pecorino Romano cheese - Zest and juice of 1 lemon, plus juice of another lemon - 2 garlic cloves, finely minced - 1 tablespoon fresh thyme leaves - 1 teaspoon paprika - Salt and freshly cracked black pepper to taste - 1/2 cup all-purpose flour - 2 large eggs, beaten - 2 tablespoons olive oil These ingredients create a wonderful blend of flavors. The chicken provides protein, while the breadcrumbs and Pecorino cheese add crunch and richness. Fresh lemons bring brightness, and garlic and thyme add depth. Using quality ingredients makes a big difference. Fresh chicken and cheese elevate the dish. Choose high-quality breadcrumbs for the best crust. This dish is simple yet impressive. It’s perfect for family dinners or special occasions. The combination of flavors will have everyone asking for seconds! {{ingredient_image_2}} To start, you need to prep the chicken. First, preheat your oven to 400°F (200°C). Take one chicken breast and place it between two sheets of plastic wrap. This helps keep things tidy. Use a meat mallet or rolling pin to pound it gently. Aim for an even thickness of about 1 inch. This step is vital because even thickness ensures the chicken cooks well. Next, let’s make the mixture. Grab a large mixing bowl. Combine these dry ingredients: breadcrumbs, grated Pecorino Romano cheese, lemon zest, minced garlic, fresh thyme, paprika, and a pinch of salt and pepper. Stir everything well. This helps blend all the flavors together. Now, let’s set up your breading station. You will need three shallow dishes. Fill one with flour, the second with beaten eggs, and the last with your breadcrumb mixture. This assembly line makes breading faster and easier. It’s time to coat the chicken. Take each breast and dredge it in flour first. Make sure to shake off any extra flour. Next, dip it in the beaten eggs. Let any excess egg drip off. Finally, press the chicken into the breadcrumb mixture. Aim for a thick layer of crumbs for a crispy crust. Now, let’s cook the chicken. Heat olive oil in a large oven-safe skillet over medium-high heat. Once the oil is hot, add the breaded chicken breasts. Cook them for about 4-5 minutes on each side. You want them to turn a lovely golden-brown color and get nice and crispy. After frying, it’s time to finish cooking in the oven. Squeeze the juice of the second lemon over the chicken. Transfer the skillet to your preheated oven. Bake for 10-15 minutes. Make sure the internal temperature reaches 165°F (75°C). This step is crucial to ensure the chicken is safe to eat and juicy. - For extra crunch, use panko breadcrumbs. They make the crust light and crispy. - You can swap breadcrumbs with crushed cornflakes or crackers for a fun twist. - Add a pinch of red pepper flakes for heat. It gives a nice kick to the dish. - Consider mixing in grated lemon zest. It boosts the lemon flavor even more. - Fresh herbs like parsley or basil can add depth. Use them for a bright finish. - Serve with roasted veggies or a fresh salad. They balance the rich flavors perfectly. - For a beautiful plate, place the chicken on a bed of greens. Drizzle lemon juice on top to brighten the dish. - Garnish with lemon wedges for an extra pop of color. It also adds a fresh squeeze for each bite. Pro Tips Use Fresh Ingredients: Always opt for fresh herbs and quality cheese to elevate the flavor profile of your dish. Perfect the Breading: For a thicker crust, double-dip the chicken in the egg and breadcrumb mixture to ensure an extra crunchy texture. Let it Rest: Allow the chicken to rest for a few minutes after baking. This helps the juices redistribute, making for a juicier bite. Experiment with Flavors: Feel free to add other herbs or spices to the breadcrumb mixture, such as oregano or chili flakes, for a unique twist. {{image_4}} You can switch up the cheese for fun flavors. Here are two great choices: - Cheddar: This cheese adds a sharp and creamy taste. It melts well and pairs nicely with the lemon. - Parmesan: A classic choice, Parmesan brings a nutty flavor. It also creates a nice crust when baked. You can try different cooking methods for this dish. Here are two options: - Air-Fried Version: Use an air fryer to make this chicken. It cooks quickly and keeps the chicken juicy while making the crust crispy. - Grilled Option: Grilling adds a smoky flavor. Simply bread the chicken and grill it for a delicious twist. If you have dietary needs, there are easy swaps you can make: - Gluten-Free Substitutions: Use gluten-free breadcrumbs or crushed nuts. This way, you can enjoy the dish without gluten. - Dairy-Free Alternatives: Swap Pecorino for a dairy-free cheese. You can also use nutritional yeast for a cheesy flavor without dairy. To keep your Lemon Pecorino Crusted Chicken fresh, let it cool first. Place the chicken in an airtight container. You can store it in the fridge for up to three days. If you follow these steps, your chicken will stay tasty and safe to eat. When reheating, use the oven for best results. Preheat it to 350°F (175°C). Place the chicken on a baking sheet. Heat for about 10-15 minutes until warm. This method keeps the crust crispy and the chicken juicy. You can freeze Lemon Pecorino Crusted Chicken for up to three months. Wrap each piece tightly in plastic wrap, then place them in a freezer bag. This helps prevent freezer burn. To thaw, move the chicken to the fridge a day before you plan to eat it. This slow method keeps the chicken safe. If you need it fast, place it in cold water for about an hour. Check often to ensure the water stays cold. Yes, you can use bone-in chicken. The cooking time will change. Bone-in pieces take longer to cook than boneless ones. I suggest adding about 10 to 15 minutes to the baking time. Always check the internal temperature to ensure it reaches 165°F (75°C) for safety. You have many great options for side dishes. Here are some ideas: - Roasted vegetables like carrots, zucchini, or bell peppers. - A fresh arugula salad with lemon vinaigrette. - Garlic mashed potatoes or creamy polenta. - Lemon or herb rice for a light touch. To add heat, try these suggestions: - Mix in some red pepper flakes with the breadcrumb mixture. - Use a spicy paprika instead of regular paprika. - Add sliced jalapeños to the side when serving. Checking the internal temperature is key. Use a meat thermometer. Insert it into the thickest part of the chicken. It should read 165°F (75°C). If you don’t have a thermometer, check if the juices run clear when you cut into the chicken. This blog post showed you how to make Lemon Pecorino Crusted Chicken. We covered key ingredients, cooking methods, and tips for the best results. By following clear steps, you can create a delicious dish that your family will love. Remember to experiment with flavors and adjust for dietary needs. With these insights, you'll feel confident in the kitchen. Enjoy your cooking!

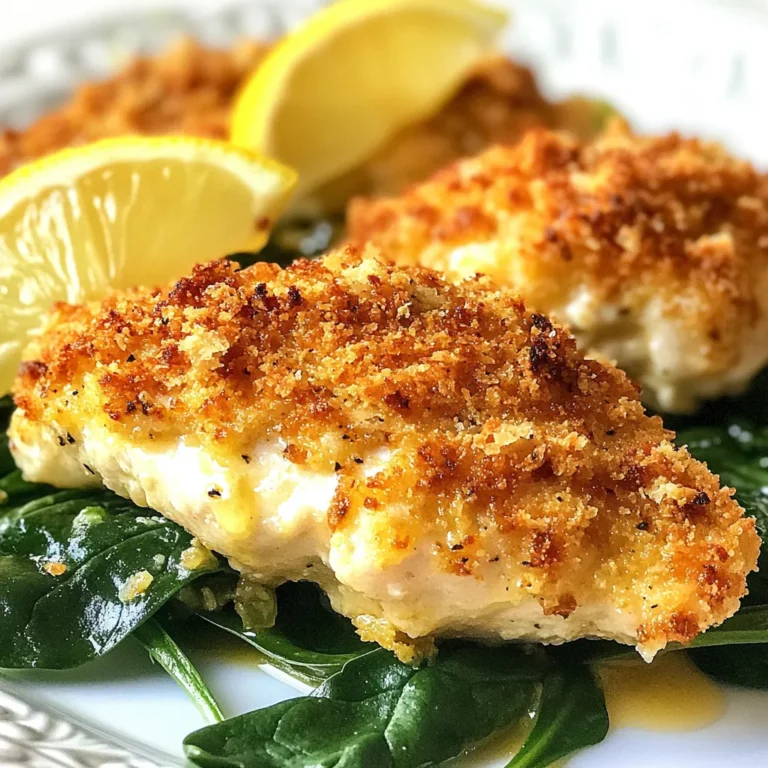
Lemon Pecorino Crusted Chicken Flavorful and Easy Meal

- Potatoes: I like to use russet potatoes for their creamy texture. You can also use Yukon Gold potatoes. They add a buttery flavor and are just as tasty. If you need a substitute, try red potatoes, but they may not blend as well. - Vegetables: This recipe needs one medium onion, finely chopped. Add two cloves of minced garlic for depth. A bell pepper adds sweetness. You can choose any color you like—red, green, or yellow. Lastly, two stalks of diced celery bring extra crunch and flavor. - Liquids: Use four cups of low-sodium vegetable broth. It keeps the soup light. For creaminess, add one cup of heavy cream. If you want a dairy-free option, coconut milk works well too. - Seasonings: Two tablespoons of Cajun seasoning give the soup its kick. One teaspoon of smoked paprika adds a nice depth of flavor. A bay leaf enhances the overall taste. Don’t forget salt and freshly cracked black pepper to make everything pop. - Garnishes: For a fresh touch, use 1/4 cup of finely chopped green onions. You can also sprinkle 1/4 cup of shredded cheddar cheese on top for richness, but it’s optional. These ingredients come together to create a warm and hearty soup that is perfect for any day! {{ingredient_image_2}} Start by washing and peeling the potatoes. Cut them into 1-inch cubes. Keep the cubes even to cook well. Chop the onion finely. Mince the garlic and dice the bell pepper and celery. Sauté the onion in olive oil over medium heat until it turns soft. This takes about 3-4 minutes. Add the garlic, bell pepper, and celery. Stir these veggies for another 3-4 minutes until they soften. Next, add the diced potatoes to the pot. Pour in the vegetable broth and add the Cajun seasoning, smoked paprika, and bay leaf. Stir well. Bring this mix to a boil. Once boiling, lower the heat and cover the pot. Let it simmer for 20-25 minutes. The potatoes should break apart easily when ready. Remove the bay leaf carefully. Use an immersion blender to puree the soup. Blend until it reaches your desired texture. For a chunkier soup, blend only half the mixture. That way, you keep some potato cubes for heartiness. After blending, stir in the heavy cream or coconut milk. This adds creaminess. Taste the soup and adjust the flavors with salt and freshly cracked black pepper. Heat through for another 5 minutes on low. For serving, ladle the soup into bowls. Garnish with chopped green onions and cheese if you like. Serve hot. A crusty piece of bread makes a great side. Enjoy your flavorful Cajun potato soup! To boost the Cajun taste, consider adding extra spices. I recommend cayenne pepper for heat or thyme for earthiness. You can also try adding a pinch of oregano for depth. When cooking, always sauté your veggies slowly. This helps release their natural sweetness and builds a strong flavor base. For creamy soup, add the heavy cream after blending. This keeps it rich without making it too thick. If you like chunkiness, blend just half the soup. This way, you maintain some potato pieces for a heartier bite. Avoid overcooking the potatoes. If they cook too long, they turn mushy and lose texture. Also, add the cream at the end of cooking. If you add it too soon, it may curdle and lose its silky feel. Keep these tips in mind, and your soup will shine! Pro Tips Use Fresh Ingredients: Opt for fresh vegetables and herbs for enhanced flavor and nutrition. Fresh produce will make your soup taste vibrant and lively. Adjust Spice Levels: If you prefer a milder soup, reduce the amount of Cajun seasoning or smoked paprika. You can always add more spice at the end if desired. Make It Ahead: This soup tastes even better the next day as the flavors meld. Make a large batch and store leftovers in the fridge for a quick meal. Garnish Creatively: Beyond green onions and cheese, consider adding crispy bacon bits, sour cream, or a drizzle of hot sauce for an extra flavor kick. {{image_4}} You can easily adjust this soup for different diets. For a dairy-free option, use coconut milk instead of heavy cream. Coconut milk gives a nice, creamy touch and fits well with the soup's flavors. If you're vegan, skip the cream and add more vegetables for extra texture. For those who need gluten-free meals, this soup is naturally gluten-free. Just check your Cajun seasoning for any hidden gluten. Most brands are safe, but it’s good to double-check. Want to change up the flavor? You can add protein to your soup. Chicken, sausage, or beans all work great. If you choose chicken, cook it first and add it in during the last few minutes. For sausage, slice it and sauté it with the veggies. Beans are a simple way to add protein and texture without meat. You can also play with the veggies. Try corn or carrots for a sweet twist. Spinach or kale can add color and nutrition. Just remember to add leafy greens at the end to keep them fresh. If you like heat, you can make it spicier. Add chopped jalapeños or your favorite hot sauce. Start with a little, then taste and adjust. This way, you control the spice level. To balance the heat, add a touch of sweetness. A little brown sugar or honey can help. This will round out the flavors and keep it tasty. To store leftover Cajun potato soup, place it in an airtight container. This keeps the soup fresh and safe. Make sure it cools down before sealing it. The soup will stay good in the fridge for up to three days. If you want to enjoy it later, storing it right is key. Freezing is a great option for this soup. Pour the cooled soup into freezer-safe bags or containers. Be sure to leave some space at the top, as the soup will expand when frozen. It can last for about three months in the freezer. When you’re ready to eat, thaw it in the fridge overnight. Reheat it on the stove over low heat. Stir it often to avoid burning. Making Cajun potato soup ahead of time is a smart choice. The flavors deepen when the soup rests. You can prepare it one day before serving. Just let it cool, then store it in the fridge. When reheating, you may want to add a splash of broth or cream for creaminess. This will help restore its rich texture and flavor. Yes, you can use other potatoes. I recommend Yukon Gold or red potatoes. They add a nice creaminess. Yukon Golds are buttery and smooth. Red potatoes hold their shape well. Both give a different taste and texture. Experiment with what you like best! Cajun seasoning can be spicy, but it varies. It usually includes paprika, garlic, and pepper. These spices create a warm flavor. If you prefer less heat, use less seasoning. You can also choose a mild blend. Taste your dish as you cook. Adjust seasoning to your liking! To thicken the soup, you have a few options. You can blend more potatoes for a creamier texture. Another method is adding a cornstarch slurry. Mix cornstarch with cold water, then stir it in. Let it cook for a few minutes to thicken. Adding cream also makes it richer. Absolutely! Adding meat can enhance flavors. Cooked sausage works great in Cajun potato soup. You can also use diced chicken or ham. Just cook the meat first, then add it with the broth. This adds protein and makes the soup heartier. Enjoy experimenting with your favorite meats! This blog covered how to make a delicious Cajun potato soup. We discussed ingredients, cooking steps, and key tips. Remember to choose the right potatoes and enhance your flavors. Pay attention to texture to get it just right. Explore variations for dietary needs and flavor twists. Store leftovers properly for the best taste. Enjoy this comforting soup now and share it with others. Happy cooking!

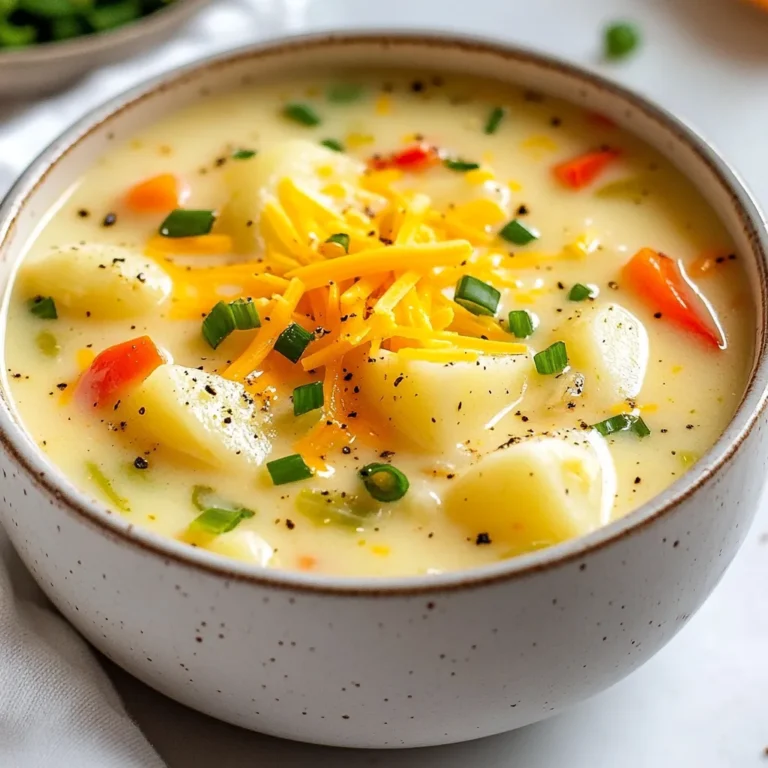
Cajun Potato Soup Hearty and Flavorful Delight

- 1 lb ground beef - 8 crisp tostada shells - 1 cup refried beans (store-bought or homemade) - 1 cup shredded romaine lettuce - 1 cup fresh tomatoes, diced - ½ cup queso fresco, crumbled - ½ cup sour cream - 1 ripe avocado, sliced - Fresh cilantro leaves for garnish - Lime wedges for serving - 1 teaspoon chili powder - 1 teaspoon ground cumin - ½ teaspoon smoked paprika - Salt and freshly ground black pepper to taste - Extra toppings: jalapeños, black olives, or corn - Variations in beans: pinto, black, or white beans - Cheese alternatives: cheddar, feta, or pepper jack cheese Using fresh, high-quality ingredients makes a big difference. The ground beef brings flavor and richness to the tostadas. Crisp tostada shells add a satisfying crunch. Fresh toppings like lettuce, tomatoes, and avocado brighten the dish. Choose your favorite beans to add creaminess and depth. Feel free to mix in different cheeses for a twist. Each topping adds a layer of flavor. This makes your tostadas unique and fun! {{ingredient_image_2}} Heating the Oil and Sautéing Onion Start by heating the olive oil in a large skillet over medium heat. Add the diced onion and minced garlic. Sauté them for 3-4 minutes. You want the onion to soften and turn clear. Browning the Ground Beef Next, raise the heat to medium-high. Add 1 pound of ground beef to the skillet. Use a spatula to break it into small bits. Cook until the beef is brown and not pink anymore, about 5-7 minutes. Adding Spices and Seasoning Now it’s time to add flavor. Sprinkle in 1 teaspoon each of chili powder and ground cumin. Also, add ½ teaspoon of smoked paprika, and season with salt and black pepper. Stir well and cook for another 2-3 minutes. This helps all the flavors mix together. Instructions for Preheating Oven While the beef cooks, preheat your oven to 375°F (190°C). This step ensures your tostadas get crispy. Toasting Tostada Shells Place the tostada shells on a baking sheet in a single layer. Toast them in the oven for about 5 minutes. You want them to be crispy and lightly browned. Spreading Refried Beans Once your tostadas are ready, take them out of the oven. Spread 1 cup of refried beans across each shell. Make sure you cover the whole surface evenly for the best taste. Layering the Ground Beef and Fresh Toppings Next, add the seasoned ground beef mixture on top of the beans. Then, layer on a handful of shredded romaine lettuce and diced fresh tomatoes. Finish this step with crumbled queso fresco. Drizzling with Sour Cream To top it off, add a dollop of sour cream on each tostada. You can also add sliced avocado for a creamy touch. Don’t forget to sprinkle fresh cilantro leaves for color and flavor. Cooking Techniques for Juicy Beef To make juicy beef, start with a hot skillet. Heat olive oil first. Then, sauté diced onion and minced garlic until soft. This adds great flavor. When adding the ground beef, break it apart well. Cook until it is browned, about 5-7 minutes. Don’t rush this step; it makes a big difference. Flavor Enhancements with Spice Adjustments You can boost flavor by adjusting spices. Add more chili powder for heat. If you like smokiness, increase the smoked paprika. Tasting as you go is key. This way, you can find the perfect balance for your taste. Visual Appeal and Garnishing Tips Presentation matters! Use colorful toppings to make each tostada pop. Layer the toppings neatly, so they look great. A sprinkle of cilantro adds a fresh touch. Lime wedges not only look nice but add zest when squeezed on top. Serving Suggestions with Fresh Ingredients Serve tostadas on a large platter for sharing. Fresh ingredients like ripe avocado and diced tomatoes make each bite fresh. You can also set out toppings like sour cream and extra cheese. Let everyone customize their own tostada! Making Your Own Tostada Shells Homemade tostada shells are easy to make. Simply bake corn tortillas in the oven. Brush them with olive oil and bake until crispy. This adds a personal touch and can impress your guests. Suggested Flavorful Bean Recipes For a tasty twist, try different bean recipes. Black beans or pinto beans can add a new flavor. You can season them with garlic and cumin for a rich taste. Or, mash them with lime juice for a fresh kick. Pro Tips Use Fresh Ingredients: Opt for fresh tomatoes and ripe avocados to maximize flavor and texture in your tostadas. Customize Your Spice Level: Adjust the amount of chili powder based on your heat preference to personalize your tostadas. Make Ahead: Prepare the beef mixture and refried beans in advance to save time when assembling your tostadas. Garnish Creatively: Experiment with different garnishes like sliced jalapeños or diced red onions for added flavor and visual appeal. {{image_4}} You can switch up the meat for your tostadas. Ground turkey makes a lean, tasty choice. It cooks much like beef and absorbs flavors well. Ground chicken is another great option. It is light and works well with spices. For a vegetarian option, try lentils or black beans. Cook the lentils with spices to boost flavor. Mashed black beans also add a rich taste to your tostadas. Both options give you a hearty meal without meat. Cheese can change the taste of your tostadas. While queso fresco is classic, try crumbled feta or pepper jack for a twist. These cheeses add creaminess and a bit of spice. Fresh herbs can make your tostadas pop. Try adding chopped cilantro or fresh parsley. You could also use green onions for a mild onion flavor. Slices of jalapeños can add heat if you like spicy food. You can serve tostadas in different ways. Tostada salad bowls are fun and easy. Just layer your ingredients in a bowl instead of on a shell. This lets you mix everything together with each bite. For a party, serve tostadas with salsas and dips. Guacamole or pico de gallo pairs well with the crunchy shells. You can also offer a yogurt dip for a cool contrast to the spices in the meat. To keep your tostadas fresh, store them properly. For leftovers, place the components in separate containers. This way, the tostada shells stay crisp. The ground beef and toppings like lettuce and tomatoes can get soggy if mixed. Use airtight containers for the best results. - Tostada shells: Store in a cool, dry place. - Ground beef: Keep in the fridge for up to 3 days. - Fresh toppings: Use within 1-2 days for best flavor. If you want to freeze your tostada parts, follow these tips. Wrap cooked ground beef tightly in plastic wrap. Place it in a freezer-safe bag. You can freeze it for up to 3 months. For the shells, store them in a sealed bag. They will stay fresh for several months. To enjoy your tostadas again, reheating is key. You want to keep them crispy. The oven is the best method. Preheat it to 375°F (190°C). Place the tostadas on a baking sheet. Heat for about 5 minutes. Check to make sure they are warm and crisp. If you use the microwave, the tostadas might get soggy. If that’s your only option, heat them for just a few seconds. - Oven method: Best for crispiness. - Microwave method: Quick but may lose crunch. It is important to know how long your ingredients last. Fresh toppings like lettuce and tomatoes last about 3-5 days in the fridge. Keep them in a crisper drawer or a sealed bag. Prepared refried beans stay good for about a week in the fridge. Store them in an airtight container. If you make your own, use them within 3-4 days. Always check for any off smell or color changes before using. Tostadas are flat, crispy tortillas. They are often made from corn. In Mexico, tostadas hold a special place in meals. They can be topped with many ingredients. You might find beans, meats, and fresh veggies on them. Tostadas are great for gatherings. They allow each person to build their own dish. This adds fun to any meal! Yes, you can prepare tostadas ahead of time. It helps save time on busy days. Cook the ground beef and store it in the fridge. You can also warm the tostada shells in the oven. Keep the toppings fresh until you serve them. This way, everything stays crispy. For meal prep, assemble the toppings in containers. Just layer them on the shells when you're ready to eat! If you want to swap out refried beans, you have options. You can use black beans or pinto beans. Just mash them for a similar texture. Another choice is hummus for a unique taste. For a lighter option, try guacamole. Each substitute gives a different flavor. Feel free to experiment with your favorite beans! Making tostadas is simple and fun. We covered the key ingredients, like ground beef and spices, and how to cook and assemble them. I shared tips for perfecting your beef and making your tostadas look great. You can explore different proteins and toppings to fit your taste. Plus, I offered advice on storing and reheating leftovers. Tostadas are versatile and ready for any meal. Enjoy them your way and keep experimenting!

Ground Beef Tostadas Easy and Flavorful Recipe

- 2 boneless, skinless chicken breasts, cooked and shredded - 1 ripe avocado, mashed until smooth - 1 cup shredded cheese (cheddar or a Mexican blend work well) - 1 small red onion, finely chopped - 1 bell pepper (your choice of color), diced into small pieces - 2 teaspoons ground cumin - 1 teaspoon garlic powder - 1 teaspoon paprika - Salt and freshly ground black pepper, to taste - 4 large flour tortillas - Olive oil for cooking These main ingredients create a tasty and filling quesadilla. The chicken provides protein, while the avocado adds creaminess. The cheese melts beautifully, making each bite delightful. The onion and bell pepper give crunch and flavor. The spices, like cumin and paprika, bring warmth and depth. - Fresh cilantro - Sour cream - Lime wedges These optional ingredients can enhance your quesadilla experience. Fresh cilantro adds a bright touch. Sour cream offers a cool contrast to the warm quesadilla. Lime wedges give a zesty twist. You can mix and match these to suit your taste. {{ingredient_image_2}} - Start by warming one tablespoon of olive oil in a large skillet over medium heat. - Add the finely chopped red onion and diced bell pepper. - Sauté for about 3-4 minutes until the vegetables become tender and fragrant. - In a mixing bowl, combine the shredded chicken and the mashed avocado. - Add in the ground cumin, garlic powder, paprika, salt, and black pepper. - Stir the mixture well until it is creamy and evenly blended. - Lay one flour tortilla flat on a clean surface. - Spread one quarter of the chicken and avocado mixture over one half of the tortilla. - Sprinkle a quarter of the shredded cheese on top of the mixture. - Carefully fold the tortilla in half over the filling. Press it down gently to seal. - Repeat this process with the remaining tortillas and filling. - In the same skillet you used for the vegetables, add more olive oil if needed. - Heat it over medium heat. Place one folded quesadilla into the skillet. - Cook for 3-4 minutes on each side until it turns golden brown and crispy. - After cooking, remove the quesadilla from the skillet and let it cool for about a minute. - Use a sharp knife to cut it into wedges for easy serving. To shred chicken well, you can use different cooking methods. Each method gives a great result. Here are three options: - Boiling: Cook the chicken in water until tender. This method keeps it moist. - Grilling: Grill the chicken until fully cooked. This adds a nice smoky flavor. - Slow-Cooking: Cook chicken in a slow cooker with some broth. It stays juicy and pulls apart easily. After cooking, let the chicken cool. Use two forks to shred it into bite-sized pieces. This makes for easy mixing in your quesadilla filling. To get your quesadillas crispy, manage your heat and oil wisely. Start with medium heat. Too high can burn the outside before the inside cooks. Use just enough oil to coat the pan lightly. This helps the tortillas crisp up without being greasy. Cook each quesadilla for 3-4 minutes on each side. Look for a golden brown color. If you want extra crunch, press down gently with a spatula while cooking. This helps achieve that perfect texture. Serving your quesadillas well makes them look even more tasty. Cut them into wedges for easy eating. Arrange the wedges in a circle on a colorful plate. Place a small bowl of sour cream in the middle for dipping. For extra flair, add lime wedges and more chopped cilantro on the side. This adds a fresh touch and brightens the plate. Your guests will love the look and flavors! Pro Tips Use Fresh Ingredients: Fresh vegetables and ripe avocados make a significant difference in flavor. Choose the best quality ingredients for the tastiest results. Customize Your Cheese: Experiment with different types of cheese like Monterey Jack or pepper jack for varying flavors and heat levels in your quesadillas. Keep It Hot: Serve the quesadillas immediately after cooking to maintain their crispy texture. They are best enjoyed fresh from the skillet! Dip with Style: Enhance your serving by offering a variety of dips like salsa, guacamole, or a spicy aioli alongside the sour cream for more flavor options. {{image_4}} You can easily make vegetarian quesadillas. Instead of chicken, use grilled vegetables like zucchini, mushrooms, or bell peppers. You can also add black beans for protein. Just sauté the veggies until tender. Mix them with mashed avocado and cheese. This option is just as tasty and filling. To spice things up, add chili powder or jalapeños. These ingredients give your quesadillas a nice kick. You can mix these spices into the chicken and avocado blend. If you like heat, don't hold back! If you're looking for cheese alternatives, try vegan cheese. There are many great options on the market now. You can also experiment with different cheese varieties, like pepper jack for extra spice or mozzarella for a milder taste. Adjusting the cheese can change the whole flavor profile of your quesadillas. To keep your leftover quesadillas fresh, place them in an airtight container. You can store them in the fridge for about three days. If you want to save them for longer, you can freeze them. Wrap each quesadilla in plastic wrap and then place them in a freezer bag. They can last up to three months in the freezer. When you want to eat them, just thaw them in the fridge overnight before reheating. To reheat your quesadillas and keep them crispy, use a skillet. Heat the pan over medium heat. Place the quesadilla in the pan for about three minutes on each side. This way, the outside gets crispy without burning. You can also use an oven. Preheat it to 350°F (175°C). Place the quesadilla on a baking sheet and heat for ten minutes. This method also works well and keeps the filling warm. Enjoy your tasty meal again! Chicken Avocado Quesadillas last about 3 to 4 days in the fridge. Make sure to store them in an airtight container. This keeps them fresh and tasty. You can also wrap them in plastic wrap for extra protection. Yes, you can make quesadillas ahead of time. Prepare them fully, then cool them before storing. You can keep them in the fridge for a few hours or overnight. When you’re ready to eat, just heat them up in a skillet until warm. Some great side dishes to serve with quesadillas include: - Mexican rice - Refried beans - Guacamole - Fresh salsa - A simple salad These sides add more flavor and nutrition to your meal. Yes, you can use corn tortillas! They add a different taste and texture. Just make sure to warm them first, as they are more fragile than flour tortillas. This helps them hold the filling better. Chicken Avocado Quesadillas can be healthy. They contain lean protein from chicken and healthy fats from avocado. You can make them even healthier by adding more veggies or using whole grain tortillas. Just watch the cheese and oil to keep calories in check. Chicken avocado quesadillas are easy and tasty. You need simple ingredients like chicken, avocado, and cheese. Start by cooking your veggies, then mix everything together. After that, assemble and cook the quesadillas until they are golden. Enjoy these delicious options, even with vegetarian twists. Store leftovers safely and reheat for the best taste. You can make this dish your own with garnishes and dips. Get creative and share your tasty creations!

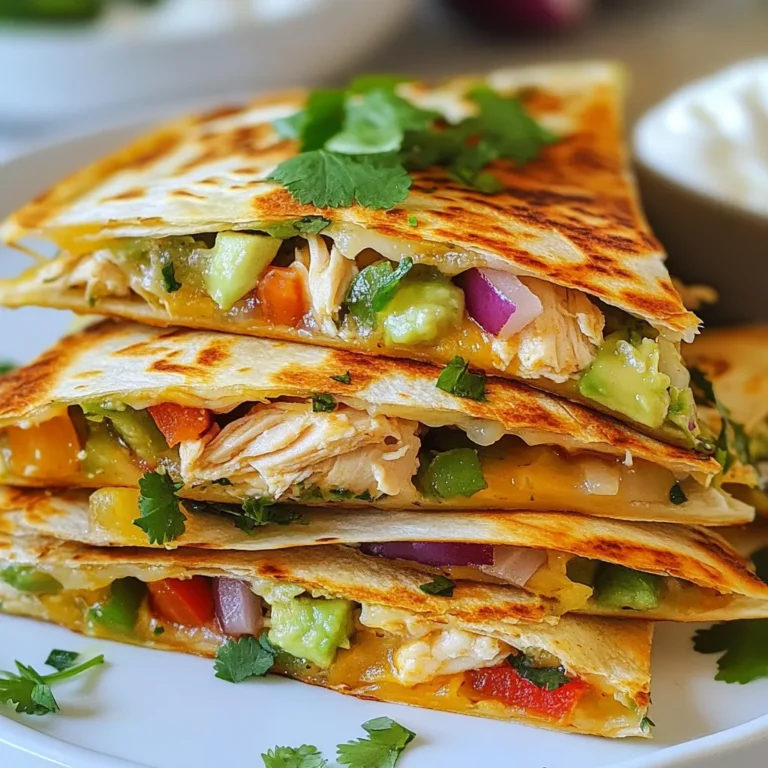
Chicken Avocado Quesadillas Flavorful and Filling Meal

To make delicious cranberry turkey stuffing balls, you need just a few key ingredients: - 2 cups stale bread, cut into cubes - 1 cup cooked turkey, shredded - 1/2 cup dried cranberries, coarsely chopped - 1/4 cup celery, finely chopped - 1/4 cup onion, minced - 1/2 teaspoon dried sage - 1/2 teaspoon dried thyme - 1/4 teaspoon garlic powder - 1 egg, beaten - 1/4 cup chicken broth - Salt and freshly cracked pepper, to taste - 1 tablespoon olive oil (for drizzling) These ingredients work together to create a savory and slightly sweet flavor that everyone loves. When measuring ingredients, accuracy is important for the best results. Use dry measuring cups for the bread and cranberries. For the broth and egg, use liquid measuring cups. A kitchen scale can help if you prefer weight measurements. - Bread: 2 cups = about 6 ounces - Turkey: 1 cup = about 5 ounces - Dried cranberries: 1/2 cup = about 2.5 ounces - Celery: 1/4 cup = about 1 ounce - Onion: 1/4 cup = about 1 ounce - Herbs and spices: Measured in teaspoons for precision - Chicken broth: 1/4 cup = 2 ounces You can easily swap some ingredients if you have dietary needs or preferences. - For a gluten-free option, use gluten-free bread. - Substitute chicken broth with vegetable broth for a vegetarian option. - Use fresh herbs instead of dried for a bolder flavor. - Swap turkey with cooked chicken or even mashed beans for a meat-free version. These substitutions keep the spirit of the recipe while allowing for personal taste. {{ingredient_image_2}} First, you need to preheat your oven to 375°F (190°C). This step is key for even cooking. While it warms up, take a baking sheet and line it with parchment paper. This makes cleanup easy and helps prevent sticking. In a large mixing bowl, gather your main ingredients. Start with 2 cups of stale bread, cut into cubes. Next, add 1 cup of shredded cooked turkey. Then, toss in 1/2 cup of coarsely chopped dried cranberries. Also, include 1/4 cup of finely chopped celery and 1/4 cup of minced onion. Mix everything well to spread out the flavors evenly. Now, it’s time to add some herbs. Sprinkle in 1/2 teaspoon of dried sage, 1/2 teaspoon of dried thyme, and 1/4 teaspoon of garlic powder. Don’t forget a pinch of salt and freshly cracked pepper. Stir until all the herbs and spices blend into the mixture. In another bowl, whisk together 1 beaten egg and 1/4 cup of chicken broth. Pour this over your bread and turkey mix. Gently fold everything together until the bread is moist but not mushy. Using your hands, form small balls about 1.5 inches in diameter. Place them on the baking sheet, leaving space between each ball. Before baking, lightly drizzle the tops of the stuffing balls with 1 tablespoon of olive oil. This will help them brown nicely. Now, put the baking sheet in your oven and bake for 20-25 minutes. They are done when they turn golden brown and feel firm to the touch. Once baked, take them out and let them cool for a few minutes before serving. To boost flavor in your stuffing balls, use fresh herbs. Fresh sage and thyme add brightness. Dried herbs work too, but fresh gives more depth. Consider adding spices like paprika for warmth. A hint of cayenne can add a kick. You can also mix in zest from citrus. Lemon or orange zest brightens the dish. Lastly, don't skip the salt. It brings out all the other flavors. Texture is key for great stuffing balls. You want them crispy outside and moist inside. Start with stale bread for the best texture. Fresh bread can make the stuffing too soggy. When mixing, fold gently to avoid crushing the bread. This keeps some of the cubes intact. If the mixture feels too dry, add more broth. But don’t overdo it; you want them to hold shape when baked. Mixing should be thorough but gentle. Use your hands to combine ingredients. This helps you feel the texture and adjust moisture. When forming the balls, aim for about 1.5 inches in diameter. This size cooks evenly and is easy to handle. Keep them spaced on the baking sheet to allow for even browning. Lightly drizzle olive oil on top before baking. This helps achieve a golden, crispy crust. Pro Tips Use Fresh Herbs: Fresh herbs can enhance the flavor of your stuffing balls. If available, use fresh sage and thyme instead of dried for a more vibrant taste. Mix and Match Add-Ins: Feel free to customize your stuffing balls by adding other ingredients like nuts, diced apples, or sautéed mushrooms for extra texture and flavor. Moisture Control: Ensure the bread mixture is moist but not soggy. If the mixture seems dry, add a little more chicken broth until well combined. Perfect Baking: For an even bake, rotate the baking sheet halfway through cooking. This helps achieve a uniform golden-brown color on all sides. {{image_4}} You can make these stuffing balls vegetarian. Start by swapping the turkey for cooked mushrooms or lentils. Use vegetable broth instead of chicken broth. This keeps the flavor rich and hearty. You can also add in more vegetables like diced bell peppers or carrots. This adds color and nutrients. Herbs can change the taste of your stuffing balls. Try using rosemary or oregano instead of sage and thyme. These herbs add a new twist. You could also go for fresh herbs if you have them. Just remember, fresh herbs have a stronger flavor. Adjust the amount based on your taste. Adding nuts or cheese can make your stuffing balls even better. Chopped walnuts or pecans give a nice crunch. If you prefer cheese, try adding shredded cheddar or feta. Both options add great flavor and richness. Just mix them in with the other ingredients. You’ll enjoy the surprise in each bite! To keep your leftover stuffing balls fresh, place them in an airtight container. Layer them gently to avoid squishing. You can store them in the fridge for up to three days. If you want to keep them longer, freezing is a great option. When you're ready to enjoy the leftovers, preheat your oven to 350°F (175°C). Place the stuffing balls on a baking sheet. Cover them with foil to keep them moist. Heat for about 15-20 minutes. If you like a crispy edge, remove the foil for the last few minutes. To freeze, let the stuffing balls cool completely. Arrange them in a single layer on a baking sheet. Freeze until solid, then transfer to a freezer bag. This way, they won’t stick together. You can keep them frozen for up to three months. When ready to eat, thaw overnight in the fridge before reheating. Yes, you can prepare these stuffing balls ahead of time. Make them up to a day in advance. After forming the balls, place them on a baking sheet. Cover them with plastic wrap and store them in the fridge. When you are ready, simply bake them as directed. This saves time and makes your holiday meal stress-free. Cranberry Turkey Stuffing Balls pair well with many sides. Consider serving them with: - Roasted vegetables - Mashed potatoes - Green bean casserole - A fresh salad - Gravy or cranberry sauce for dipping These sides create a balanced meal and complement the flavors of the stuffing balls well. To check if the stuffing balls are done, look for a golden brown color. They should feel firm to the touch. You can also use a food thermometer. The center should reach 165°F (74°C). Once they reach this temperature, you can be sure they are safe to eat. Enjoy them warm for the best flavor! Cranberry Turkey Stuffing Balls blend tasty ingredients and simple steps. We explored main components, measurements, and swaps for your needs. I outlined how to prep, mix, and bake, ensuring a delicious result. You learned tips for flavor and texture, plus fun variations like vegetarian options and unique add-ins. We also discussed how to store leftovers and answered common questions. Enjoy creating these stuffing balls for your next meal! They will impress your guests and add joy to your table.

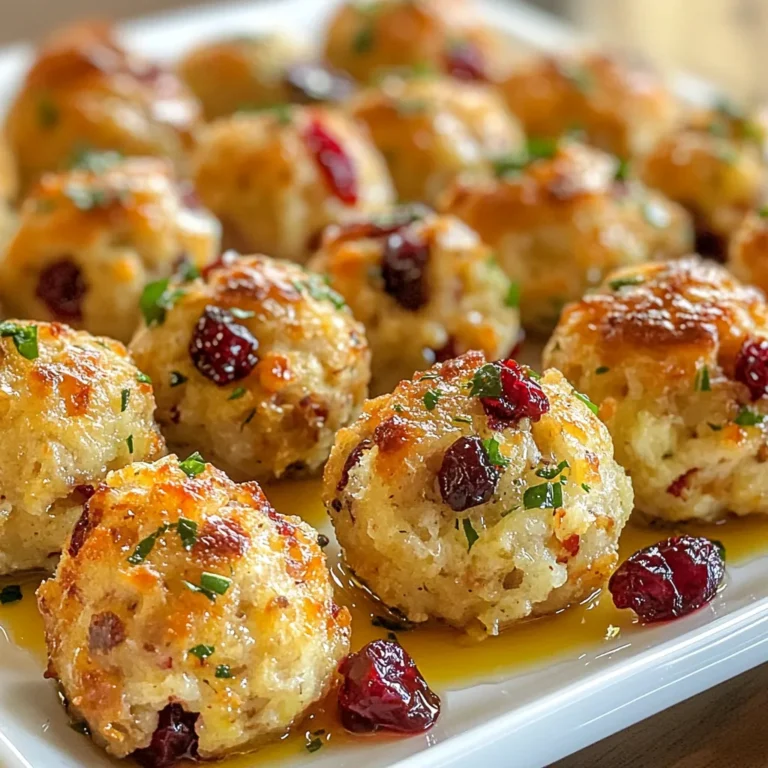
Cranberry Turkey Stuffing Balls Flavorful Holiday Treat

- 1.5 lbs boneless, skinless chicken thighs - 2 cups broccoli florets - 1 red bell pepper, sliced into strips - 1 carrot, thinly sliced into rounds - 1 cup snap peas, trimmed - 1 cup teriyaki sauce (store-bought or homemade) - 2 tablespoons sesame seeds, for garnish - Fresh chopped green onions, for garnish - 3 tablespoons olive oil - 2 cloves garlic, finely minced - 1 teaspoon fresh ginger, minced The key to this dish is using fresh chicken and vibrant vegetables. Chicken thighs work best as they stay juicy when cooked. Broccoli, bell peppers, carrots, and snap peas give a nice mix of colors and tastes. The teriyaki sauce ties it all together, adding sweet and savory notes that everyone loves. Olive oil helps the veggies roast nicely. Garlic and ginger add depth to the flavor. You can use store-bought teriyaki sauce for ease, or make your own for a fresh twist. Consider topping with sesame seeds and green onions for a lovely finish. These little extras bring crunch and color, making your meal pop. {{ingredient_image_2}} - Preheat the Oven Start by preheating your oven to 400°F (200°C). This heat helps roast the chicken and veggies perfectly. - Make the Marinade In a medium bowl, whisk together the teriyaki sauce, minced garlic, minced ginger, and a bit of salt and pepper. This marinade gives the chicken a rich, savory flavor. - How to Marinate Chicken Place the chicken thighs in a large resealable bag or a baking dish. Pour half of the marinade over the chicken. Make sure all pieces are well coated. Seal the bag or cover the dish, then refrigerate for at least 30 minutes. - Best Practices for Marinating For the best flavor, marinate the chicken for up to 2 hours. This allows the flavors to soak in deeply. - Tossing the Vegetables While the chicken marinates, prepare the vegetables. In a large bowl, mix broccoli florets, sliced red bell pepper, thin carrot rounds, and snap peas. Drizzle with olive oil, then add salt and pepper. Toss until coated. - Preparing the Sheet Pan Line a large baking sheet with parchment paper or foil for easy cleanup. Place the marinated chicken thighs on one side of the pan, leaving space. Spread the seasoned vegetables on the other side. - Glazing the Chicken Drizzle the remaining marinade over the chicken thighs. This adds more flavor while roasting. - Roasting Duration and Temperature Roast the pan in the oven for 25-30 minutes. The chicken should reach an internal temperature of 165°F (75°C). The veggies should be tender yet bright. - Ensuring Doneness Use a meat thermometer to check the chicken. This ensures it is safe to eat and juicy inside. The veggies should be vibrant and not soggy. Choosing Teriyaki Sauce Select your teriyaki sauce wisely. A good teriyaki sauce can make or break your dish. Look for one with a balance of sweet and salty. Homemade sauce adds a personal touch. You can mix soy sauce, sugar, garlic, and ginger for a quick blend. Additional Spices and Flavors If you want extra flavor, try adding crushed red pepper flakes. They will bring a mild heat that complements the sweet sauce. Consider adding a splash of rice vinegar for a tangy twist. This will brighten up the dish nicely. Space Management When arranging your chicken and veggies, keep some space on the pan. Overcrowding can lead to steaming instead of roasting. Make sure each piece has room to breathe. This helps them cook evenly and get that nice, crisp texture. Layering for Even Cooking Place chicken on one side and veggies on the other. This helps keep flavors separate while they cook. If adding more veggies, layer them in a single layer. This way, they roast perfectly without becoming soggy. Timing for Vegetables Different veggies cook at different rates. Broccoli florets and snap peas cook faster than carrots. Cut vegetables into uniform sizes for even cooking. This way, all the veggies will be tender at the same time. Avoiding Sogginess To keep your veggies crispy, avoid adding too much oil. A light drizzle is enough. Make sure to toss them well to coat evenly. This helps them roast nicely without getting soggy. Pro Tips Marinate Longer for Flavor: For the best flavor, marinate the chicken for at least 2 hours, or even overnight, to allow the teriyaki sauce to deeply penetrate the meat. Customize Your Veggies: Feel free to swap in your favorite vegetables like bell peppers, zucchini, or asparagus. Just ensure they are cut into similar sizes for even cooking. Use High-Quality Teriyaki Sauce: The flavor of your dish largely depends on the teriyaki sauce. Opt for a high-quality store-bought version or make your own for the best results. Check Chicken Temperature: Always use a meat thermometer to check for doneness; chicken should reach an internal temperature of 165°F (75°C) for safe consumption. {{image_4}} You can switch the chicken thighs for chicken breasts. Chicken breasts cook faster and have less fat. If you like dark meat, stick with thighs for more flavor. If you want to try something new, consider tofu, beef, or shrimp. Tofu absorbs flavors well, making it a great choice. Shrimp cooks quickly and adds a nice twist. Beef offers a rich taste that pairs well with teriyaki sauce. Feel free to mix up the veggies! Use seasonal vegetables for the best taste. Try zucchini, bell peppers, or asparagus in spring. In winter, root veggies like sweet potatoes work well. You can use frozen vegetables too. They are quick and easy. Just make sure to thaw and drain them first. Fresh vegetables often taste better, but frozen can save time. Making your own teriyaki sauce is simple and fun. Combine soy sauce, honey, rice vinegar, and cornstarch. You can adjust the sweetness by adding more or less honey. For a savory kick, try adding garlic or sesame oil. A homemade sauce lets you control the flavors. You can make it as sweet or savory as you like. This freedom helps you create a dish that fits your taste perfectly. For best results, store leftovers in an airtight container. This keeps the teriyaki chicken and veggies fresh. Make sure to let the dish cool down before sealing it. The meal can last about 3 to 4 days in the fridge. Enjoy it during the week for a quick and tasty meal. When reheating, you have two main options: the oven or the microwave. - Oven Method: Preheat your oven to 350°F (175°C). Place the chicken and veggies on a baking sheet. Heat for about 10-15 minutes, or until warm. This method helps keep the texture nice. - Microwave: If you’re short on time, use the microwave. Place your food in a microwave-safe dish. Heat in short bursts, about 1 minute each time. Stir in between to ensure even heating. To keep the dish from getting soggy, avoid overheating. You can freeze portions of this meal for later. - How to Freeze Portions: After cooling, divide the chicken and veggies into freezer-safe bags. Squeeze out as much air as possible before sealing. This helps prevent freezer burn. Label the bags with the date for easy tracking. - Thawing and Cooking Frozen Meal: To use frozen meals, thaw them in the fridge overnight. If you’re in a rush, you can microwave them on the defrost setting. Once thawed, reheat using the oven or microwave methods mentioned earlier. This keeps the flavors fresh and delicious. For the best flavor, marinate the chicken for at least 30 minutes. However, you can let it sit for up to 2 hours. This longer time helps the chicken soak up the teriyaki sauce. The garlic and ginger in the marinade also add great taste. Just remember to keep it in the fridge while it marinates. You can serve this dish with rice or quinoa. Both options soak up the sauce well. You might also enjoy it with a fresh salad or steamed vegetables. If you want something easy, serve it with store-bought fried rice. This adds a nice twist and complements the teriyaki flavors. You can prep this dish ahead of time. Marinate the chicken and cut the veggies a day before. Store them in the fridge until you are ready to cook. This makes weeknight dinners a breeze. When you are ready, just follow the cooking steps. You can enjoy a tasty meal without much fuss! This post covered the tasty sheet pan teriyaki chicken and veggies. You learned about the main ingredients, optional garnishes, and cooking essentials. We also explored the step-by-step process for marinating and roasting. Helpful tips for flavor and storage were provided, ensuring your dish shines. Finally, I shared variations to keep meals fresh and fun. By following these steps, you can create a delicious dish every time. Enjoy your cooking journey!

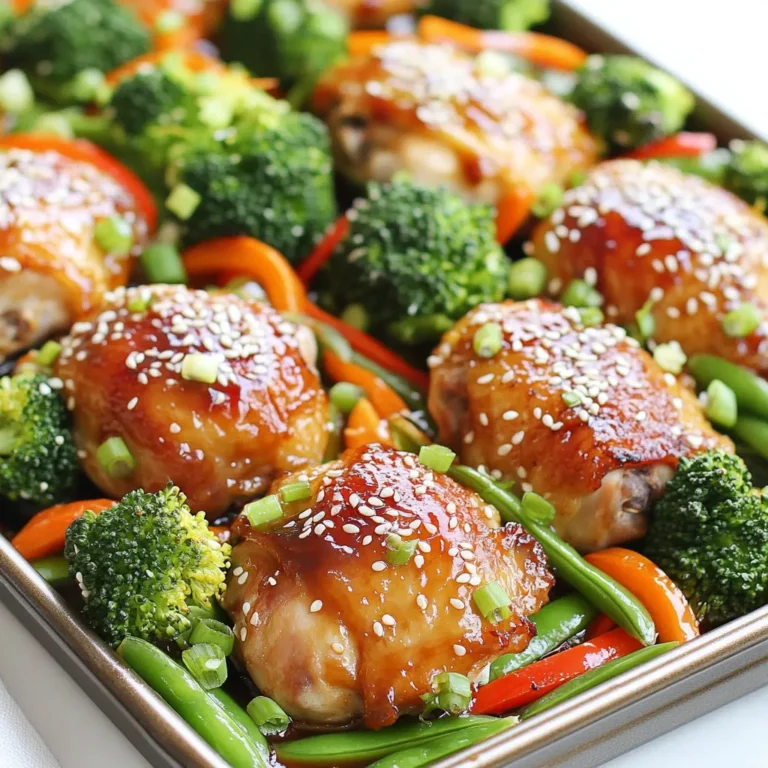
Sheet Pan Teriyaki Chicken & Veggies Savory Dinner

PREV 1 … 14 15 16 … 18 NEXT
easy meal kitchen

explore

DessertsDinnerAppetizersDrinks

Our Policies

  • Cookie Policy
  • Copyright Policy
  • Disclaimer
  • GDPR Policy
  • Terms Of Use
Back to Top
  • About
  • Contact Us
  • Privacy Policy
© 2025 easy meal kitchen