FREE DINNER EBOOK! Get your copy!
  • Cookie Policy
  • GDPR Policy
  • Disclaimer
  • Terms Of Use
  • Visit my other site: Fun Cookie Recipes
easy meal kitchen
  • Home
  • Dinner
  • Desserts
  • Drinks
  • Appetizers
  • Contact
  • About
  • Privacy Policy
  • Home
  • Dinner
  • Desserts
  • Drinks
  • Appetizers
  • Contact
  • About
  • Privacy Policy
  • Cookie Policy
  • GDPR Policy
  • Disclaimer
  • Terms Of Use
Visit my other site: Fun Cookie Recipes

HOME / CATEGORIES /

Latest

- 1 cup pastina (such as star-shaped pasta or acini di pepe) - 4 cups low-sodium vegetable or chicken broth - 1 medium onion, finely chopped - 2 cloves garlic, minced - 2 medium carrots, diced into small pieces - 1 celery stalk, diced - 1 cup fresh spinach, roughly chopped - 1 teaspoon dried Italian herbs (a mix of oregano, basil, and thyme) - 2 tablespoons extra-virgin olive oil - Salt and freshly ground black pepper to taste - 1/4 cup grated Parmesan cheese (optional for a richer flavor) - Fresh basil leaves for garnish - Pastina: A small pasta that cooks quickly. One cup is enough for four servings. - Broth: Use four cups of low-sodium broth for a clean taste. - Onion: A medium onion brings flavor. Chop it finely for quick cooking. - Garlic: Use two cloves. Mince them to release their strong flavor. - Carrots and Celery: Dice into small pieces. This helps them soften fast. - Spinach: One cup, roughly chopped, adds color and nutrients. - Dried Italian Herbs: One teaspoon gives a nice blend of flavor. - Olive Oil: Two tablespoons help sauté the veggies. - Salt and Pepper: Use to taste for a balanced flavor. - Parmesan Cheese: Optional, but adds creaminess and depth if used. - Basil Leaves: Fresh basil enhances the soup's look and taste. - Lemon Juice: A splash brightens the soup. - Red Pepper Flakes: Add for a touch of heat. - Peas: Toss in a half-cup for added sweetness and color. - Zucchini: Dice and add for extra veggies. - Chicken: Diced cooked chicken can make this soup heartier. This list keeps it simple. You can mix and match to suit your taste. Enjoy the process of making this comforting soup! {{ingredient_image_2}} To start, gather all your ingredients. This makes cooking smooth and easy. You will need: - 1 cup pastina (like star-shaped pasta or acini di pepe) - 4 cups low-sodium vegetable or chicken broth - 1 medium onion, finely chopped - 2 cloves garlic, minced - 2 medium carrots, diced - 1 celery stalk, diced - 1 cup fresh spinach, roughly chopped - 1 teaspoon dried Italian herbs (oregano, basil, and thyme) - 2 tablespoons extra-virgin olive oil - Salt and freshly ground black pepper to taste - 1/4 cup grated Parmesan cheese (optional) - Fresh basil leaves for garnish Chop your vegetables before cooking. This helps you stay organized and ready. 1. Heat the olive oil in a large pot over medium heat. 2. Add the chopped onion, diced carrots, and diced celery. Sauté for 5-7 minutes. Stir often until the vegetables soften. 3. Add the minced garlic and dried herbs. Sauté for another minute. Allow the lovely smells to fill your kitchen. 4. Pour in the broth and raise the heat to a boil. 5. Once boiling, add the pastina. Reduce the heat and let it simmer for 6-8 minutes. Stir occasionally to keep it from sticking. 6. After the pastina cooks, stir in the spinach. Cook for another 2-3 minutes until the spinach wilts. 7. Taste your soup. Add salt and pepper as you like. 8. If you want creaminess, stir in Parmesan cheese. Let it melt into the soup. Ladle the hot soup into bowls. Garnish with fresh basil leaves for a nice look. For extra flavor, drizzle a bit of olive oil on top. This soup pairs well with crusty bread. Enjoy every comforting spoonful! Cooking Italian Pastina Comfort Soup is simple. Start by sautéing the onion, carrots, and celery in olive oil. This step adds depth to the soup. Cook them until the onion is soft and clear. Then, add garlic and Italian herbs. This brings out rich flavors. When you add the broth, let it boil. This helps the pastina cook well. Remember to stir often. It keeps the pasta from sticking. Once done, add spinach last. This keeps it bright and fresh. To enhance the flavor, always use fresh herbs. Fresh basil at the end gives a nice touch. If you like cheese, add grated Parmesan. It melts beautifully into the soup. You can also squeeze a bit of lemon juice. This adds a nice zing. If you want more flavor, add a dash of red pepper flakes. They give a warm kick without overpowering the dish. One common mistake is overcooking the pastina. Keep an eye on it. It should be tender but firm. Avoid adding too much salt early on. Taste as you go. Lastly, don’t skip the fresh basil. It balances the flavors and makes the soup pop. Pro Tips Use Fresh Ingredients: Fresh vegetables and herbs will enhance the flavor of your soup significantly, making it more vibrant and delicious. Customize the Broth: Feel free to use homemade broth for a richer flavor or to add different spices to adjust the taste to your liking. Perfecting the Pastina: Keep an eye on the pastina while it cooks, as it can become mushy if overcooked. Aim for al dente for the best texture. Add a Protein: To make this soup heartier, consider adding shredded chicken, beans, or tofu for added protein and nutrition. {{image_4}} You can easily swap ingredients in Italian pastina comfort soup. For a vegan dish, use vegetable broth and skip the cheese. Instead of pastina, try quinoa or rice for a gluten-free option. If you want more protein, add lentils or chickpeas. These swaps keep the soup tasty while meeting diverse dietary needs. One great way to change this soup is by adding seasonal veggies. In spring, toss in fresh asparagus or peas. In summer, add zucchini or tomatoes for brightness. In fall, use butternut squash or pumpkin. In winter, root veggies like parsnips or turnips work well. These additions not only change the flavor but also bring color and nutrition. If you love meat, consider adding chicken or sausage. For chicken, use cooked, shredded meat. Stir it in when you add the spinach, letting it heat through. For sausage, slice it and brown it in the pot before adding other veggies. This adds a rich flavor to the soup. Whether you choose chicken or sausage, your soup becomes heartier and more filling. To keep your Italian Pastina Comfort Soup fresh, store it in an airtight container. Let the soup cool down first. This helps avoid steam buildup. Place it in the fridge if you plan to eat it within three days. For longer storage, freezing is a better option. When you're ready to enjoy your leftovers, take the soup out of the fridge. Pour it into a pot and heat it over medium heat. Stir it often to prevent sticking. If the soup seems thick, add a little broth or water to reach your desired consistency. You can also use a microwave if you're in a hurry. Heat it in a microwave-safe bowl for one to two minutes. Stir halfway for even heating. Freezing your soup is a great way to save it for later. Use freezer-safe containers or bags. Leave some space at the top, as liquids expand when frozen. Label the container with the date. Your soup can last up to three months in the freezer. When you're ready to eat it, thaw it overnight in the fridge. Reheat as mentioned above. Enjoy the comfort of this warm soup anytime! Pastina is tiny pasta, often shaped like stars or little pearls. It cooks fast and adds a soft texture to soups. This makes it perfect for a comforting bowl of Italian Pastina Comfort Soup. I love using star-shaped pastina or acini di pepe in my soup. They are fun to eat and look great in a bowl. You can make this soup your own! Try adding different veggies like peas or zucchini. You can also swap the spinach for kale for a heartier taste. If you want more protein, add cooked chicken or beans. For a spicy kick, stir in red pepper flakes. This recipe is flexible, so feel free to experiment! This soup goes well with crusty bread. A slice of garlic bread or a warm baguette is perfect. You can also serve a light salad on the side. A simple green salad with lemon dressing adds freshness. If you want more cheese, sprinkle some Parmesan on top before serving. Enjoy your meal! This blog post covered important parts of making Italian Pastina Comfort Soup. We discussed the key ingredients, step-by-step cooking guide, and tips for better flavor. You learned how to avoid common mistakes and explored variations for different diets. Proper storage and reheating rules will keep your soup tasty. Enjoy making this soup for any meal. With these details, you can create a warm bowl of comfort.

Italian Pastina Comfort Soup Hearty and Nourishing Dish

- 1 pound ground chicken - 1/2 cup breadcrumbs - 1/4 cup fresh cilantro, finely chopped - 2 green onions, thinly sliced - 2 cloves garlic, minced - 1 tablespoon fresh ginger, grated - 2 tablespoons Thai red curry paste - 1 tablespoon fish sauce - 1 tablespoon soy sauce - 1 egg, lightly beaten - 1 tablespoon lime juice - 1/2 teaspoon salt - 1/4 teaspoon black pepper - Cooking spray or olive oil, for greasing In this recipe, ground chicken acts as the main protein. It brings a light flavor that pairs well with fresh herbs and spices. I love using fresh cilantro and green onions for brightness. Garlic and ginger add depth, while Thai red curry paste gives the meatballs their signature kick. Fish sauce and soy sauce enhance the umami profile. An egg binds the mixture, keeping it moist. The lime juice adds a nice zing that cuts through the richness. - Substitute ground turkey or beef for chicken. - Use gluten-free breadcrumbs for a gluten-free option. - Consider a spicy dipping sauce made with sriracha and lime. - Try peanut sauce for a creamy twist. If you want to switch things up, you can use ground turkey or beef instead of chicken. If you need a gluten-free option, just use gluten-free breadcrumbs. For dipping sauces, sriracha mixed with lime juice adds heat. If you prefer creamy, a peanut sauce will take it to the next level. - Mixing bowl and spoons - Baking sheet - Measuring cups and spoons You will need a mixing bowl and some spoons to combine the ingredients. A baking sheet is essential for cooking the meatballs evenly. Make sure you have measuring cups and spoons to get the amounts just right. This will help ensure that your meatballs turn out perfectly every time. {{ingredient_image_2}} First, you need to preheat your oven to 400°F (200°C). This step helps to cook the meatballs evenly. While the oven heats up, grab a baking sheet. Line it with parchment paper. This keeps the meatballs from sticking. Lightly spray it with cooking spray or drizzle a bit of olive oil on top. This will give the meatballs a nice texture. In a big mixing bowl, it's time to bring it all together. Add the ground chicken, breadcrumbs, and fresh herbs. Toss in the cilantro, green onions, minced garlic, and grated ginger. Don’t forget the Thai red curry paste, fish sauce, soy sauce, beaten egg, lime juice, salt, and black pepper. Use your hands to mix everything gently. Make sure not to overmix. If you do, the meatballs can become hard. Now, you’ll shape the meatballs. With clean hands, take small bits of the mixture. Roll them into 1-inch balls. Place them on the baking sheet, leaving space between each one. This helps them cook properly. Once all the meatballs are on the sheet, give the tops a light spray of cooking spray. This helps them get that beautiful golden color. Bake the meatballs in your preheated oven for about 20 to 25 minutes. You will know they are ready when they turn golden brown and are fully cooked. For a crispy finish, switch the oven to broil. Broil the meatballs for 2 to 3 minutes. Keep a close eye on them to avoid burning! Finally, take them out and let them cool a bit before serving. To get tender meatballs, avoid overmixing. When you mix the chicken and other ingredients, do it gently. Overmixing makes the meatballs tough. Just combine until everything is mixed well. This keeps them soft and juicy. You can adjust the spices and heat levels to fit your taste. If you like more heat, add more Thai red curry paste. For a milder flavor, use less. You can also try adding fresh herbs like basil or mint for a different twist. Experiment and find your perfect flavor! Serving your meatballs well makes them more appealing. Arrange them on a nice plate. Add extra cilantro and lime wedges for a pop of color. A simple dipping sauce can elevate the dish. Mix soy sauce, lime juice, and honey for a tasty dip. It balances sweetness and saltiness, making each bite even better! Pro Tips Keep It Moist: Adding a splash of coconut milk to the meatball mixture can enhance moisture and flavor, giving your meatballs an authentic Thai taste. Use Fresh Ingredients: Whenever possible, opt for fresh herbs like cilantro and lime. They significantly boost the flavor profile of your meatballs. Experiment with Spices: Don't hesitate to adjust the level of Thai red curry paste based on your spice preference. Start with a smaller amount and add more to taste. Perfectly Cooked: To ensure your meatballs are cooked through without drying out, use a meat thermometer. Aim for an internal temperature of 165°F (74°C). {{image_4}} You can change up the protein in these meatballs. Try ground turkey or pork for a twist. If you want a plant-based option, use lentils or chickpeas. For a binding agent, swap breadcrumbs with cooked rice or oats. These changes keep the flavor fun and fresh. Serve your meatballs with a spicy peanut sauce for a tasty kick. You can also pair them with sweet chili sauce for a milder option. Fresh veggies like cucumber or carrots add crunch. Serve the meatballs on a bed of rice or noodles for a full meal. To make this dish gluten-free, use gluten-free breadcrumbs. You can also use tamari instead of soy sauce. If you like heat, add more Thai red curry paste or fresh chili. These simple swaps keep everyone happy at the table. To store meatballs for short-term use, let them cool first. Place cooked meatballs in an airtight container. You can keep them in the fridge for up to four days. If you want to reheat, just warm them in the oven or microwave until hot. Freezing is a great way to keep your meatballs fresh. To do this, let the meatballs cool completely. Then, arrange them in a single layer on a baking sheet. Freeze them for about an hour. Once frozen, place them in a freezer bag or container. They can last up to three months in the freezer. When you’re ready to eat, bake straight from the freezer. Just add a few extra minutes to the cook time. For best taste and safety, check your meatballs often. In the fridge, eat them within four days. In the freezer, use them within three months. Always check for any signs of spoilage, like a funny smell or strange color. If you see any, it’s best to throw them away. Check the meatballs for doneness by using a meat thermometer. The center should reach 165°F (74°C). If you don't have a thermometer, cut one open. The meat should be white with no pink inside. The outside should be golden brown. Yes, you can use other meats. Ground turkey works well. Pork or beef are also great choices. Just keep the same seasoning and ingredient amounts for best results. These meatballs pair well with many sides. Serve them with jasmine rice for a classic touch. Fresh veggies, like cucumber or bell peppers, add crunch. You can also try a sweet chili sauce for dipping. A simple salad can brighten the meal too. You can now make delicious Thai baked chicken meatballs with ease. We covered the key ingredients, kitchen tools, and options for variations that suit your needs. With simple steps, you can mix, shape, and bake meatballs that impress. Remember to store leftovers properly and enjoy your creations later. Make the recipe yours by trying different herbs or dipping sauces. With these tips, you can serve up mouthwatering meatballs every time. Experiment, taste, and enjoy this fun and tasty dish!

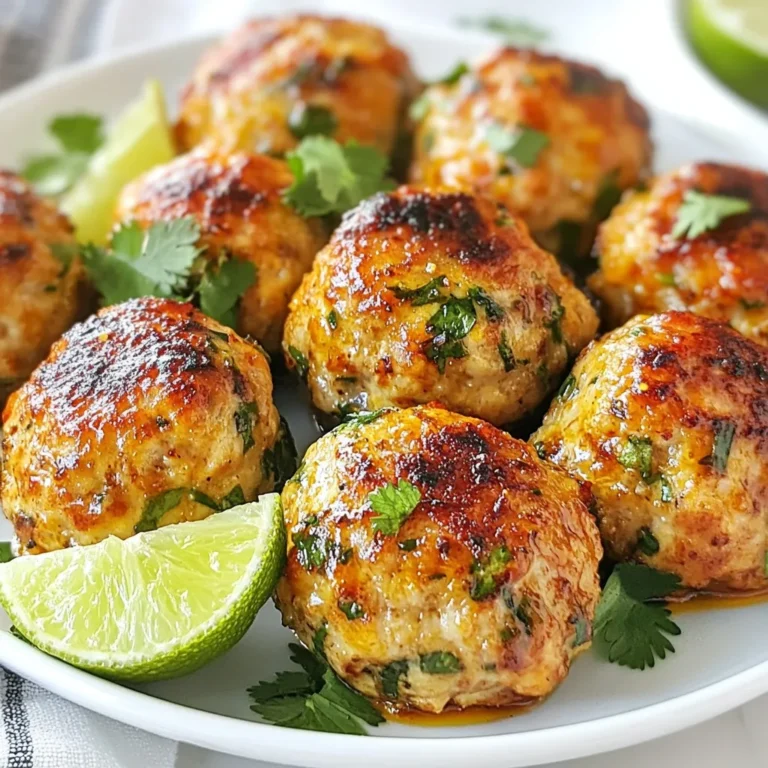
Thai Baked Chicken Meatballs Delicious and Easy Recipe

- 4 cups whole milk - 1 cup heavy cream - 4 large eggs - 3/4 cup granulated sugar - 1 teaspoon pure vanilla extract - 1 teaspoon ground cinnamon - 1/4 teaspoon ground nutmeg - 1/4 teaspoon ground ginger - 1/4 cup pure pumpkin puree - Whipped cream (for garnish) - Additional ground cinnamon or nutmeg (for garnish) Whole milk and heavy cream create a rich and creamy base. They give the eggnog its smooth texture. Eggs add protein and help thicken the mixture. Sugar provides sweetness, balancing the spices. Vanilla extract adds warmth and depth, enhancing the flavor. Spices like cinnamon, nutmeg, and ginger bring warmth, making this drink cozy. Pumpkin puree not only adds flavor but also provides vitamins and fiber. Whipped cream on top makes it extra festive and fun! If you need a lighter version, use low-fat milk instead of whole milk. You can swap heavy cream for half-and-half. If you want a vegan option, try almond or oat milk and a plant-based cream. For sweetness, maple syrup or honey work well instead of sugar. If you cannot find pumpkin puree, use sweet potato puree. You can mix in vanilla bean or pumpkin spice blend for a twist! {{ingredient_image_2}} 1. First, gather your ingredients. You'll need whole milk, heavy cream, eggs, sugar, and spices. 2. In a medium saucepan, mix the whole milk and heavy cream. Heat it on medium-low. Stir it often to keep it from burning. You want it hot, but don’t let it boil. 3. While the milk heats, crack the eggs into a bowl. Add the granulated sugar. Whisk them together until smooth and light in color. 4. When the milk is hot, pour about 1 cup into the egg mixture. Keep whisking as you pour. This tempers the eggs, warming them slowly. 5. Next, pour the egg mixture back into the saucepan. Stir it well into the remaining hot milk. 6. Turn the heat down to low. Cook while stirring for 5 to 7 minutes. You want it to thicken but not boil. 7. When it thickens, take it off the heat. Add vanilla, cinnamon, nutmeg, ginger, and pumpkin puree. Stir until everything blends well. 8. Let the eggnog cool at room temperature. Then, put it in the fridge for at least 2 hours. 9. When you're ready, whisk it again to mix any settled bits. Pour it into glasses. 10. Top each glass with whipped cream and a sprinkle of cinnamon or nutmeg. - Always whisk while pouring hot liquid into eggs. This helps prevent cooking the eggs too fast. - Pour slowly to ensure even mixing. This keeps the eggs smooth and creamy. - Use a thermometer if you can. Aim for milk around 160°F, which is hot but not boiling. - Heat the milk on medium-low. This keeps it safe and helps it warm evenly. - Cook the eggnog on low heat. Stir constantly for 5 to 7 minutes. - Check for thickness. It should coat the back of a spoon when ready. To make the best pumpkin spice eggnog, stick to these tips: - Use fresh whole milk and heavy cream for a rich taste. - Temper the eggs slowly. This avoids scrambling them. - Stir constantly while cooking to keep the mix smooth. - Let the eggnog chill completely for better flavor. Here are some common mistakes to watch for: - Don’t boil the milk and cream; it can ruin the texture. - Avoid rushing the tempering step; it’s key for smoothness. - Skipping the chilling time can lead to a less tasty drink. - Forgetting to whisk before serving can result in uneven flavors. Make your eggnog shine with these fun ideas: - Serve in clear glasses to show off the creamy color. - Add a sprinkle of cinnamon or nutmeg on top for flair. - Include cinnamon sticks as stirring tools for added spice. - Offer whipped cream on the side for guests to add. These tips will help you create a delightful pumpkin spice eggnog for cozy evenings. Pro Tips Chill the Ingredients: For a creamier texture, make sure your milk and cream are well chilled before starting the recipe. Use Fresh Spices: Ground spices lose potency over time; using fresh spices will enhance the flavor of your eggnog significantly. Adjust Sweetness: If you prefer a less sweet eggnog, start with 1/2 cup of sugar and adjust to taste after mixing in the spices. Experiment with Alcohol: For an adult version, consider adding rum, bourbon, or brandy to your eggnog for a festive kick. {{image_4}} You can make a creamy, dairy-free version. Use almond milk or coconut milk instead of whole milk. Replace heavy cream with full-fat coconut cream. This keeps the rich texture while being friendly for those who avoid dairy. Always check labels to ensure no added sugars or flavors sneak in. You can still enjoy the same tasty spices and pumpkin flavor. Add some fun by mixing in a splash of rum or bourbon. These spirits pair well with the spices and pumpkin. If you prefer a lighter drink, try adding a bit of spiced rum. This gives a warm kick. For a festive twist, consider adding flavored liqueurs, like hazelnut or coffee, to enhance the overall taste. Mix things up by adding chocolate or caramel. Stir in some chocolate syrup for a sweet touch. If you want a rich flavor, drizzle in caramel sauce. You can also sprinkle cocoa powder on top for extra flair. Each variation brings a new taste that makes your eggnog even more delightful. Feel free to get creative with toppings and flavors! To keep your pumpkin spice eggnog fresh, pour it into a clean, airtight container. Make sure the lid is tight. This helps prevent air and moisture from spoiling it. Store it in the fridge. It’s best to use it within a few days for the best flavor. In the fridge, your eggnog stays good for about three to five days. If you want to keep it longer, you can freeze it. When freezing, use freezer-safe containers. Leave some space at the top, as liquids expand when frozen. Frozen eggnog can last up to three months. When you're ready to enjoy your eggnog again, take it out of the fridge or freezer. If it’s frozen, let it thaw overnight in the fridge. For reheating, warm it gently on low heat in a saucepan. Stir it often to prevent it from sticking. You can also serve it cold. Just give it a good stir to mix up any settled ingredients. Enjoy your cozy drink! Pumpkin spice eggnog is a creamy drink made with milk, eggs, and pumpkin. It has warm spices like cinnamon and nutmeg. This drink is perfect for cozy evenings and holiday gatherings. The blend of flavors gives it a rich, festive taste. You can enjoy it cold or warm, making it a versatile treat. Yes, you can make pumpkin spice eggnog in advance. It tastes even better after chilling for a few hours. I suggest making it a day ahead. Just store it in the fridge, covered. Give it a good whisk before serving to mix everything well again. You can find pumpkin spice eggnog in many grocery stores during fall. Check the dairy section or seasonal aisles. Some stores may offer it year-round. You can also look for it at specialty food shops. If you can't find it, making it at home is always a great option! Pumpkin spice eggnog is rich and tasty but not very low-calorie. It has whole milk, cream, and sugar, which can add up. However, it does contain pumpkin, which is nutritious. Pumpkin is high in fiber and vitamins. Enjoy it in moderation, and consider it a special treat! This article covered how to make Pumpkin Spice Eggnog. We discussed the key ingredients and their benefits, along with tasty substitutions. I provided step-by-step instructions for preparation and cooking. We focused on tips to avoid common mistakes and how to serve this drink well. You also learned some fun variations and storage tips. In short, making Pumpkin Spice Eggnog is fun and easy. Enjoy making it your own!

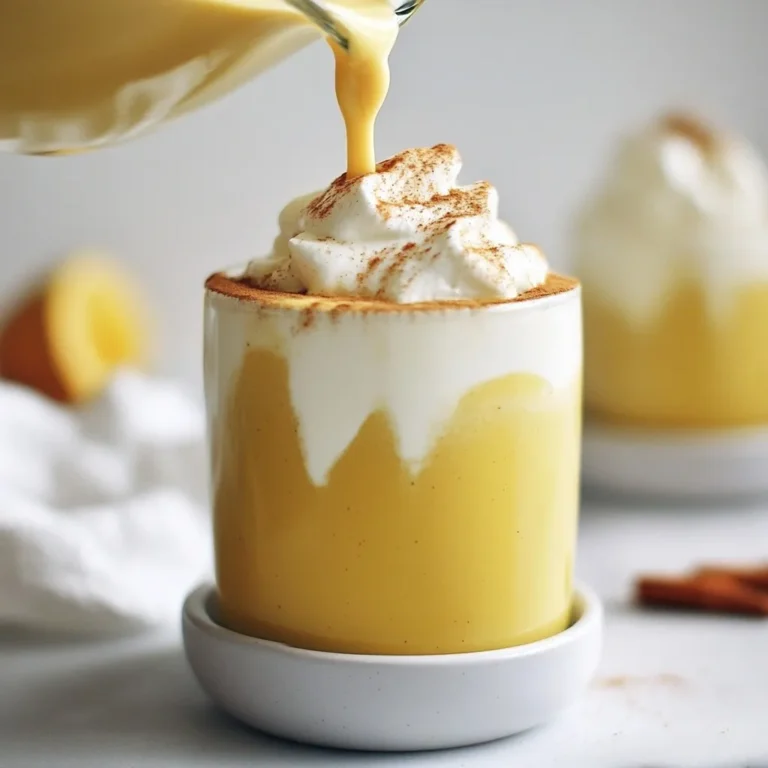
Pumpkin Spice Eggnog Delight for Cozy Evenings

- 4 breakfast sausages, casings removed - 4 large eggs - 1 cup shredded cheddar cheese - 1 cup fresh spinach, finely chopped - 1 tablespoon olive oil - Salt and black pepper to taste - 1 package of puff pastry (contains 2 sheets, thawed) - 1 egg (for egg wash) You can change this recipe to fit your taste. Here are some fun ideas: - Use turkey or chicken sausage for a leaner option. - Add diced bell peppers or onions for extra flavor. - Swap cheddar cheese for mozzarella or pepper jack. - Try fresh herbs like chives or parsley for a fresh touch. This recipe offers great nutrition. Here are some key points: - Each roll packs protein from eggs and sausage. - Spinach adds vitamins and minerals, helping your health. - Cheddar cheese provides calcium for strong bones. - Puff pastry gives a delightful crunch while keeping it fun. These rolls are not just tasty; they also give you energy to start your day right. Enjoy making them your own! {{ingredient_image_2}} Start by preheating your oven to 400°F (200°C). Line a baking sheet with parchment paper. This step prevents sticking and makes cleanup easy. In a skillet, heat one tablespoon of olive oil over medium heat. Remove the casings from the breakfast sausages and add the meat to the skillet. Use a wooden spoon to break the sausage into smaller pieces. Cook for about 5 to 7 minutes until it's browned and no longer pink. Next, whisk four large eggs in a bowl with a pinch of salt and black pepper. Pour this egg mix into the skillet with the sausage. Add one cup of finely chopped spinach and stir constantly. Cook until the eggs are fully scrambled, about 3 to 4 minutes. Finally, fold in one cup of shredded cheddar cheese until it melts into the filling. On a lightly floured surface, roll out the thawed puff pastry sheets. Make sure they are smooth. Cut each sheet into four equal squares, giving you a total of 8 squares. Take a spoonful of the sausage and egg mixture and place it at the center of each pastry square. Be careful not to overfill! Gently fold the corners of each square over the filling. Pinch the edges tightly to seal them. This step keeps the filling inside while baking. In a small bowl, beat one egg. Brush this egg wash over the tops of the rolls with a pastry brush. This will give the rolls a glossy finish when baked. Place the rolls on the lined baking sheet, leaving space between them. Bake in the preheated oven for 15 to 20 minutes. Look for that golden brown color and puffed-up shape. Once baked, let the rolls cool for a few minutes on the baking sheet. Then transfer them to a wire rack or serving plate. Enjoy your delicious sausage egg breakfast rolls! To cook the sausage well, break it into small pieces. This helps it brown evenly. Use medium heat and stir often. This keeps the sausage from sticking. When cooking the eggs, whisk them until smooth. Add salt and pepper for taste. Mix in spinach for extra nutrition. Cook until the eggs are set but still soft for best texture. When you work with puff pastry, keep it cool. If it gets too warm, it can stick and tear. Roll it out on a floured surface for less mess. Cut the pastry into even squares. This makes filling them easier. When sealing the rolls, pinch the edges tightly. This helps keep the filling inside while baking. To boost the flavor of your rolls, try adding herbs. Fresh herbs like parsley or chives work well. You can also mix in spices such as paprika or garlic powder. For a kick, add diced jalapeños or hot sauce to the filling. Pair the rolls with a sweet or tangy sauce for dipping. This adds another layer of taste and fun! Pro Tips Use Fresh Ingredients: Always opt for fresh spinach and high-quality sausages to enhance the flavor of your breakfast rolls. Don’t Overfill: Be careful not to overfill the pastry squares. This helps ensure they seal properly and bake evenly without leaking. Experiment with Cheese: Try different kinds of cheese like feta or pepper jack for a unique flavor twist that complements the sausage and egg. Serve Warm: For the best experience, serve these rolls warm out of the oven. They taste even better when enjoyed fresh! {{image_4}} You can make these rolls vegetarian by swapping the sausage. Use plant-based sausage or cooked mushrooms. Both options add a great taste. You can also use crumbled tofu for extra protein. Add spices like garlic powder for more flavor. You won’t miss the meat! Cheddar cheese is tasty, but you can switch it up. Try mozzarella for a gooey texture. Feta cheese adds a nice salty kick. If you want a creamy touch, use cream cheese. Each choice gives a unique twist to your rolls. Fresh herbs can boost the flavor of your rolls. Add chopped parsley or basil for freshness. A sprinkle of red pepper flakes can bring heat. Try mixing in some garlic powder or onion powder for depth. Experiment with your favorite spices to make it your own! To keep your sausage egg breakfast rolls fresh, store them in an airtight container. Let the rolls cool completely before sealing them. Place parchment paper between layers to avoid sticking. They will last up to three days in the fridge. If you want to keep them longer, freezing is a great option. For best results, reheat the rolls in an oven. Preheat your oven to 350°F (175°C). Place the rolls on a baking sheet. Heat them for about 10 to 15 minutes until warm. This will help keep the pastry crispy. You can also use a microwave, but the pastry may get soft. Heat them for about 30 seconds to 1 minute. To freeze your breakfast rolls, let them cool completely. Wrap each roll tightly in plastic wrap or foil. Then, place them in a freezer bag. Make sure to remove as much air as possible. They can stay in the freezer for up to three months. When you are ready to eat, just follow the reheating instructions. Yes, you can prepare these rolls ahead of time. Make the filling and fill the pastry, then wrap them tightly. Store them in the fridge for up to one day. You can bake them fresh when ready. This saves time on busy mornings. These rolls pair well with many sides. Fresh fruit, like berries or melon, adds a sweet touch. You can also serve them with yogurt for creaminess. For a spicy kick, add hot sauce or salsa. A light salad can also brighten the meal. To change servings, simply adjust the ingredients. Each sausage and egg mixture fills two pastry squares. If you want more rolls, double the ingredients. For fewer, use half. Keep the cooking times the same. Just watch the rolls closely as they bake. Sausage Egg Breakfast Rolls combine tasty ingredients and easy steps for a quick meal. You can customize with veggies, cheeses, or spices for unique flavors. Remember to store extras properly for the best quality. If you follow the tips for cooking and handling, your rolls will turn out great every time. These rolls fit different diets, making them perfect for everyone. Enjoy experimenting with variations and sharing them with friends and family!

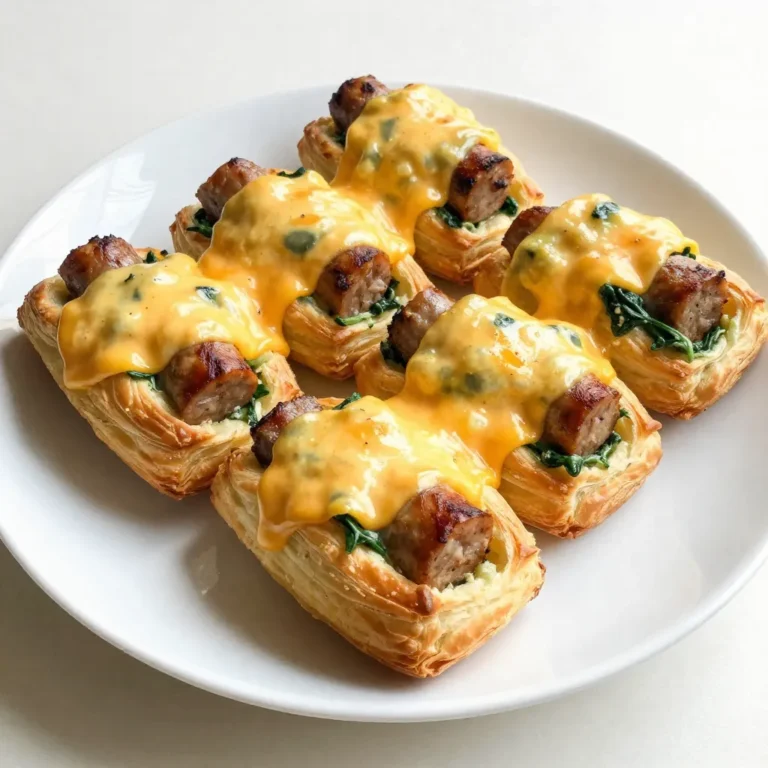
Sausage Egg Breakfast Rolls Quick and Tasty Recipe

To make fudgy chocolate peanut butter brownies, you will need: - 1 cup creamy peanut butter - 1 cup granulated sugar - 1/2 cup light brown sugar, packed - 4 large eggs - 1 teaspoon vanilla extract - 1 cup all-purpose flour - 1/2 cup unsweetened cocoa powder - 1/4 teaspoon salt - 1 cup dark chocolate chips - 1/2 cup chopped peanuts (optional for garnish) You can swap some ingredients if needed. For a nut-free version, use sun butter instead of peanut butter. If you want to lower sugar, try using coconut sugar. You can also use applesauce as an egg substitute. Just use 1/4 cup of applesauce for each egg. If you want gluten-free brownies, use almond flour or a gluten-free flour blend instead of all-purpose flour. Using high-quality ingredients makes a big difference. Fresh peanut butter adds creaminess and flavor. Choose dark chocolate chips with at least 60% cocoa for a rich taste. Fresh eggs help create a smooth batter. Good cocoa powder deepens the chocolate flavor. Always use fresh flour and sugar for the best texture. Quality ingredients lead to fudgy, delicious brownies that impress everyone! {{ingredient_image_2}} First, set your oven to 350°F (175°C). This heat helps the brownies bake just right. Grab a 9x9 inch baking pan. You can grease it lightly or line it with parchment paper. This way, the brownies come out easily. In a big bowl, add 1 cup of creamy peanut butter, 1 cup of granulated sugar, and 1/2 cup of light brown sugar. Use a hand mixer or whisk to mix them well. Aim for a smooth and creamy mix. This is the base of your brownies. Next, add 4 large eggs to the peanut butter mix. Do this one at a time. Mix well after each egg. Then, add 1 teaspoon of vanilla extract. Stir until everything blends nicely. This adds flavor and richness to your brownies. In another bowl, sift together 1 cup of all-purpose flour, 1/2 cup of cocoa powder, and 1/4 teaspoon of salt. Slowly add this dry mix to the wet mix. Stir gently until just combined. Be careful not to overmix. This keeps your brownies fudgy. Now, fold in 1 cup of dark chocolate chips. Make sure they spread out evenly in the batter. Each bite will have that rich chocolate flavor you love. Pour the brownie batter into your prepared pan. Use a spatula to smooth the top. Place the pan in the oven. Bake for 25-30 minutes. To check if they are done, insert a toothpick into the center. It should come out with a few moist crumbs. Once they are baked, take the pan out of the oven. Let the brownies cool completely in the pan. This step is key for easy cutting. When cooled, cut them into squares and serve. Enjoy your fudgy chocolate peanut butter brownies! To make your brownies super fudgy, follow these tips. Use the right ratio of peanut butter, sugar, and eggs. This recipe uses one cup of peanut butter and four eggs, which helps create a rich texture. Don't overmix the batter; mix just until combined. This keeps the air out and helps the brownies stay dense. Bake them for 25 to 30 minutes. The toothpick test is key. It should come out with a few moist crumbs, not clean. Many people make a few common mistakes. First, they overmix the batter. This adds too much air and makes brownies cake-like. Second, they forget to check the oven temperature. An oven that is too hot can dry out your brownies. Lastly, don't rush the cooling process. Cutting them too soon can lead to a messy result. Let them cool completely for the best shape and taste. Using the right tools can help you bake better brownies. Here are some essentials: - A 9x9 inch baking pan for even baking. - Parchment paper for easy removal. - A mixing bowl for blending ingredients. - A hand mixer or whisk for smooth batter. - A spatula to smooth the top before baking. These tools will help you create perfect fudgy brownies every time. Happy baking! Pro Tips Use Room Temperature Ingredients: Ensure your peanut butter and eggs are at room temperature for easier mixing and a smoother batter. Don't Overbake: For fudgy brownies, keep an eye on the baking time; they should be set around the edges but slightly soft in the center. Chill Before Serving: For enhanced flavor and texture, refrigerate the brownies for a few hours before cutting them into squares. Experiment with Mix-Ins: Feel free to add your favorite nuts, chocolate chunks, or even a swirl of caramel for extra flavor variations. {{image_4}} If you want to skip the nuts, it’s easy. Use sun butter instead of peanut butter. Sun butter works well and gives a similar taste. This swap makes the brownies nut-free and safe for kids with allergies. The texture remains fudgy and rich, just like the original. You can play with flavors to make these brownies even more exciting. Add 1 teaspoon of peppermint extract for a minty kick. This change brings a fresh twist. You can also sprinkle sea salt on top before baking. The salt will balance the sweetness and enhance the chocolate flavor. For a gluten-free version, swap all-purpose flour with almond flour or coconut flour. Almond flour adds moisture and keeps the brownies fudgy. If using coconut flour, reduce the amount to 1/3 cup. Coconut flour absorbs more liquid, so you will need less. These changes allow everyone to enjoy the brownies, no matter their diet. To keep your fudgy chocolate peanut butter brownies fresh, store them in an airtight container. This prevents air from drying them out. Place a piece of parchment paper between layers to stop sticking. Keep your container in a cool, dry place. If you want to keep them longer, consider refrigeration. They last up to a week this way. Freezing brownies is easy. First, let them cool completely. Then, cut them into squares. Wrap each square in plastic wrap. Place the wrapped squares in a freezer bag. Squeeze out the air before sealing. This helps prevent freezer burn. You can freeze brownies for up to three months. When you’re ready to enjoy, let them thaw in the fridge overnight. To enjoy your brownies warm, preheat your oven to 350°F (175°C). Place the brownies on a baking sheet. Heat them for about 10 minutes. This makes them soft and gooey again. You can also microwave them for 15 to 20 seconds. This is a quick way to warm them up. Enjoy your fudgy chocolate peanut butter brownies fresh and warm! You can tell when the brownies are done by checking the center. Insert a toothpick into the middle. If it comes out with a few moist crumbs, the brownies are ready. If the toothpick has wet batter on it, they need more time. Bake for 25 to 30 minutes for best results. Yes, you can use natural peanut butter. Just make sure it is creamy. Natural peanut butter may make the brownies a bit less sweet. You might want to adjust the sugar slightly. To make these brownies vegan, swap the eggs for flax eggs. Mix 1 tablespoon of flaxseed meal with 2.5 tablespoons of water for each egg. Let it sit until it thickens. Use dairy-free chocolate chips instead of regular ones. The best way to cut brownies is to use a sharp knife. Dip the knife in hot water. Wipe it dry before cutting. This helps create clean edges. Cut them into squares while they are still in the pan for easy handling. To make delicious brownies, we covered key ingredients and their quality. We explored step-by-step instructions, focusing on mixing and baking for the perfect texture. Tips helped avoid common mistakes and suggested tools to use. Variations gave you options to match your taste. Finally, we discussed storage to keep them fresh. Remember, great brownies come from good choices and careful baking. Enjoy your next batch, and don't hesitate to experiment!

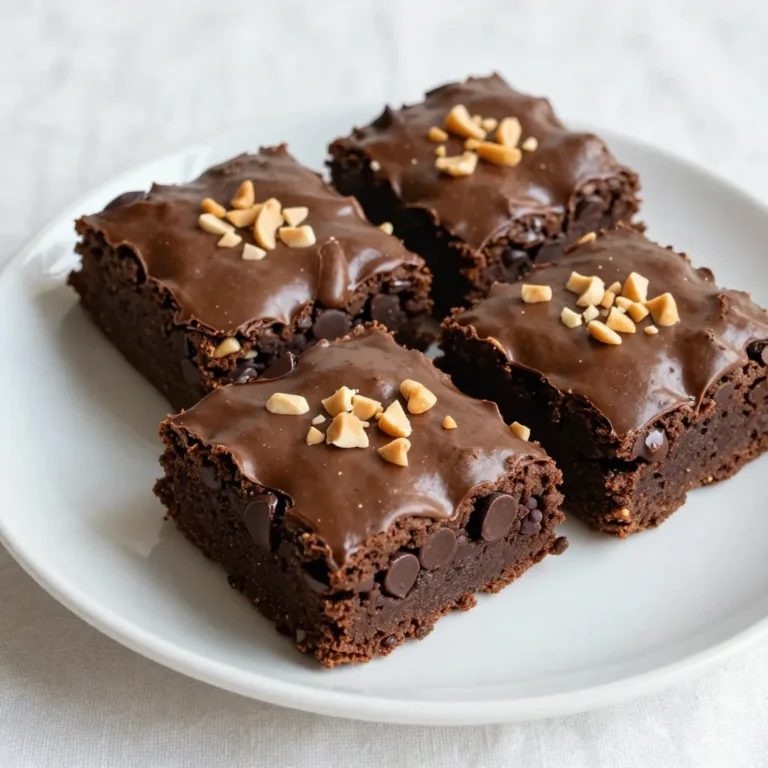
Fudgy Chocolate Peanut Butter Brownies Indulgent Treat

- Extra virgin olive oil - Yellow onion - Fresh garlic - Carrots - Celery - Zucchini - Green beans - Diced tomatoes - Vegetable broth - Dried oregano - Dried basil - Gluten-free pasta - Kidney beans - Fresh spinach or kale - Optional garnish: Grated Parmesan cheese To make the best classic minestrone with gluten-free noodles, you need simple, fresh ingredients. Each one adds to the rich flavor of the soup. First, gather your base: extra virgin olive oil, yellow onion, and fresh garlic. The onion becomes sweet, and the garlic adds a nice kick as they cook. Next, you’ll want your colorful veggies. Carrots, celery, zucchini, and green beans make your soup bright and healthy. Don’t forget the canned diced tomatoes! They bring sweetness and acidity to balance the flavors. Vegetable broth is essential for that comforting depth. To season, use dried oregano and dried basil for warmth and aroma. For the gluten-free element, pick noodles like penne or fusilli. They hold the soup's flavors well. Add kidney beans for protein and fiber. Finally, fresh spinach or kale gives a nice, vibrant touch. If you like, sprinkle some grated Parmesan cheese on top for a rich finish. With these ingredients, you’ll create a hearty and delicious minestrone soup that everyone will love. {{ingredient_image_2}} - Heat 1 tablespoon of extra virgin olive oil in a large soup pot. - Add 1 small yellow onion, finely diced, and sauté for 3-4 minutes. The onion should look translucent. - Next, add 2 cloves of minced garlic, 2 medium diced carrots, and 2 diced celery stalks. Sauté for 5 minutes. Stir often until the veggies soften. - Time to incorporate 1 medium zucchini, diced into half-moons, and 1 cup of trimmed and cut green beans. - Cook these for 3 minutes. They should be tender but still crisp. - Now, pour in 1 can of diced tomatoes with juice and 4 cups of low-sodium vegetable broth. - Add 1 teaspoon of dried oregano, 1 teaspoon of dried basil, and season with salt and pepper. Bring this to a gentle simmer. - Once your soup simmers, stir in 1 cup of gluten-free pasta. Cook it according to the package directions, which usually takes 6-8 minutes. - In the last few minutes, fold in 1 cup of canned kidney beans and 1 cup of roughly chopped fresh spinach or kale. They will wilt and heat through quickly. - Taste the soup and adjust the seasoning. Add more salt or pepper if needed. - Serve hot in bowls, garnished with grated Parmesan cheese if you like. Enjoy! To make your minestrone shine, taste is key. Adjust the seasoning to your liking. Add salt and pepper little by little. If you want a fresh kick, use herbs like basil and oregano. Fresh herbs brighten the soup and give it a lovely aroma. Cooking gluten-free noodles takes care. Always follow the package instructions. They usually cook in about 6-8 minutes. Avoid overcooking them. They can turn mushy quickly. Keep an eye on them while they boil. For a finishing touch, think about garnishing. A sprinkle of grated Parmesan cheese adds a creamy finish. You can also add fresh herbs on top. Pair your soup with crusty bread or a fresh salad. This gives a nice crunch and balances the soup's warmth. Pro Tips Fresh Ingredients: Using fresh, seasonal vegetables will enhance the flavor and nutritional value of your minestrone soup. Cooking Pasta: To prevent the gluten-free pasta from becoming mushy, cook it separately and add it to the soup just before serving. Herb Variations: Feel free to experiment with different herbs like thyme or rosemary for a unique flavor twist. Storage Tips: Store any leftovers in an airtight container in the fridge for up to 3 days. Reheat gently on the stove to maintain texture. {{image_4}} You can change the veggies in your minestrone. Use what you have at home. Adding seasonal vegetables boosts flavor. Try sweet bell peppers or squash in summer. In fall, add root veggies like parsnips. For a vegan twist, skip the cheese and use vegetable broth. You can also add more greens like arugula or Swiss chard for extra nutrients. Gluten-free pasta comes in many shapes. Penne and fusilli are great choices. Penne holds sauce well, while fusilli adds fun twists. You can also use rice noodles or chickpea pasta. Each type gives a unique texture to your soup. Choose one that you enjoy best. Want to add protein? You can add cooked chicken, turkey, or beef. If you prefer plant-based, tofu is a great choice. Just be sure to cut it into small pieces. Adjust your cook time based on what you add. Meat may need more time, while tofu heats quickly. This way, your minestrone stays hearty and filling. To store leftovers, place minestrone in an airtight container. Make sure to cool it first. This helps keep the soup fresh. It lasts about 3 to 4 days in the fridge. Check for any off smells or changes in color before eating. You can freeze minestrone for later meals. First, let it cool completely. Then, pour it into freezer-safe bags or containers. Remove as much air as possible. It will stay good for up to 3 months. When you're ready to eat, thaw it in the fridge overnight. For reheating, heat it on the stove over low heat, stirring often. You can also use the microwave, but be sure to stir it halfway through. Make sure it’s hot all the way through before serving. To keep the flavor and texture, avoid freezing the gluten-free noodles with the soup. Cook the noodles fresh when you're ready to eat. This way, they won’t get mushy. Stir in fresh herbs or a splash of olive oil to enhance the taste. Enjoy your minestrone like it’s freshly made! Yes, you can use regular noodles. Just be aware of the cooking time. Regular pasta cooks faster than gluten-free noodles. You may need to adjust the soup's cooking time. Add the noodles when the soup is almost done to avoid mushiness. Minestrone soup can last up to five days in the fridge. Store it in an airtight container. Make sure it cools down first. If you want to keep it longer, consider freezing it. You can use black beans or chickpeas as a substitute. Both add great texture and flavor. If you prefer no beans, try adding more veggies instead. This keeps your soup hearty and tasty. This blog post explored how to make a delicious gluten-free minestrone soup. You learned about key ingredients, step-by-step cooking instructions, and helpful tips for the best flavor. I covered variations and storage tips to keep your soup fresh. Remember, you can swap out veggies and pasta types based on your taste. Enjoy creating a comforting bowl of soup that fits your needs!

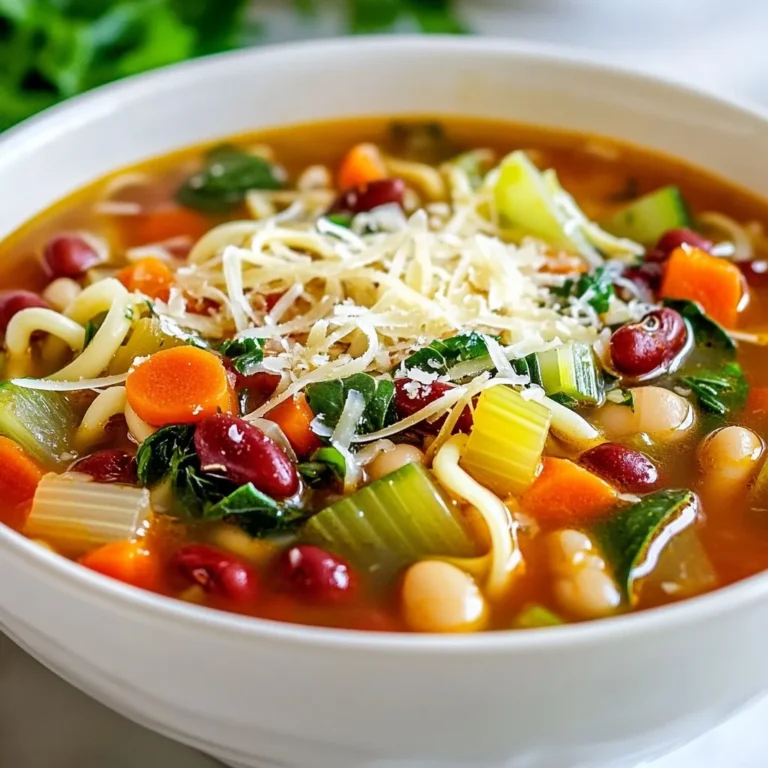
Classic Minestrone with Gluten-Free Noodles Delight

- 1 lb boneless chicken thighs - 2 tablespoons cornstarch - 2 tablespoons vegetable oil - 3 green onions - 2 cloves garlic - 1 tablespoon fresh ginger - 1/4 cup soy sauce - 1/4 cup brown sugar - 1 tablespoon rice vinegar - 1 teaspoon sesame oil - 1 red bell pepper - Sesame seeds for garnish - Salt and pepper to taste Let’s dive into the key ingredients for this tasty dish. First, I choose boneless chicken thighs because they stay juicy and tender when cooked. I cut them into bite-sized pieces for even cooking. Next, cornstarch is my secret weapon. It helps create a nice crispy texture on the chicken. I use vegetable oil to fry the chicken. This oil has a high smoke point and works well for stir-frying. Green onions add a fresh touch. I chop them and separate the white parts from the green. The white parts go in the pan first for sautéing. I also include garlic and fresh ginger. They bring a lot of flavor and make the dish smell amazing. For the sauce, I mix soy sauce, brown sugar, rice vinegar, and sesame oil. The soy sauce gives saltiness, while brown sugar adds a sweet touch. Rice vinegar brightens the taste, and sesame oil gives a nutty flavor. I slice a red bell pepper for color and crunch. Finally, I sprinkle sesame seeds on top for a nice finish. Don't forget salt and pepper to taste! These ingredients come together to create a delicious meal that’s easy to make. Enjoy cooking! {{ingredient_image_2}} Start by tossing the chicken with cornstarch. Use a medium bowl for this. Add a pinch of salt and black pepper too. This step is key for a crispy texture. Make sure every piece is coated well. The cornstarch helps the chicken turn golden and crunchy when cooked. Next, heat the vegetable oil in a large skillet over medium-high heat. Once the oil shimmers, add the chicken pieces in one layer. Cook for about 5-7 minutes. Turn the chicken so it browns on all sides. Once it’s golden, remove the chicken from the skillet. Set it aside on a plate to keep it warm. In the same skillet, lower the heat to medium. Add the white parts of the green onions, garlic, and ginger. Sauté this mixture for about one minute. It should smell amazing and the garlic should turn lightly golden. Then, pour in the soy sauce, brown sugar, rice vinegar, and sesame oil. Stir well and let it simmer. The sugar needs to dissolve completely for great flavor. Now, add the sliced red bell pepper into the skillet. Return the cooked chicken to the pan. Stir everything together so the chicken gets coated in the sauce. Cook for another 2-3 minutes until the chicken is hot and the veggies are a bit tender. Taste the dish and adjust the seasoning if needed. Finish by sprinkling sesame seeds and the green parts of the green onions on top. This adds a nice touch to your dish. Cornstarch is key for crispy chicken. It forms a nice crust when you fry it. Toss the chicken pieces in cornstarch before cooking. This step makes a big difference in texture. The cooking temperature matters too. Use medium-high heat to get that golden brown color. If the heat is too low, the chicken will not crisp up. Watch the oil; it should shimmer before adding chicken. Always use fresh ingredients for the best taste. Fresh garlic and ginger add a bright zing. Green onions also enhance flavor. You can use the whites for cooking and the greens for garnish. Consider adding more seasoning. A pinch of red pepper flakes gives a nice kick. You can also add a splash of lemon juice for brightness. Serve Mongolian Chicken over fluffy jasmine rice. The rice absorbs the sauce well and adds texture. For visual appeal, garnish with sesame seeds and green onion tops. This adds color and makes the dish pop. A well-presented dish is always more inviting! Pro Tips Perfectly Crispy Chicken: Ensure that the chicken pieces are thoroughly coated with cornstarch for a crispy texture. Avoid overcrowding the skillet to allow even cooking. Flavor Boost: For an extra depth of flavor, consider marinating the chicken in soy sauce and ginger for 30 minutes before cooking. Vegetable Variations: Feel free to add other vegetables such as broccoli or snap peas for more color and nutrition. Just adjust the cooking time accordingly. Serving Suggestions: Serve the dish over jasmine rice or noodles, and top with fresh cilantro or basil for an aromatic finish. {{image_4}} You can switch chicken for beef or tofu. Beef brings a rich taste. Use tender cuts like sirloin or flank steak. If you want a vegetarian dish, tofu is an excellent choice. Firm tofu holds up well in cooking. Just make sure to press it to remove excess water before cooking. You can add different vegetables to your Mongolian chicken. Broccoli, snap peas, or carrots add color and crunch. They also boost nutrition. You can also try spices like red pepper flakes for a kick. Adding hoisin sauce can enhance the sweetness too. Feel free to get creative with the flavors. Mongolian chicken works well in wraps. Use lettuce or tortillas for a fun meal. It’s also great over a fresh salad. This makes for a lighter dinner option. Top your salad with the chicken and some dressing. The warm chicken adds a nice touch to the crisp greens. To keep your Mongolian chicken fresh, use airtight containers. Glass containers work well, but plastic ones are fine too. Store the chicken in the fridge for up to three days. If you want to keep it longer, freeze it. Mongolian chicken can stay in the freezer for about three months. Just make sure to label the containers with the date. When reheating, try using a skillet. This method helps keep the chicken crispy. Heat the skillet over medium heat. Add a splash of water or broth to keep it moist. Stir the chicken often until it’s hot. You can also use a microwave if you are in a hurry. Place the chicken in a microwave-safe dish and cover it. Heat it in short bursts, stirring in between to maintain texture. To keep the flavor strong, add a pinch of soy sauce before reheating. Mongolian Chicken is a tasty dish that comes from Asian cuisine. It is not actually from Mongolia but is popular in American Chinese food. This dish features tender chicken cooked in a sweet and savory sauce. Common ingredients used: - Boneless chicken thighs - Cornstarch - Soy sauce - Brown sugar - Garlic - Ginger - Green onions - Red bell pepper These ingredients come together to create a delightful flavor that is hard to resist. Yes, you can make Mongolian Chicken ahead of time. This makes it great for busy weeks. Prepping tips for busy weeks: - Cut the chicken and veggies a day before. - Mix the sauce and store it in the fridge. Storing and reheating appropriately: - Store leftovers in an airtight container for up to three days. - Reheat in a skillet over medium heat, adding a splash of water to keep it moist. Mongolian Chicken is not very spicy. It has a well-balanced flavor profile, with sweetness from brown sugar and saltiness from soy sauce. Adjusting spice levels to taste: - If you like spice, add red pepper flakes. - For less heat, skip the flakes or reduce the garlic. You can serve Mongolian Chicken with many side dishes for a complete meal. Suggested side dishes: - Jasmine rice - Fried rice - Steamed broccoli Pairing with beverages: - I recommend green tea or a light beer. These drinks complement the dish nicely. Mongolian chicken is a tasty dish made with simple ingredients. We covered the main components, steps for cooking, tips for crispy texture, and ways to store leftovers. You can customize the dish with different proteins or flavors, making it versatile. My final thought is to have fun with this recipe. Enjoy the process and make it your own!

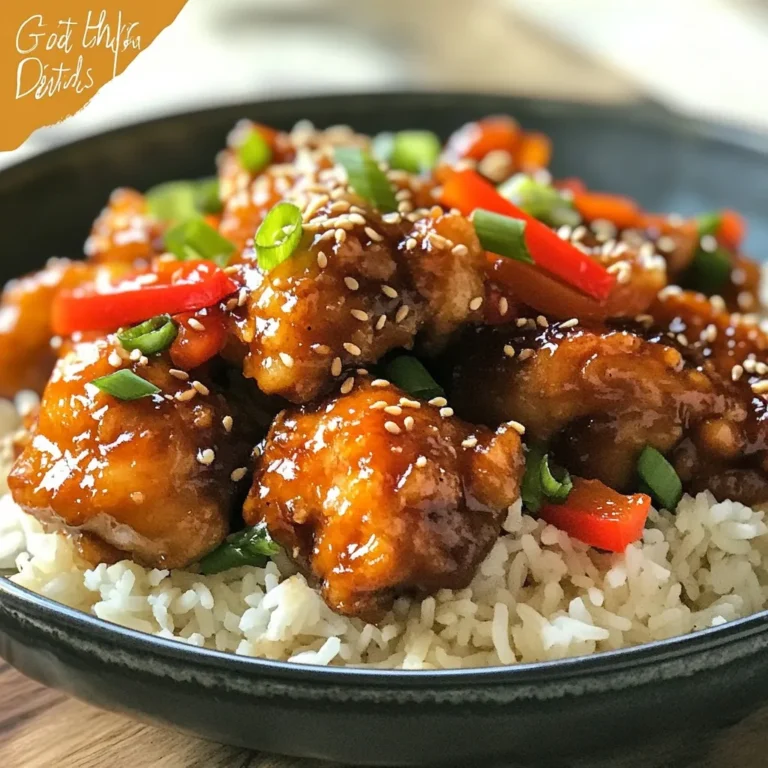
Mongolian Chicken Flavorful and Easy Dinner Recipe

- 4 large russet potatoes - 1 cup sour cream - 1/2 cup cream cheese - 1/2 cup milk - 1 1/2 cups sharp cheddar cheese - 1 cup cooked turkey bacon - 1/2 cup crumbled feta cheese - 1/2 cup green onions - 1 teaspoon garlic powder - Salt and pepper to taste The main ingredients set the stage for a rich and creamy dish. The russet potatoes give a fluffy texture. Sour cream and cream cheese add a nice tang. The milk keeps everything smooth. Sharp cheddar cheese brings a bold flavor that makes this dish shine. Optional ingredients can elevate your casserole even more. Turkey bacon adds a savory crunch. Feta cheese gives a unique twist with its salty taste. Green onions introduce a fresh bite that balances the creaminess. For seasonings, garlic powder adds depth. Don't forget salt and pepper; they enhance all the flavors. Adjust to your taste. This combination of ingredients creates a comforting dish that everyone loves. You can’t go wrong with this loaded mashed potato casserole! {{ingredient_image_2}} - Preheat the oven to 375°F (190°C). - In a large pot, bring salted water to a boil. Add the cubed potatoes. Cook them for 15-20 minutes until tender. Drain the potatoes and return them to the pot. - Use a potato masher to mash the potatoes until smooth and creamy. - Mix in the sour cream, softened cream cheese, and milk. Stir well until combined. Season with garlic powder, salt, and pepper to taste. - Gently fold in the shredded sharp cheddar cheese, crumbled feta cheese, chopped green onions, and turkey bacon if using. - Transfer the potato mixture to a greased 9x13 inch casserole dish. Spread it evenly across the dish. - Sprinkle the remaining 1/2 cup of shredded sharp cheddar cheese on top. - Bake the casserole for 25-30 minutes. Look for a golden and bubbly top to know it’s done. To get smooth, creamy mashed potatoes, I recommend using a potato masher. Start with hot, cooked potatoes. This helps break them down easily. Avoid using a food processor; it can make potatoes gluey. For that perfect creamy texture, mix in sour cream and cream cheese. The fats from these ingredients add richness and silkiness. Adding toppings can boost your casserole's flavor. Try crispy bacon bits, extra shredded cheese, or fresh herbs like parsley. For a colorful touch, sprinkle some chopped green onions on top before serving. Serve it straight from the dish for a warm, inviting look, or plate it for a more refined touch. One common mistake is adding too much water when cooking potatoes. This can lead to a watery mash. Always drain them well after boiling. Also, balance your flavors. Taste and adjust with salt, pepper, and garlic powder. This ensures the flavors pop and you get a delicious, savory dish every time. Pro Tips Use Starchy Potatoes: Russet potatoes are ideal for a creamy texture. Their high starch content makes for fluffy mashed potatoes that blend beautifully with the other ingredients. Experiment with Cheeses: While sharp cheddar is a classic choice, feel free to mix in other cheeses like gouda or Monterey jack for a unique flavor profile. Make Ahead: Prepare the casserole a day in advance and store it in the refrigerator. Just add an extra 5-10 minutes to the baking time when you're ready to cook it. Garnish for Appeal: A sprinkle of fresh herbs like parsley or chives not only adds color but also enhances the dish's flavor. Don't skip this step for a restaurant-quality presentation! {{image_4}} You can make this dish fit your diet with a few swaps. If you need dairy-free options, use vegan cream cheese and almond or oat milk. These will still give you that creamy texture. If you want to skip the meat, try using vegetarian bacon. It adds flavor without the meat. Seasonal veggies can make this dish even better. Spinach and broccoli are great choices. They add color and nutrients. You can also switch up the cheese. Try gouda or pepper jack for a fun twist. If you follow a low-carb diet, use cauliflower instead of potatoes. It mashes well and tastes great. For a gluten-free option, just check your cream cheese and sour cream. Most brands are safe, but always read labels! After enjoying your Loaded Mashed Potato Casserole, you’ll likely have some leftovers. To store them properly, follow these steps: - Refrigeration: Let the casserole cool down to room temperature. This helps prevent condensation in the container. - Storage Containers: Use airtight containers for best results. Glass or plastic containers with tight lids work great. This keeps your casserole fresh and tasty. When it's time to enjoy your leftovers, reheating them correctly is key. Here are the best methods: - Oven Method: Preheat your oven to 350°F (175°C). Place the casserole in an oven-safe dish, cover it with foil, and bake for about 20-25 minutes. This method warms it evenly without drying it out. - Microwave Method: If you're in a rush, use the microwave. Place a portion in a microwave-safe dish. Cover it with a microwave-safe lid or wrap. Heat in short bursts of 1-2 minutes, stirring in between. This helps to heat it evenly. If you want to save some for later, freezing is a good option. Here’s how to do it: - Freezing Portions: Allow the casserole to cool completely. Then, cut it into individual servings. Place each portion in a freezer-safe container. Be sure to leave some space for expansion. - Thawing and Reheating: To enjoy your frozen casserole, transfer it to the fridge the night before to thaw. Once thawed, use the oven or microwave to reheat as mentioned above. If you forgot to thaw it, you can bake it straight from the freezer. Just add extra time to your cooking. These storage and reheating tips will help keep your Loaded Mashed Potato Casserole delicious for days to come! Yes, you can prepare this dish ahead. Just follow these tips: - Make the Mashed Potatoes: Cook and mash the potatoes. Mix in all the creamy ingredients. - Assemble the Casserole: Place the mixture in the casserole dish. - Cover and Chill: Wrap the dish tightly with plastic wrap. Store it in the fridge. - Baking Later: When ready to bake, remove the wrap. Add topping and bake. You may need to increase the time. This makes it easy to enjoy your casserole without much fuss on the day of serving. This casserole pairs well with many dishes. Here are a few ideas: - Roasted Chicken: Its flavor complements the cheese. - Green Salad: A fresh salad balances the richness. - Grilled Vegetables: Adds a nice crunch and color. - Steak or Meatloaf: Hearty dishes work well with this casserole. These sides create a full meal, making your dinner special. Absolutely! Here are some fun ideas to change it up: - Different Cheeses: Try gouda or pepper jack for a spicy kick. - Add Veggies: Spinach or broccoli can boost nutrition. - Herbs and Spices: Use herbs like thyme or rosemary for extra flavor. - Change the Protein: Swap turkey bacon for veggie bacon or ham. Feel free to mix and match based on your taste. The options are endless! This article covered how to make a delicious Loaded Mashed Potato Casserole. We explored key ingredients, step-by-step instructions, and tips to perfect your dish. With various options for customization and storage advice, you can make this meal fit your needs. Remember, the right blend of flavors and textures creates a winner. Enjoy experimenting with your choices, and have fun in the kitchen!

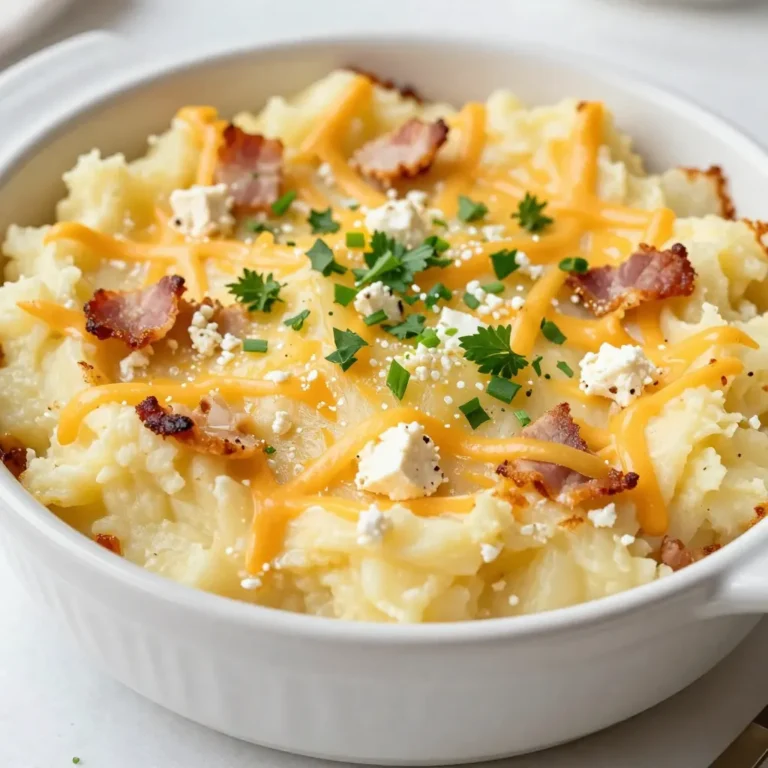
Loaded Mashed Potato Casserole Tasty Comfort Dish

Creating No-Bake Oreo Cheesecake Cups is simple and fun. Here’s what you need: - 18 Oreo cookies, finely crushed - 4 tablespoons unsalted butter, melted - 1 (8 oz) package cream cheese, softened - 1/2 cup powdered sugar - 1 teaspoon pure vanilla extract - 1 cup heavy whipping cream, chilled - 8 Oreo cookies, roughly chopped (for filling and topping) These ingredients come together to make a rich and creamy dessert. The crushed Oreos form a tasty crust, while the cream cheese and whipped cream create a light filling. The added chopped Oreos give a nice crunch. Each ingredient plays a key role in the flavor and texture of your cheesecake cups. Enjoy gathering these simple items to create a delicious treat! {{ingredient_image_2}} To make the crust, start by mixing 18 finely crushed Oreo cookies with 4 tablespoons of melted butter. Stir until all the crumbs are coated. This should create a sandy texture. It’s important to ensure the butter coats every crumb. This will help hold the crust together when you layer it in the cups. Next, prepare the cheesecake filling. In a large bowl, beat 1 package of softened cream cheese until it’s smooth. This step is key for a creamy filling. Gradually add in 1/2 cup of powdered sugar and 1 teaspoon of pure vanilla extract. Mix until the mixture is fluffy and well blended. The flavor will be rich and inviting. Now, it’s time to whip the cream. In a separate bowl, pour in 1 cup of chilled heavy whipping cream. Use an electric mixer to whip the cream until you see stiff peaks. This usually takes about 2 to 3 minutes. Be careful not to over-whip, as this can make the cream grainy. You want it light and airy. Now, fold the whipped cream into the cream cheese mixture. Use a spatula to gently combine them. This keeps the mixture light. Next, add 8 roughly chopped Oreo cookies to the filling. Fold them in until they’re evenly mixed. This adds bits of cookie throughout the cheesecake. To assemble the cups, spoon about 2 tablespoons of the Oreo crust into the bottom of each cup. Then, add a layer of the cheesecake filling. Repeat this layering process until the cups are filled. Make sure the final layer is the creamy cheesecake filling. This will create a nice look when you serve them. After you assemble the cups, place them in the refrigerator. Chill for at least 4 hours, or until they feel firm to the touch. This step is crucial for the right texture. Before serving, you can garnish each cup with more chopped Oreo cookies. This adds a nice touch and extra crunch. To get the best texture, use room temperature cream cheese. Cold cream cheese will not mix well. This may leave lumps in your filling. Let it sit out for about 30 minutes before mixing. When making whipped cream, use a chilled bowl and beaters. This helps the cream whip faster and get fluffy. Beat the cream until stiff peaks form, which should take about 2-3 minutes. Remember, do not over-whip the cream. If you do, it can turn grainy and separate. Presentation makes a big difference. Use decorative spoons for each cup. This adds a fun touch. You can also sprinkle crushed Oreos on top for a nice look and crunch. If you want to switch up the cups, use small mason jars or dessert glasses. Clear containers let you show off the layers. It makes the dessert even more inviting. One common mistake is over-whipping the cream. If you whip too long, it can turn into butter. Stop once you see stiff peaks. Another mistake is switching ingredient measurements. Use the exact amounts listed in the recipe. Changing them can affect texture and taste. Stick to the recipe for the best results. Pro Tips Use Room Temperature Cream Cheese: Make sure your cream cheese is softened to room temperature for a smoother and creamier cheesecake filling. Cold cream cheese can lead to lumps in your mixture. Chill the Cups Overnight: For the best texture and flavor, try to let the cheesecake cups chill overnight. This allows the flavors to meld and the filling to set perfectly. Experiment with Flavors: Feel free to mix in different flavors of crushed cookies or add a layer of chocolate or caramel sauce for a twist on the classic Oreo taste. Presentation Matters: Consider using clear cups or jars to showcase the beautiful layers of the cheesecake. Adding a decorative spoon and some crushed Oreos on top can elevate the presentation even more. {{image_4}} You can switch up the cookies in this recipe. For a fun twist, try using chocolate chip cookies or peanut butter cookies. Each type adds a unique flavor. If you need a gluten-free option, use gluten-free Oreos or any gluten-free cookie you enjoy. This way, everyone can enjoy these treats! Want to change the taste? You can add chocolate or caramel flavors! Just swirl in some chocolate sauce or caramel sauce into the cheesecake filling. You can also mix in fruit purees. A layer of strawberry or raspberry puree adds a fresh touch. These options make each cup even more exciting! Think about what drinks pair well with these cheesecake cups. A cold glass of milk or hot coffee works great! For a fun twist, serve them with fresh fruit on the side. When you present these cups, try using clear jars. This shows off the layers and looks very pretty. Add a decorative spoon for a cute touch! To keep your No-Bake Oreo Cheesecake Cups fresh, use airtight containers. Glass jars or plastic cups work well. Make sure to cover each container tightly. This helps prevent the cheesecake from absorbing other smells in the fridge. Always place them in the refrigerator right after making them. You can store these cheesecake cups for up to five days in the fridge. Check for changes in color or texture. If the filling looks watery or the crust appears soggy, it’s time to toss them. Always trust your senses! If they smell off or have an unusual texture, it’s best to throw them out. Yes, you can use low-fat cream cheese. However, the texture may change. Low-fat cream cheese can be a bit grainy. It also may not be as rich and creamy as regular cream cheese. This change can affect the overall taste of your cheesecake. If you want a lighter option, try it. Just know the cheesecake might not be as smooth. These cheesecake cups need at least four hours to chill. Chilling helps the filling to set properly. If they do not chill long enough, they can be runny. To get the best results, aim for overnight chilling. This extra time makes the flavors meld well and enhances the taste. You can make these cups ahead of time. They store well in the fridge for up to three days. For the best flavor and texture, make them one day before serving. This allows the flavors to develop nicely. Just cover them tightly to keep them fresh. In this post, I covered how to make delicious Oreo cheesecake cups. You learned about the key ingredients and easy steps. I shared tips to get the best texture and avoid common mistakes. There are also ideas for fun variations and storage tips. With these insights, you can create a tasty dessert. Enjoy making your cheesecake cups for friends and family!

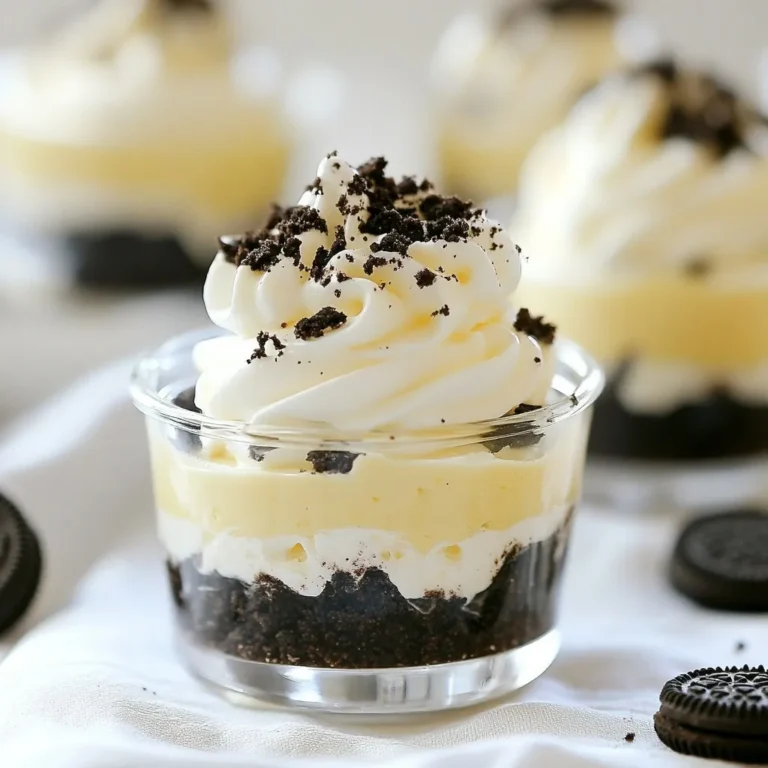
No-Bake Oreo Cheesecake Cups Delicious and Easy Treat

- 2 pounds beef chuck, cut into 1-inch cubes - 4 slices of thick-cut bacon, chopped (omit if avoiding pork entirely) - 2 cups beef broth - 1 large onion, finely chopped - 2 carrots, sliced into rounds - 2 cloves garlic, minced - Fresh parsley, finely chopped (for garnish) - 1 tablespoon tomato paste - 1 teaspoon dried thyme - 8 ounces cremini mushrooms, quartered When making Beef Bourguignon, choose quality ingredients for the best flavor. The beef chuck is key. It becomes tender and juicy during cooking. The thick-cut bacon adds a rich, smoky taste, but feel free to skip it if you prefer a pork-free dish. The beef broth enhances the depth of flavor. Use homemade or store-bought broth, but I recommend low-sodium options for better control over salinity. Fresh vegetables bring brightness to the dish. The onion and carrots soften and sweeten as they cook. Garlic adds an aromatic touch. Lastly, don’t forget the mushrooms. They add texture and earthiness to the stew. With these ingredients, you create a warming, hearty dish full of flavor. {{ingredient_image_2}} First, heat olive oil in a large Dutch oven. Use medium-high heat. Once the oil shimmers, add chopped bacon. Cook until crispy. Then, use a slotted spoon to take it out. Let it drain on paper towels. If you want a pork-free dish, skip this step. Next, season the beef cubes with salt and pepper. In batches, place them in the hot pot. Sear the beef until browned on all sides, about 4-5 minutes. Remove the browned beef and set it aside. In the same pot, add the chopped onion and sliced carrots. Sauté them for about 5-6 minutes. The vegetables should soften and smell great. Now, stir in the minced garlic. Cook for one more minute until it gets fragrant. Next, add the tomato paste and sprinkle flour over the mixture. Stir well to mix. Cook for one minute to get rid of the raw flour taste. Gradually pour in the beef broth. Use a wooden spoon to scrape any brown bits from the bottom of the pot. This adds a lot of flavor. Return the browned beef to the pot. Add thyme, bay leaves, and the crispy bacon if you used it. Bring the mixture to a gentle simmer. Cover the pot with a lid. Reduce the heat to low. Let the beef bourguignon cook gently for about 1.5 to 2 hours. The beef should become tender and flavorful. About 20 minutes before serving, add quartered cremini mushrooms. Stir to mix them in evenly. Once cooking is done, taste the stew. Adjust the seasoning with salt and pepper, if needed. Finally, carefully remove the bay leaves before serving. This helps ensure a great dining experience. To make your beef bourguignon shine, use a good beef broth. A rich, dark broth adds depth. It enhances the stew’s overall taste. Scraping the browned bits from the pot is key. These bits, called fond, hold so much flavor. When you add broth, use a wooden spoon. This action lifts all those tasty morsels. It creates a base full of savory goodness. Always taste your stew before serving. You may want to add more salt or pepper. Each bite should burst with flavor. After cooking, remove the bay leaves carefully. They can be bitter if left in the dish. Tasting and adjusting is part of the fun! Serve your beef bourguignon in deep, rustic bowls. This makes the dish look warm and inviting. A sprinkle of fresh parsley on top adds color. It also brings a fresh taste to each spoonful. Pair it with crusty bread for dipping. The bread soaks up the rich sauce perfectly. Enjoy every bite of this hearty meal! Pro Tips Choose the Right Cut: Opt for beef chuck, as it becomes tender and flavorful through long, slow cooking, making it ideal for stews like bourguignon. Sear for Flavor: Don’t skip the searing step! Browning the beef and bacon adds a depth of flavor to the dish that enhances the overall taste. Low and Slow Cooking: Allow the stew to simmer on low heat for the full time. This method breaks down the tough fibers in the beef, resulting in a tender dish. Adjusting Seasoning: Always taste your stew before serving. Adjust the salt and pepper if needed to ensure the flavors are well-balanced. {{image_4}} You can change the beef in Bourguignon. Chicken or pork can be great swaps. They add a nice twist to this classic dish. If you want a vegetarian meal, try mushrooms and lentils. They both soak up flavors well and create a rich taste. If you want to skip bacon, that’s easy. Just leave it out for a pork-free dish. You can also mix in different veggies. Think about adding bell peppers, peas, or even sweet potatoes. Each swap can give you a new flavor. Bourguignon can take on flavors from many places. Try adding herbs like rosemary or cilantro for a fresh touch. You can also use spices from around the world. For example, a hint of cumin can add warmth. Each region has its own take on this dish, and that’s what makes it fun! To store leftovers, place Beef Bourguignon in an airtight container. Make sure it cools first. Keep it in the fridge for up to 3 days. Reheat on the stove or in the microwave. If you want to freeze it, use freezer-safe containers. Glass or plastic containers work well. Leave some space at the top for expansion. It can last up to 3 months in the freezer. To reheat, let it thaw in the fridge overnight. Warm it gently on the stove for the best taste. Enjoy your meal even after days or weeks! Beef Bourguignon comes from France, specifically the Burgundy region. This dish has roots in peasant cooking. Farmers used local beef and red wine. They made it hearty to feed their families. Over time, it gained fame and became a classic. Today, many chefs make it in fine dining too. Yes, you can! Start by browning the beef and bacon in a skillet. This step adds flavor. Then, transfer everything to your slow cooker. Add the vegetables, broth, and seasonings. Cook on low for 6-8 hours. This method gives a rich taste. Just remember to add the mushrooms in the last hour. You can tell the beef is tender when it falls apart easily with a fork. It should not be chewy or tough. A gentle simmer helps achieve this. Cooking for 1.5 to 2 hours usually ensures perfect tenderness. Always taste the beef to check for doneness. This blog post shared a complete guide to making Beef Bourguignon. We explored the main ingredients, including beef chuck, bacon, and fresh vegetables. I detailed easy step-by-step instructions and offered helpful tips for perfecting flavor and presentation. I also shared ideas for variations and storage tips. In conclusion, making Beef Bourguignon can be simple and fun. By using quality ingredients and cooking with care, you can create a delicious meal. Enjoy the process and share your dish with others!

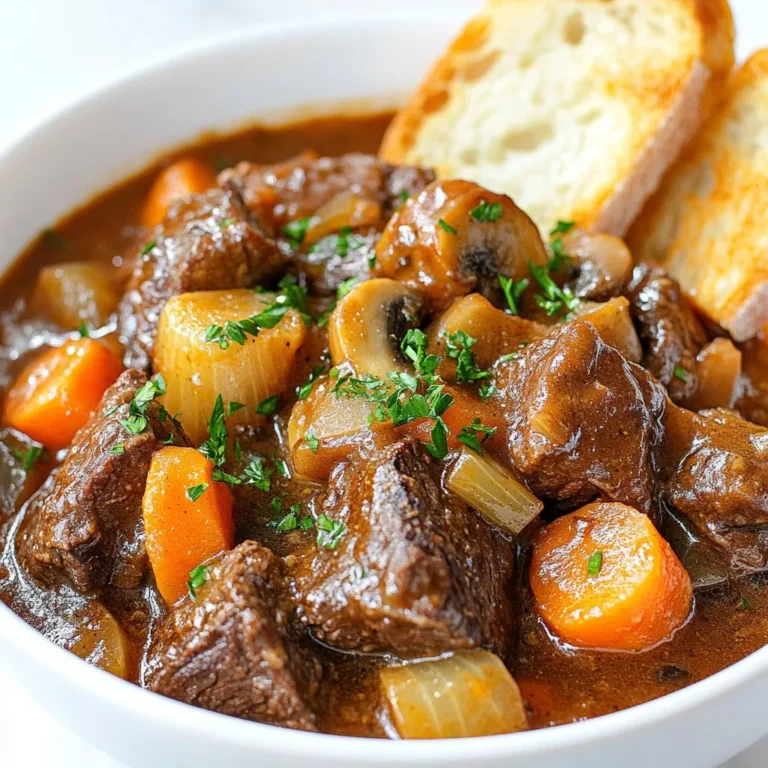
Classic Beef Bourguignon Hearty and Flavorful Dish

PREV 1 … 42 43 44 … 48 NEXT
easy meal kitchen

explore

DessertsDinnerAppetizersDrinks

Our Policies

  • Cookie Policy
  • Copyright Policy
  • Disclaimer
  • GDPR Policy
  • Terms Of Use
Back to Top
  • About
  • Contact Us
  • Privacy Policy
© 2026 easy meal kitchen