FREE DINNER EBOOK! Get your copy!
  • Cookie Policy
  • GDPR Policy
  • Disclaimer
  • Terms Of Use
  • Visit my other site: Fun Cookie Recipes
easy meal kitchen
  • Home
  • Dinner
  • Desserts
  • Drinks
  • Appetizers
  • Contact
  • About
  • Privacy Policy
  • Home
  • Dinner
  • Desserts
  • Drinks
  • Appetizers
  • Contact
  • About
  • Privacy Policy
  • Cookie Policy
  • GDPR Policy
  • Disclaimer
  • Terms Of Use
Visit my other site: Fun Cookie Recipes

HOME / CATEGORIES /

Latest

- Whole chicken (approximately 3-4 lbs), cut into manageable pieces - 8 cups low-sodium chicken broth - 1 medium onion, finely chopped - 3 cloves garlic, minced - 3 medium carrots, diced - 2 celery stalks, diced - 1 cup diced tomatoes, fresh or canned (well-drained) - 1 cup acini di pepe or small pasta - 1 teaspoon dried oregano - 1 teaspoon dried basil - 1/2 teaspoon red pepper flakes (optional, for a touch of heat) - Salt and freshly ground black pepper to taste - Fresh parsley, chopped (for garnish) - Zest of 1 lemon When making Italian Penicillin Chicken Soup, I always start with these core ingredients. The whole chicken adds rich flavor and protein. Using low-sodium chicken broth allows for better control of salt. Fresh vegetables like onion, garlic, carrots, and celery create a great base. Diced tomatoes give a nice texture and sweetness. I love using acini di pepe pasta because it cooks quickly and adds a fun bite. You can swap it for any small pasta you prefer. Herbs like oregano and basil bring a classic Italian taste. Red pepper flakes add a hint of heat, but you can skip them if you want a milder soup. Finally, fresh parsley and lemon zest brighten the dish and make it special. Gather these ingredients, and you’ll be on your way to making a warm and nourishing soup that feels like a hug in a bowl. {{ingredient_image_2}} - Sauté onion and garlic: In a large pot, heat 2 tablespoons of olive oil over medium heat. Add 1 medium onion, finely chopped, and 3 cloves of minced garlic. Cook them for about 3-4 minutes until they are soft and fragrant. Stir them occasionally to avoid burning. - Add carrots and celery: Next, add 3 diced carrots and 2 diced celery stalks to the pot. Cook these for about 5 minutes, stirring often. This helps to soften the veggies and brings out their flavors. - Combine broth and chicken: Carefully pour in 8 cups of low-sodium chicken broth. Add a whole chicken, cut into manageable pieces. Raise the heat to bring it to a gentle boil. Then, lower the heat to let it simmer. - Add tomatoes and seasonings: Stir in 1 cup of diced tomatoes, 1 teaspoon of dried oregano, and 1 teaspoon of dried basil. If you like some heat, add 1/2 teaspoon of red pepper flakes. Taste and season with salt and black pepper. - Simmer and shred chicken: Cover the pot and let it simmer for 25-30 minutes. The chicken should be fully cooked and tender. Use a slotted spoon to take out the chicken pieces. Let them cool for a bit. - Cook pasta: Shred the chicken off the bones and return the meat to the pot. Add 1 cup of acini di pepe or small pasta. Cook according to package instructions, usually about 8-10 minutes, until it’s al dente. Stir often to prevent sticking. - Garnish and serve: Remove the pot from heat and mix in the zest of 1 lemon and some chopped fresh parsley. Taste the soup again and adjust seasonings if needed. Serve hot in bowls, garnished with more parsley or lemon zest. Enjoy your nourishing Italian Penicillin Chicken Soup! To make this soup shine, adjust the seasonings. Taste as you go! If you want more depth, add salt and pepper to your liking. Dried oregano and basil are great choices. These herbs add warmth and earthiness. If you enjoy spice, try adding red pepper flakes for a little kick. Just remember, a little goes a long way! You can choose how thick or thin you want your soup. If you prefer a thicker soup, let it simmer longer. This helps the flavors blend better. If it gets too thick, add more broth or water. Stir it well, and keep adjusting until you reach your desired consistency. Using a pressure cooker can speed up cooking time. It cooks the chicken quick and keeps it juicy. If you use the stovetop, be patient and let it simmer. After cooking, shredding the chicken is simple. Use two forks to pull apart the meat. This makes it easy to mix back into the soup. Enjoy the process! Pro Tips Use Fresh Ingredients: Opt for fresh vegetables and herbs to enhance the flavor of your soup. Freshness ensures a vibrant taste and better nutrition. Customize Your Pasta: You can substitute acini di pepe with any small pasta like orzo or ditalini. Just adjust the cooking time according to the pasta package instructions. Make it Ahead: This soup tastes even better the next day! Make it ahead of time and store in the fridge. Reheat gently on the stove before serving. Add More Veggies: Feel free to add more vegetables such as zucchini, spinach, or kale for added nutrition and flavor. Just toss them in during the last few minutes of cooking. {{image_4}} You can make Italian Penicillin Chicken Soup your own. Add different vegetables to it. Spinach or zucchini works well. These veggies add color and nutrition. You can also try different types of pasta. Small shells or ditalini can replace acini di pepe. This keeps the dish fresh and fun. If you need gluten-free options, use gluten-free pasta. This keeps the soup safe for those with gluten issues. You can also make low-fat variations. Use skinless chicken and less oil. This way, you enjoy a light and healthy soup. Want to add some brightness? Try adding lemon juice or zest. It gives the soup a fresh kick. You can also experiment with different herbs. Thyme or rosemary can create unique flavor profiles. Each choice adds a special touch to your soup. To keep your Italian Penicillin Chicken Soup fresh, store it in an airtight container. Let the soup cool to room temperature first. Then, seal the container and place it in the fridge. This method keeps the soup safe and tasty. Leftovers stay good for up to four days. When storing, try to divide the soup into smaller portions. This way, you can grab just what you need. If you want to save some soup for later, freezing is a great option. Portion out the soup into freezer-safe bags or containers. Leave some space at the top, as soup expands when frozen. Label the bags with the date and type of soup. To reheat, move the soup from the freezer to the fridge the night before. This way, it thaws gently. When ready to eat, heat it on the stove over low heat. Stir often until it warms through. You can also use a microwave, but be sure to cover the container to avoid spills. In the fridge, your soup can last about four days. If you freeze it, the soup stays good for up to three months. Check for signs of spoilage before eating. If the soup smells sour or has mold, it's best to throw it away. It's always safer to trust your nose and eyes. Enjoy your delicious soup while it's fresh! Italian Penicillin Chicken Soup is a warm and hearty dish. It combines chicken, vegetables, and pasta in a rich broth. Many call it "penicillin" for its comforting and healing properties. This soup is perfect for cold days or when you're feeling under the weather. Making this soup takes about one hour. You will spend around fifteen minutes prepping the ingredients. The cooking time is about forty-five minutes. This includes simmering the broth and cooking the chicken and pasta. Yes, you can use chicken thighs. They add extra flavor and tenderness. Just adjust the cooking time if needed. Thighs may take less time to cook than a whole chicken. Ensure the chicken reaches a safe internal temperature. To spice up your soup, add more red pepper flakes. You can also include chopped jalapeños or a dash of hot sauce. Start with a small amount, then taste as you go. Adjust the heat to your liking. This soup pairs well with crusty bread or a fresh salad. You can also serve it with garlic bread for a tasty side. Consider a light dessert, like fruit or sorbet, to finish the meal. This blog covered the art of making Italian Penicillin Chicken Soup. We discussed key ingredients, like whole chicken and fresh vegetables, along with the best herbs and spices. You learned step-by-step cooking techniques and tips to adjust flavor and consistency. Exploring variations and storage methods helps you customize and keep your soup fresh. In closing, this soup offers warmth, comfort, and endless flavor options. Enjoy making your own version!

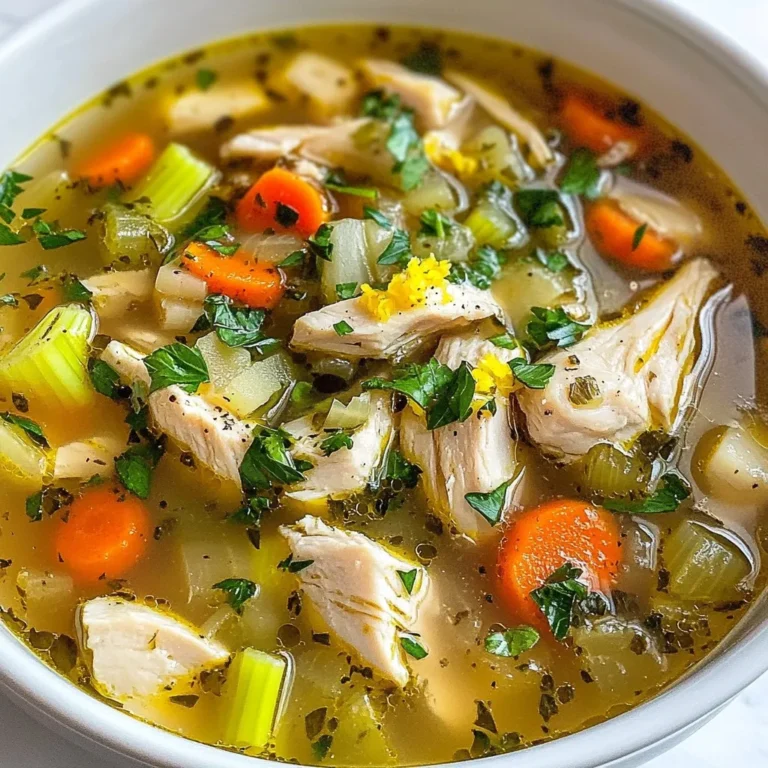
Italian Penicillin Chicken Soup Nourishing and Simple

To make Slow Cooker Marry Me Chicken, gather the following ingredients: - 4 boneless, skinless chicken breasts - 1 teaspoon salt - 1/2 teaspoon black pepper - 1 teaspoon garlic powder - 1 teaspoon onion powder - 1 cup sun-dried tomatoes, finely chopped - 1 cup heavy cream - 1 cup chicken broth - 1 cup freshly grated Parmesan cheese - 1 teaspoon mixed Italian herbs - Fresh basil leaves, for garnish Each ingredient plays a key role in this dish. The chicken provides a solid base, while the sun-dried tomatoes add a burst of flavor. The heavy cream and chicken broth create a rich sauce that coats the chicken perfectly. Seasoning the chicken with salt, pepper, garlic powder, and onion powder enhances its taste. The Parmesan cheese enriches the sauce, making it creamy and delicious. Mixed Italian herbs bring a lovely aroma and depth to the dish. Finally, fresh basil leaves add a touch of color and freshness when serving. When you have all the ingredients ready, you're set to create a warming and flavorful meal that will impress anyone who tries it. {{ingredient_image_2}} To start, season the chicken breasts well. Use one teaspoon of salt, half a teaspoon of black pepper, one teaspoon of garlic powder, and one teaspoon of onion powder. Rub the seasonings over the chicken evenly. This step helps the chicken absorb all the flavors. Next, place the seasoned chicken breasts in the slow cooker. Lay them flat at the bottom. This way, the juices can flow around the chicken as it cooks. Now, it's time to add the sun-dried tomatoes. Chop one cup of sun-dried tomatoes finely and sprinkle them over the chicken. Make sure to spread them out to ensure even flavor. In a separate bowl, prepare the creamy mixture. Combine one cup of heavy cream, one cup of chicken broth, one cup of grated Parmesan cheese, and one teaspoon of mixed Italian herbs. Whisk until smooth. This creamy sauce will make the dish rich and comforting. Carefully pour this mixture over the chicken and tomatoes. Ensure that everything is covered well by the sauce. Cover the slow cooker and set it to cook. If you choose low heat, cook for six to seven hours. If you prefer high heat, three to four hours will do. The chicken should become tender and fully cooked. Once the cooking time is up, use two forks to shred the chicken in the slow cooker. Mix it well with the creamy sauce. This step allows all the flavors to blend together, making each bite delicious. To ensure even flavor distribution, layer the sun-dried tomatoes well. Spread them evenly over the seasoned chicken. This way, every bite will burst with flavor. Mix the creamy sauce well before pouring it over the chicken. A smooth blend helps coat everything evenly. For tender chicken texture, cook on low heat for six to seven hours. This slow cooking breaks down tough fibers, making the chicken soft. If you’re short on time, high heat for three to four hours works too, but low is best for tenderness. To plate the dish, scoop the chicken onto warm plates. Drizzle the creamy sauce generously over the chicken. Add fresh basil leaves on top for color. This simple garnish makes your dish look inviting. For sides, I recommend crusty garlic bread or al dente pasta. These pair nicely with the creamy sauce. A fresh salad can also add a nice crunch. Choose sides that balance the rich flavors. For leftovers, let the dish cool down first. Store it in airtight containers to keep it fresh. It can last in the fridge for up to three days. If you want to enjoy it later, freezing is an option too. To reheat without losing flavor, use low heat in the microwave or on the stove. Add a splash of chicken broth or cream to keep it moist. Heat gently, stirring to blend the flavors back together. Enjoy that creamy goodness again! Pro Tips Use Fresh Ingredients: Opt for high-quality, fresh sun-dried tomatoes and herbs to enhance the flavor profile of your dish. Adjust Creaminess: If you prefer a lighter sauce, consider substituting half of the heavy cream with Greek yogurt for a tangy twist. Perfect Shredding: Allow the chicken to rest for a few minutes after cooking before shredding to keep it juicy and tender. Storage Tips: This dish stores well in the fridge for up to 3 days. Reheat gently to keep the chicken moist. {{image_4}} If you want to try a dairy-free version, swap heavy cream for coconut cream. This keeps the dish rich and creamy without dairy. For cheese lovers, use a dairy-free Parmesan. Want to change the protein? You can use boneless thighs or even turkey. Each option brings its own unique taste, but the cooking times may vary slightly. Adding vegetables is a fun way to boost flavor. Try spinach, bell peppers, or zucchini. They blend well and add color. Another option is to mix in mushrooms for an earthy taste. To spice it up, consider adding crushed red pepper or Italian seasoning. A dash of smoked paprika can also add depth to the dish. Adjust the spices based on your taste. Transform your Marry Me Chicken into a pasta dish. Serve it over cooked pasta like fettuccine or penne. The creamy sauce clings to the pasta perfectly. You can also pair it with rice or quinoa. These grains soak up the sauce well. For a heartier option, serve it with farro or barley. Each pairing makes the meal feel complete and satisfying. To keep your Marry Me Chicken fresh, use the right containers. Glass containers with tight lids work best. They seal well and keep air out. You can also use BPA-free plastic containers. Make sure they are food-safe. When storing, let the dish cool first. This helps avoid moisture build-up. Once cool, spoon the chicken and sauce into your containers. Fill them only three-quarters full. This leaves room for the food to expand if it freezes. To maintain freshness, store your leftovers in the fridge. They will last for 3 to 4 days. For longer storage, consider freezing. If you want to freeze Marry Me Chicken, start by prepping it right. First, let the dish cool completely. Next, portion the chicken and sauce into freezer-safe bags. Squeeze out as much air as you can. This prevents freezer burn. Label the bags with the date. This helps you track how long they stay frozen. Marry Me Chicken can be frozen for up to 3 months. When you’re ready to enjoy it again, thaw the chicken in the fridge overnight. If you're short on time, you can use the microwave on the defrost setting. After thawing, reheat the chicken in a pot over medium heat. Stir it often to keep it from sticking. You can also use the slow cooker on low for 1 to 2 hours. This method keeps the sauce creamy and delicious. Can I use frozen chicken breasts? Yes, you can use frozen chicken breasts. Just make sure to cook them longer. Add an extra hour if you cook on low. If you use high heat, add 30 minutes. Always check that the chicken reaches 165°F for safety. How can I make this dish more spicy? To spice it up, add red pepper flakes or diced jalapeños. You can also use spicy Italian sausage instead of chicken. Just adjust the amount based on your heat preference. A touch of cayenne pepper can also enhance the flavor. Can I prepare this dish ahead of time? Yes, you can prep this dish ahead. Season the chicken and layer it in the slow cooker. Cover and store it in the fridge overnight. When you are ready, add the creamy mixture and start cooking. This saves time and adds flavor! Slow Cooker Marry Me Chicken is simple yet full of flavor. We covered the key ingredients, easy steps, and helpful tips to make it perfect. Remember to season well and cook it low for the best results. Feel free to try new flavors or serve it with your favorite sides. With these tips, you will impress anyone you serve this dish to. Enjoy every bite of your Marry Me Chicken and happy cooking!

Slow Cooker Marry Me Chicken Flavorful Comfort Dish

- 4 bone-in, skin-on chicken thighs - 1/4 cup fresh cilantro, finely chopped - Zest and juice of 2 limes - 3 cloves garlic, minced - 1 teaspoon ground cumin - 1 teaspoon smoked paprika - 1 teaspoon chili powder - Salt and freshly ground black pepper to taste - 2 tablespoons extra-virgin olive oil - 1 ripe avocado, sliced (for garnish) - Lime wedges (for serving) I love using bone-in, skin-on chicken thighs. They stay juicy and full of flavor. Fresh cilantro adds a bright taste. The zest and juice from limes bring a burst of freshness. Garlic gives the dish a rich depth. Spices like ground cumin, smoked paprika, and chili powder add warmth and heat. Olive oil helps the chicken crisp up nicely. Salt and pepper are key for enhancing all the flavors. You can garnish with avocado slices and lime wedges for a great finish. These ingredients come together to create a dish that is not only tasty but also simple to prepare. Each bite of crispy chicken thighs, combined with the zesty marinade, is pure joy. {{ingredient_image_2}} First, preheat your oven to 425°F (220°C). This heat is key for crispy skin. In a large bowl, mix the marinade. Combine the cilantro, lime zest, lime juice, minced garlic, cumin, smoked paprika, chili powder, olive oil, salt, and pepper. Whisk until it’s all blended. This creates a fresh, zesty flavor. Take your chicken thighs and coat them in the marinade. Make sure each piece is well covered. For the best taste, let the chicken marinate for at least 30 minutes at room temperature. You can also marinate it overnight in the fridge for a stronger flavor. This step is important for juicy, tasty chicken. Heat an oven-safe skillet over medium-high heat. Place the marinated chicken thighs skin-side down in the hot skillet. Sear them for about 5-7 minutes. Look for that nice, golden brown color on the skin. Then, flip the thighs over to skin-side up. Transfer the skillet to your preheated oven. Bake for 20-25 minutes. Use a meat thermometer to check the internal temperature. It should reach 165°F (74°C). This ensures your chicken is safe to eat. After cooking, let the chicken rest for about 5 minutes. This helps keep the juices inside, making the chicken tender. To get that perfect crispy skin, use a cast-iron skillet. It holds heat well. Start with medium-high heat. This allows the skin to brown nicely. Sear the chicken for 5-7 minutes. Once it’s golden, flip it skin-side up. Avoid moving it around too much. Let it sit and crisp up. After cooking, let the chicken rest for 5 minutes. This step keeps juices inside. It helps make each bite tender and juicy. Want more flavor? Try adding extra spices. A pinch of cayenne gives heat. Fresh herbs like parsley or thyme can add depth. You can also experiment with different marinades. For a zesty twist, try orange juice or even pineapple. For a different marinating method, mix the marinade the night before. Letting the chicken soak overnight boosts flavor. The longer it marinates, the better it tastes. Always use a meat thermometer. This tool checks if your chicken is safe to eat. The internal temperature should reach 165°F (74°C). This ensures that harmful bacteria are gone. Letting chicken rest is vital too. It allows juices to settle. This makes the chicken moist and tasty. Following these tips guarantees a delicious meal every time. Pro Tips Marination Matters: Allowing the chicken to marinate overnight in the refrigerator will enhance the flavor significantly, making it more tender and juicy. Perfect Searing: Ensure your skillet is hot before adding the chicken thighs. A good sear creates a crispy skin and locks in moisture. Resting Period: Let the chicken rest for at least 5 minutes after cooking. This helps the juices redistribute for a more succulent bite. Serving Suggestions: Pair the chicken with a fresh salad or rice to complement the flavors, and don't forget to drizzle any remaining pan juices on top for extra flavor. {{image_4}} You can use boneless thighs for easier eating. They cook faster but may lack some flavor. Chicken breasts work too, but they can dry out if overcooked. If you want to switch proteins, try pork. Pork tenderloin can absorb the marinade well and gives a nice twist. For a spicy version, add diced jalapeños to the marinade. You can also use red pepper flakes for a different heat. If you want more citrus, swap lime for orange or even grapefruit. Each fruit brings a unique taste that pairs well with cilantro. Pair your chicken with rice or quinoa for a complete meal. A fresh side salad with mixed greens can balance the rich flavors. If you have leftovers, shred the chicken and make a tasty salad. Add some avocado and a squeeze of lime for extra flavor. To keep your leftover crispy cilantro lime chicken thighs fresh, store them in an airtight container. Make sure to let the chicken cool down before sealing it up. This helps prevent steam, which can make the skin soggy. For the best taste, eat the leftovers within 3 days. When you're ready to enjoy them again, you can add a squeeze of fresh lime juice to brighten up the flavors. You can freeze both marinated and cooked chicken thighs. If you freeze marinated chicken, place it in a freezer bag after marinating. Remove as much air as possible. For cooked chicken, let it cool, then wrap it tightly in plastic wrap or foil. Use a freezer-safe bag for added protection. The recommended shelf life for both is about 3 months. After this time, the flavor may fade. To reheat your chicken thighs without losing moisture, use the oven. Preheat it to 350°F (175°C). Place the chicken on a baking sheet and cover it with foil. This keeps the chicken juicy. Heat for about 15-20 minutes until warmed through. You can also use a microwave, but be careful. Heat in short bursts and check often to avoid drying it out. Always make sure your chicken reaches an internal temperature of 165°F (74°C) for safety. You should marinate chicken thighs for at least 30 minutes. This time lets the flavors soak in well. For a deeper taste, you can marinate them overnight. Just keep them in the fridge if you do. Yes, you can use skinless chicken thighs. However, the skin adds crispiness and flavor. Without the skin, your dish may lose some texture and taste. If you prefer skinless, consider adding more oil to keep it moist. Cook chicken thighs until they reach 165°F (74°C). This temperature ensures they are safe to eat. Use a meat thermometer to check the temp. It helps you avoid undercooking or overcooking the chicken. This article covered how to prepare delicious bone-in chicken thighs with fresh herbs and spices. You learned about the key ingredients, step-by-step cooking instructions, and helpful tips to ensure crispy skin and great flavor. Remember, marinating adds depth, and storing properly keeps your leftovers tasty. As you experiment with variations and flavors, enjoy the process. Cooking is fun, and your skills will grow. You can create a meal your friends and family will love!

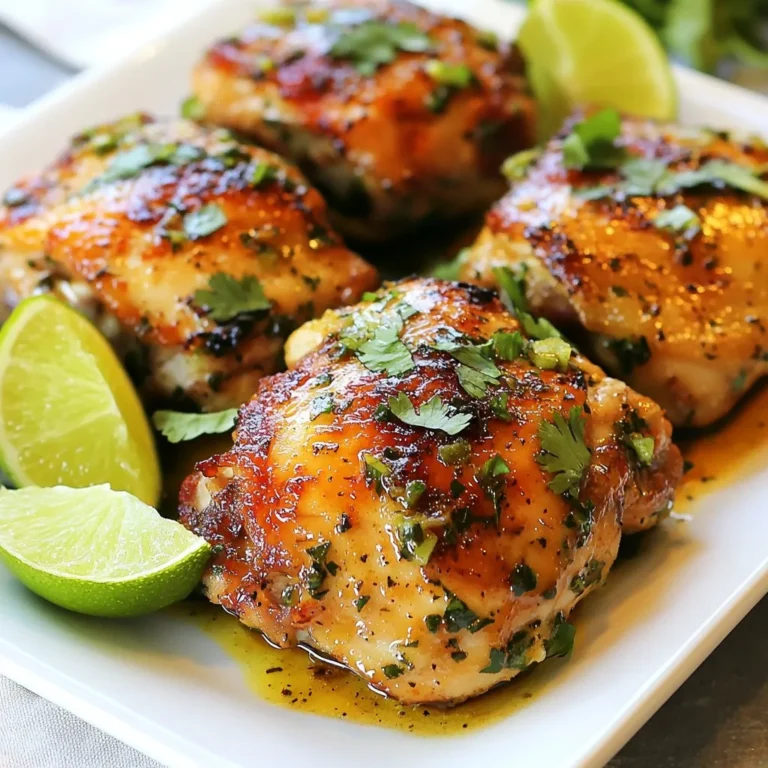
Crispy Cilantro Lime Chicken Thighs Flavor Burst Dish

- 1 cup unsalted butter, softened to room temperature - 1 cup brown sugar, tightly packed - 1/2 cup granulated sugar - 1 large egg, at room temperature - 2 teaspoons pure vanilla extract - 2 1/2 cups all-purpose flour - 1 teaspoon baking soda - 1 teaspoon fine sea salt - 1 cup mini chocolate chips - 1 cup Christmas-themed M&M's - 1 tablespoon colorful sprinkles (for decoration, optional) When I make Christmas Cookie Monster Cookies, I love using these simple ingredients. They come together to create a soft and chewy cookie filled with festive joy. Each ingredient plays a role in building flavor and texture. Optional Decoration Items: You can add colorful sprinkles for a fun touch. Sprinkles bring a joyful look to the cookies. They also add a little crunch. You can use any type of sprinkles you like! {{ingredient_image_2}} Start by preheating your oven to 350°F (175°C). This temperature works best for baking cookies. Next, line two baking sheets with parchment paper. This step makes cleanup easy and helps the cookies not stick. In a large mixing bowl, add 1 cup of softened unsalted butter, 1 cup of packed brown sugar, and 1/2 cup of granulated sugar. Use a hand mixer or a stand mixer. Mix these on medium speed for about 3-4 minutes. You want the mixture to be light and fluffy. This step adds air to the dough and makes the cookies soft. Now, it’s time to add one large egg and 2 teaspoons of pure vanilla extract to the bowl. Beat this mixture again until everything is mixed well. Make sure there are no streaks of egg left. This part helps bind the dough together. In another bowl, whisk together 2 1/2 cups of all-purpose flour, 1 teaspoon of baking soda, and 1 teaspoon of fine sea salt. Gradually add this dry mixture to the wet mixture. Mix until just combined to avoid overworking. Overmixing can make the cookies tough. Gently fold in 1 cup of mini chocolate chips and 1 cup of festive Christmas-themed M&M's using a rubber spatula. Be sure to mix them evenly throughout the dough. This step adds fun and flavor to each bite. Using a cookie scoop or a tablespoon, portion the dough onto the prepared baking sheets. Space each cookie about 2 inches apart. This allows the cookies to spread while baking. Bake them in the oven for 10-12 minutes, but keep an eye on them. The edges should be lightly golden, while the centers remain soft. Once the cookies are baked, remove them from the oven. Let them cool on the baking sheet for about 5 minutes. Then, transfer them to a wire rack to cool completely. Cooling is key to getting the right texture. Enjoy the smell of fresh cookies! When baking cookies, the key is to know when to stop. Underbaking yields soft, chewy cookies. Overbaking gives you crunchy treats. For the best texture, take them out when the edges are golden and the centers look a bit shiny. They will firm up as they cool. Make your cookies shine with fun decorations! After baking, try drizzling melted chocolate over the tops. You can also add colorful sprinkles or extra M&M's for a festive touch. Stacking them on a lovely plate adds to the holiday charm. A sprinkle of powdered sugar can make them look extra special. Sometimes cookie dough can be tricky. If your dough is too crumbly, mix in a little milk. This helps bind it together. If it’s too sticky, add a bit more flour. Always remember to measure your ingredients carefully. This will help you avoid common problems and create perfect cookies every time! Pro Tips Chill the Dough: For thicker cookies, chill the dough for at least 30 minutes before baking. This helps prevent spreading and gives the cookies a better texture. Use Room Temperature Ingredients: Ensure your butter and egg are at room temperature for a smoother batter and better incorporation of ingredients. Don’t Overbake: To achieve soft and chewy cookies, take them out of the oven when the edges are golden but the centers are still slightly underbaked. They will continue to cook on the baking sheet. Storage Tip: Store cookies in an airtight container at room temperature for up to a week, or freeze for longer storage. Layer with parchment paper to prevent sticking. {{image_4}} You might want to try different sugars or flours. For a healthier option, use coconut sugar instead of brown sugar. This gives a slight caramel flavor while lowering the glycemic index. If you’re gluten-free, replace all-purpose flour with almond flour. It adds a nutty taste and keeps cookies soft. Get creative with themes! For Halloween, swap Christmas-themed M&M's for orange and black candies. You can even change the sprinkles to match the season. For birthdays, use colorful sprinkles and mix in pastel candies. This makes the cookies fun for any occasion! Consider adding fun mix-ins. Try adding crushed peppermint candies for a minty twist. You can also mix in nuts like walnuts or pecans for crunch. Another great idea is to add dried fruits like cranberries or cherries for a tangy flavor. These simple changes keep your cookies exciting! When storing your Christmas Cookie Monster cookies, keep them in an airtight container. This helps keep them soft and fresh. You can store them at room temperature for up to a week. If you live in a humid area, refrigeration might be better. However, cold air can make cookies hard. Freezing cookies is easy and fun! To freeze, let the cookies cool completely. Then, place them in a single layer on a baking sheet and freeze for 1-2 hours. Once frozen, transfer them to a freezer bag. Remove as much air as possible before sealing. They can last up to three months in the freezer. You can bake them straight from the freezer. Just add a couple of extra minutes to the baking time. Understanding how long cookies last is key to enjoying them. At room temperature, these cookies stay fresh for about seven days. In the fridge, they can last up to two weeks. When frozen, they taste great up to three months later. Just remember to check for any signs of freezer burn to keep them at their best! These cookies can last up to a week. Store them in an airtight container at room temperature. If you want them to stay fresh longer, keep them in the fridge. Yes, you can prepare the dough ahead of time. Wrap it well in plastic wrap and keep it in the fridge for up to three days. This way, you can bake fresh cookies whenever you want. You can use white chocolate chips, butterscotch chips, or even chopped nuts. They add a fun twist to your cookies. Just make sure to keep the same amount. Yes, you can freeze these cookies! After baking, let them cool completely. Place them in a single layer on a baking sheet. Freeze until firm, then transfer to a freezer bag. They can last up to three months. This article covered everything you need to bake tasty cookies. You learned the right ingredients, step-by-step instructions, and helpful tips. We explored fun variations and how to store cookies for freshness. Remember, cookie baking can be creative and enjoyable. Use these techniques to impress friends and family. Now, get in the kitchen and start baking those delicious cookies!

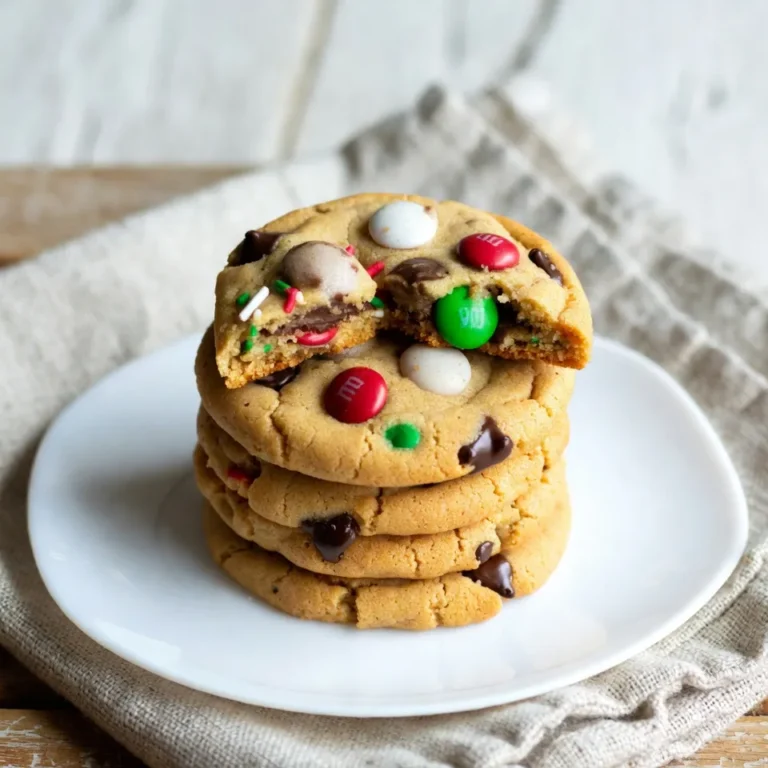
Christmas Cookie Monster Cookies Festive and Fun Treat

To make an Old-Fashioned German fruitcake, gather these simple ingredients: - 2 cups mixed dried fruits (such as raisins, currants, apricots, and cherries) - 1 cup candied citrus peel, finely chopped - 1 cup unsalted butter, softened to room temperature - 1 cup packed brown sugar - 4 large eggs, at room temperature - 3 cups all-purpose flour, sifted - 1 teaspoon baking powder - 1 teaspoon ground cinnamon - 1/2 teaspoon ground nutmeg - 1/4 teaspoon ground cloves - 1/4 teaspoon fine sea salt - 1 cup chopped nuts (preferably walnuts or pecans) - 1/2 cup fresh orange juice - Zest of 1 orange - Zest of 1 lemon 1. Mixed Dried Fruits: This mix adds sweetness and chewiness. Use a blend of raisins, currants, apricots, and cherries for full flavor. 2. Candied Citrus Peel: This adds a bright, tangy taste. Chop it finely so it blends well in the cake. 3. Butter and Sugar: Softened unsalted butter is key for creaming. Brown sugar gives a rich flavor. 4. Eggs, Flour, and Baking Powder: Use large eggs at room temperature for smooth mixing. Sift all-purpose flour with baking powder for a light cake. 5. Spices and Seasonings: Ground cinnamon, nutmeg, cloves, and sea salt enhance the cake’s warm flavor. 6. Nuts and Citrus Zest: Chopped walnuts or pecans add crunch. Fresh orange and lemon zest brighten the cake. Each ingredient plays a role in creating a moist, flavorful cake. As you prepare, enjoy the sweet and spicy aromas that fill your kitchen! {{ingredient_image_2}} First, gather your ingredients. You need: - 2 cups mixed dried fruits (raisins, currants, apricots, cherries) - 1 cup candied citrus peel, chopped - 1 cup unsalted butter, softened - 1 cup packed brown sugar - 4 large eggs, at room temp - 3 cups all-purpose flour, sifted - 1 teaspoon baking powder - 1 teaspoon ground cinnamon - 1/2 teaspoon ground nutmeg - 1/4 teaspoon ground cloves - 1/4 teaspoon fine sea salt - 1 cup chopped nuts (walnuts or pecans) - 1/2 cup fresh orange juice - Zest of 1 orange - Zest of 1 lemon Grease and flour a 10-inch bundt pan or a loaf pan. Preheat your oven to 325°F (160°C). This step ensures a smooth release after baking. Now, in a medium bowl, mix the dried fruits and chopped citrus peel. Pour the orange juice over this mix. Let it soak for at least one hour. This makes the fruits plump and more flavorful. In a large bowl, cream the softened butter and brown sugar. Use an electric mixer for about 3-5 minutes. The mixture should be light and fluffy. Next, add the eggs one at a time. Mix well after each addition. This keeps your batter smooth. In another bowl, whisk the sifted flour, baking powder, cinnamon, nutmeg, cloves, and salt. This helps distribute the spices evenly. Now, gently fold the dry mix into the butter and egg mixture with a spatula. Mix until just combined. Avoid overmixing, as this can make your cake dense. Add the soaked fruits, chopped nuts, orange zest, and lemon zest. Stir gently until everything is well mixed. Pour the batter into your prepared pan. Smooth the top with a spatula for an even bake. Bake in the preheated oven for 60-75 minutes. Check for doneness with a toothpick. It should come out clean when the cake is done. Once baked, take the fruitcake out of the oven. Let it cool in the pan for about 15 minutes. After that, carefully invert it onto a wire rack. This helps it cool completely. For a beautiful finish, dust the top with powdered sugar. You can also drizzle a simple glaze made from powdered sugar and a few drops of water. For extra flair, serve slices with fresh citrus or a dollop of whipped cream. Soaking dried fruits helps them become plump and juicy. I like to soak them in orange juice. Use a bowl to combine the mixed dried fruits and chopped candied citrus peel. Pour in the orange juice, then let them soak for at least 1 hour. This step makes the fruits more flavorful and moist. You can even soak them overnight for even better results. To get the right cake texture, avoid overmixing the batter. After you combine the wet and dry ingredients, use a spatula to mix gently. Fold in the soaked fruits and nuts carefully. This keeps the cake light and fluffy. Also, make sure your eggs are at room temperature. This step helps the batter blend smoothly. To enhance flavor, consider adding spices like ginger or cardamom. You can also swap out nuts for your favorites, like almonds. For a lovely finish, dust the cooled cake with powdered sugar. A simple glaze made of powdered sugar and water adds shine. Serve the slices with fresh citrus or whipped cream for a delightful touch. Pro Tips Soak the Fruits: Soaking the dried fruits in orange juice not only rehydrates them but also infuses the cake with a delightful citrus flavor, enhancing the overall taste. Room Temperature Ingredients: Ensure all your ingredients, especially eggs and butter, are at room temperature. This helps create a smoother batter and contributes to a lighter texture in the final cake. Avoid Overmixing: When combining the dry ingredients with the wet mixture, mix just until combined. Overmixing can lead to a dense cake instead of a light and fluffy one. Check for Doneness: Start checking the cake for doneness at the 60-minute mark. Insert a toothpick into the center; if it comes out clean, the cake is ready to be removed from the oven. {{image_4}} You can switch up the dried fruits in this cake. Try using dried figs, dates, or prunes. Each fruit brings its own unique flavor. For a fun twist, add dried pineapple or mango. These fruits give a tropical touch to your fruitcake. The mix of flavors adds depth and excitement to each bite. The recipe calls for walnuts or pecans, but you can use other nuts too. Almonds, hazelnuts, or cashews work great. Just chop them finely to blend well. Each nut brings a different crunch and taste. This choice can change the cake's flavor profile. Feel free to experiment with your favorites. Besides cinnamon, nutmeg, and cloves, consider adding ginger or allspice. A pinch of ground ginger adds warmth and zest. Allspice can enhance the cake's complexity. You can also try a dash of cardamom for a rich aroma. Play with spice levels to find your perfect mix. Each variation makes your fruitcake special and unique. To keep your old-fashioned German fruitcake fresh, wrap it well. Use plastic wrap or aluminum foil. You can also place it in an airtight container. This helps keep moisture in and air out. Store the cake in a cool, dark place. Avoid heat and direct sunlight. These can dry out the cake and spoil its taste. When stored properly, your fruitcake can last quite a while. It stays fresh for about one month at room temperature. If you place it in the fridge, it can last up to three months. For best taste and quality, enjoy it within these time frames. Freezing is a great way to save your fruitcake for later. First, wrap it tightly in plastic wrap. Then, add a layer of aluminum foil. This protects it from freezer burn. You can freeze the cake for up to one year. When you’re ready to eat it, thaw it in the fridge overnight. Avoid thawing at room temperature to keep it moist. Enjoy your delicious fruitcake whenever you like! German fruitcake stands out due to its rich flavors and dense texture. It often uses a mix of dried fruits, nuts, and spices. Other fruitcakes may use more candied fruits or less spice. German versions emphasize tradition and often include unique local ingredients. They are usually baked in a bundt shape, making them visually special. Fresh fruits will not work well in this recipe. Dried fruits bring sweetness and a chewy texture. They also hold their shape during baking. Fresh fruits release moisture and can make the cake soggy. If you want to add a fresh touch, serve slices with fresh fruit on the side. Check the cake after 60 minutes of baking. Insert a toothpick into the center. If it comes out clean, the cake is ready. If there is wet batter, bake for 5 to 10 more minutes. Avoid opening the oven too often, as this can change the baking time. Serve German fruitcake with a light dusting of powdered sugar. You can also drizzle a simple glaze on top. A dollop of whipped cream adds a great touch. Pair it with fresh citrus slices for a bright flavor. Enjoy it with coffee or tea for a cozy treat. In this blog post, we explored the key ingredients, step-by-step instructions, and helpful tips for making fruitcake. We discussed variations, storage info, and answered common questions. Now you have all the tools to bake a delicious fruitcake. Use your creativity and make it your own. Enjoy your baking journey and the tasty results!

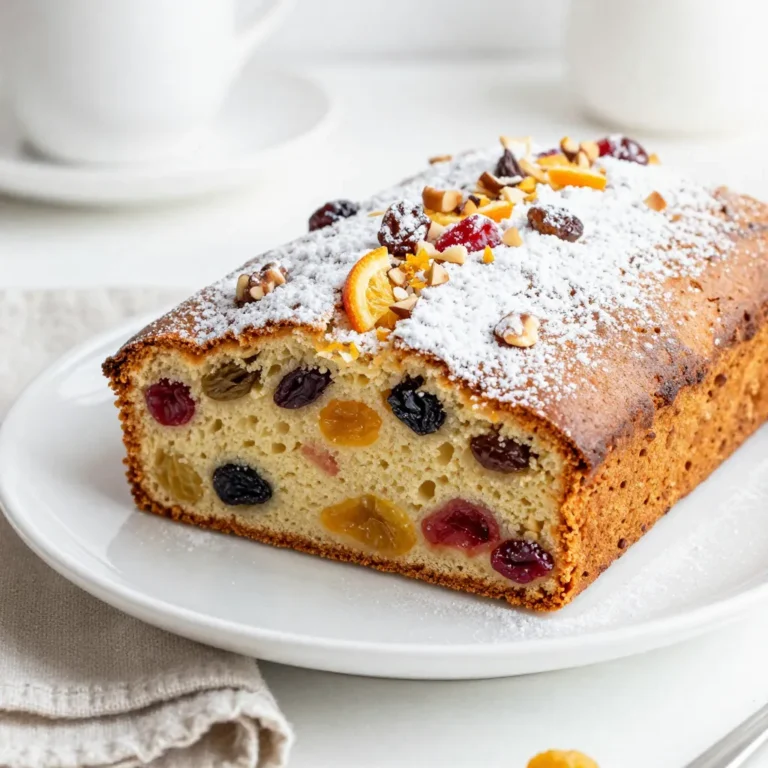
Old-Fashioned German Fruitcake Delightful and Easy Recipe

- 9 sheets of no-boil lasagna noodles - 2 cups ricotta cheese - 3 cups shredded mozzarella cheese - 1 cup grated Parmesan cheese - 3 cups fresh spinach (or 3 cups frozen spinach, thawed and well-drained) - 2 cups marinara sauce - 2 teaspoons dried Italian seasoning - 1 teaspoon garlic powder - Salt and pepper to taste - Fresh basil for garnish To make my no-boil creamy lasagna, I use simple, fresh ingredients. The no-boil lasagna noodles save time and hassle. You don’t need to cook them first. Just layer them straight into the dish. Ricotta cheese adds a rich, creamy taste. I like to mix it with half of both mozzarella and Parmesan. This blend creates a delightful filling. Spinach is a great addition, giving color and nutrition. You can use fresh or frozen spinach, whichever you prefer. Marinara sauce is key. It keeps the noodles moist and adds flavor. I use dried Italian seasoning and garlic powder for an extra kick. Finally, I season with salt and pepper to taste. For garnish, fresh basil adds a nice touch. It brightens the dish and makes it look beautiful. With these ingredients, you will create a mouth-watering lasagna that everyone will love. {{ingredient_image_2}} First, preheat your oven to 375°F (190°C). This step is key for even cooking. Next, take a 9x13-inch baking dish. Coat the bottom with a thin layer of marinara sauce. This sauce keeps the noodles moist and adds flavor. In a large bowl, mix the ricotta cheese with half of the mozzarella and half of the Parmesan. Add in the spinach, dried Italian seasoning, garlic powder, and a pinch of salt and pepper. Stir until you have a creamy filling. This mix is rich and adds a lot of taste to your lasagna. Start with a layer of three no-boil lasagna noodles laid side by side. Then, spread half of the ricotta mixture over the noodles. Drizzle about 1 cup of marinara sauce on top. Make sure it covers the mix evenly. Repeat this process: add another three noodles, the rest of the ricotta mixture, and another cup of marinara. Finish with the last three noodles on top. Pour the remaining marinara sauce over this layer, then sprinkle the rest of the mozzarella and Parmesan on top. This gives your lasagna a cheesy crust. Cover the baking dish tightly with aluminum foil. Make sure the foil does not touch the cheese, or it will stick. Place it in the preheated oven for 30 minutes. After that, carefully remove the foil. Let it bake for another 15 minutes. You want the cheese to bubble and turn golden. This step adds a nice finish. Once baked, let the lasagna rest for about 10 minutes. This helps it set. It makes cutting easier. When serving, add fresh basil leaves on top for color and extra flavor. You can serve slices on a rustic wooden platter to impress your guests. To make your lasagna creamy, moisture is key. The sauce and spinach add this needed moisture. You can also use quality cheeses. I recommend fresh ricotta and whole milk mozzarella for the best flavor. These cheeses melt well and help create a rich texture. Covering your lasagna with foil is very important. Make sure the foil does not touch the cheese. This prevents it from sticking. To remove the lasagna from the dish, use a sharp knife to cut around the edges first. Then, gently slide a spatula under the pieces to lift them out. You can add fresh herbs or spices to boost the flavor. Try mixing in some fresh basil or oregano in the ricotta mix. It adds a nice touch. As for side dishes, a crisp salad or some garlic bread pairs well with this lasagna. They balance the rich flavors and add freshness to your meal. Pro Tips Layer Wisely: Make sure to spread the marinara sauce evenly between layers to prevent dryness and to enhance the flavor. Cheese Choices: Experiment with different cheeses like fontina or gouda for a unique twist on the classic flavor profile. Resting Time: Allowing the lasagna to rest for 10 minutes before slicing not only improves the texture but also makes it easier to serve. Fresh Spinach Benefits: If using fresh spinach, lightly sautéing it can enhance its flavor and reduce moisture content, leading to a better overall dish. {{image_4}} You can make a meat lover's version of this lasagna. Just add ground beef or sausage to the ricotta mixture. Cook the meat in a pan before mixing it in. This adds a savory flavor and makes the dish heartier. You can use any ground meat you like. Just be sure to drain the fat before mixing. If you prefer a vegetarian option, use different vegetables like zucchini or mushrooms. Slice them thin and layer them between the noodles. You can also sauté the vegetables first. This adds a nice depth of flavor. Spinach works great, but feel free to get creative with your veggie choices. For a dairy-free or vegan lasagna, substitute with plant-based cheeses. Look for vegan ricotta and mozzarella at the store. You can also make your own with nuts or tofu. Use a marinara sauce without added dairy to keep it vegan. This way, everyone can enjoy a slice of lasagna! To store leftovers, let the lasagna cool completely. Cover it tightly with plastic wrap or aluminum foil. You can also place it in an airtight container. It will stay fresh in the fridge for about 3 to 5 days. When ready to enjoy, check for any signs of spoilage before reheating. If you want to freeze lasagna, let it cool first. Wrap it tightly in plastic wrap, then in aluminum foil. You can also use a freezer-safe container. It’s best to freeze it before baking, but you can freeze leftovers too. Lasagna can be frozen for up to 3 months. To avoid freezer burn, make sure it’s sealed well. When reheating, you can use the oven or microwave. For the oven, preheat to 350°F (175°C). Place the lasagna in an oven-safe dish and cover with foil. Heat for about 25-30 minutes. For the microwave, slice the lasagna into pieces. Heat on medium power for 2-3 minutes. Check to make sure it's hot all the way through. This helps keep the texture and flavor just right. Yes, you can use regular lasagna noodles. However, you need to boil them first. Follow the package instructions for cooking time. This can add extra steps to your recipe. No-boil noodles save time and ensure a softer texture. If you want an alternative to ricotta, try cottage cheese. It has a similar texture and a mild taste. You can also use cream cheese mixed with a bit of yogurt. This mixture will give you creaminess and a nice tang. Look for bubbling cheese and a golden-brown top. The edges should be slightly crispy. You can insert a knife in the center to check if it's hot. Let the lasagna rest for 10 minutes after baking. This helps it set for easier slicing. Yes, you can prepare the lasagna a day before. Just layer it in the baking dish and cover it tightly. When ready to bake, let it sit at room temperature for about 30 minutes. This ensures even cooking. You can also freeze it for later. Just make sure to wrap it well. When reheating, bake it covered to keep moisture. This blog post offers a simple way to make delicious lasagna. You learned about key ingredients, step-by-step instructions, and helpful tips. I shared ways to adapt this dish and how to store it. Remember, using quality ingredients gives the best taste. Whether you prefer meat, veggies, or a vegan option, you can enjoy making this dish your own. So, go ahead and whip up a delightful lasagna that everyone will love!

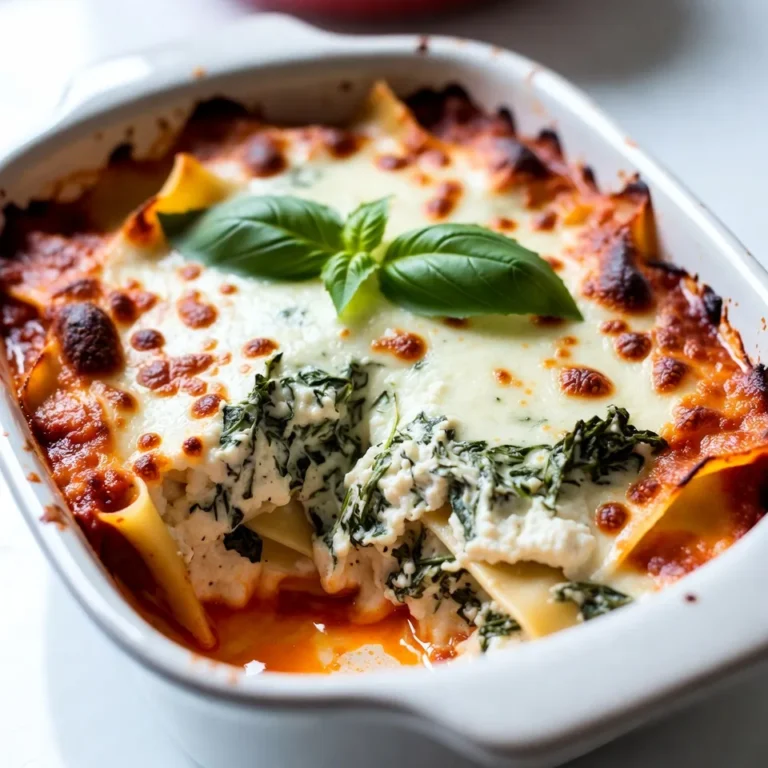
No Boil Creamy Lasagna Easy and Delicious Recipe

To make Classic Italian Wedding Soup, gather these ingredients: - 1 lb ground turkey or chicken - 1/2 cup grated Parmesan cheese - 1/4 cup fresh parsley, finely chopped - 1/4 cup plain breadcrumbs - 1 garlic clove, finely minced - 1/2 teaspoon salt - 1/4 teaspoon freshly ground black pepper - 8 cups chicken broth - 1 cup carrots, peeled and diced - 1 cup celery, diced - 1 cup kale, stems removed and chopped (or fresh spinach) - 1/2 teaspoon dried oregano - 1/2 teaspoon dried thyme - 1 cup small pasta (such as acini di pepe or orzo) - Additional salt and pepper, to taste - 1 tablespoon olive oil This soup is not just tasty; it is also healthy. Each serving has: - About 250 calories - 20 grams of protein - 8 grams of fat - 30 grams of carbohydrates - A good amount of vitamins from the veggies Feel free to mix things up with these optional ingredients: - Add different herbs like basil or rosemary for extra flavor. - Use ground beef or pork instead of turkey or chicken for a richer taste. - Try different greens like Swiss chard or collard greens. - Add beans for extra protein and fiber. - Use whole grain pasta for a healthier option. These choices let you make the soup fit your taste. Enjoy playing with the flavors! {{ingredient_image_2}} To start, gather your ingredients. In a large bowl, mix 1 pound of ground turkey or chicken. Add 1/2 cup of grated Parmesan cheese, 1/4 cup of fresh parsley, and 1/4 cup of plain breadcrumbs. Don't forget 1 minced garlic clove, 1/2 teaspoon salt, and 1/4 teaspoon black pepper. Use your hands to mix everything well. Once combined, roll the mixture into small meatballs, about 1 inch in size. You should make around 20 to 25 meatballs. This step is fun and quite hands-on, so enjoy it! Next, heat 1 tablespoon of olive oil in a large pot over medium heat. When the oil is hot, add the meatballs gently. Brown them for about 5 minutes, turning occasionally. This step gives your meatballs a lovely color and flavor. Once browned, take the meatballs out and set them aside. In the same pot, add 1 cup of diced carrots and 1 cup of diced celery. Sauté these vegetables for about 5 to 7 minutes until they soften. This will create a nice base for your soup. After the veggies soften, pour in 8 cups of chicken broth. Bring the broth to a gentle simmer over medium-high heat. Once the broth simmers, return the browned meatballs to the pot. Add 1/2 teaspoon of dried oregano and 1/2 teaspoon of dried thyme. Taste and add extra salt and pepper if needed. Now, stir in 1 cup of small pasta, like acini di pepe or orzo. Cook it according to the package instructions, usually about 8 to 10 minutes. During the last 2 minutes of cooking, add 1 cup of chopped kale or fresh spinach. Stir well to mix the greens into the soup. After everything cooks just right, taste the soup. Adjust the seasoning if necessary. Serve the soup hot in bowls, garnished with extra Parmesan if you like. Enjoy your classic Italian wedding soup! To make great meatballs, start with a good mix. Use ground turkey or chicken for lean flavor. Add in grated Parmesan, parsley, breadcrumbs, minced garlic, salt, and pepper. Mix until just combined. Don't overwork the meat; this keeps them tender. Roll the mixture into small balls, about one inch wide. You should get around 20 to 25 meatballs. Taste is key in this soup. Start with the basics: salt and pepper. After cooking the soup, taste it. If it needs more flavor, add a pinch of salt or pepper. Fresh herbs can elevate the taste. You can also add a splash of lemon juice for brightness. If you like heat, consider adding a little crushed red pepper. Serve the soup hot in rustic bowls. A sprinkle of extra Parmesan adds flavor and looks nice. Fresh parsley gives a burst of color. You can drizzle olive oil on top for a rich finish. Pair it with crusty bread for a complete meal. Enjoy this warm, hearty dish any time of year! Pro Tips Use Fresh Herbs: Fresh parsley adds a vibrant flavor to the meatballs and the soup, enhancing the overall taste. If you have it, consider adding fresh thyme or oregano as well for a more aromatic experience. Don't Overcook the Pasta: To ensure your pasta retains a perfect texture, cook it until just al dente. Remember that it will continue to cook slightly after being added to the hot broth. Adjust the Greens: Feel free to mix and match your leafy greens. Spinach wilts quickly, while kale holds its texture better, so adjust based on your preference and what you have on hand. Make It Ahead: This soup can be made in advance and stored in the fridge for up to three days. The flavors meld beautifully over time, but you may need to add a splash of broth when reheating. {{image_4}} You can swap the ground turkey or chicken for beef or pork. Both meats give a richer taste. Ground beef adds a hearty flavor. Pork meatballs bring a sweet note. Adjust the seasonings slightly to balance the flavor. You can use the same steps to prepare the meatballs. To make this soup vegetarian, use plant-based meat. You can find many great brands at the store. For a vegan version, skip the cheese or use a vegan substitute. Use vegetable broth instead of chicken broth. Add more vegetables, like mushrooms or bell peppers, for extra flavor. This way, you keep the soup hearty and satisfying! If you want to change the pasta, try different shapes. Small shells or ditalini work well too. You can also use gluten-free pasta for a gluten-free option. Cook it separately if you want to keep the soup gluten-free. This helps avoid mushy pasta in your soup. To keep your Italian wedding soup fresh, let it cool first. Use an airtight container. You can store it in the fridge for up to three days. Always label your container with the date. This helps you track how long it's been stored. If you want to eat it later, freezing is a great option. For longer storage, freeze the soup. Use freezer-safe bags or containers. Leave some space for the soup to expand as it freezes. It keeps well for up to three months. To prevent freezer burn, remove as much air as possible. Remember to label your containers with the date and contents. When you are ready to enjoy your soup, thaw it in the fridge overnight. Heat it on the stove over low to medium heat. Stir it often to ensure even heating. If the soup is too thick, add a bit of broth or water. You can also reheat it in the microwave. Use a microwave-safe bowl and cover it loosely. Heat in short intervals, stirring in between. Enjoy your warm, hearty meal! Italian Wedding Soup is not about weddings. The name comes from the word "marriage," which means the mix of flavors. It brings together rich broth, meatballs, and greens. This dish has roots in Southern Italy, where family meals are important. Immigrants brought it to America, where it became popular. Each cook adds their own twist, making it a true family favorite. Yes, you can use a slow cooker for this soup. Start by making the meatballs as usual. Brown them in a pan, then add them to the slow cooker. Put in the broth, veggies, herbs, and pasta. Cook on low for 6 to 8 hours. You will have a warm, tasty meal waiting for you. To make the soup gluten-free, swap out the breadcrumbs for gluten-free options. You can use ground nuts or gluten-free breadcrumbs. Also, check your pasta. Use gluten-free pasta varieties like rice or corn pasta. With these changes, enjoy a delicious gluten-free Italian Wedding Soup. If you want to change it up, spinach is a great choice. You can also use Swiss chard, arugula, or collard greens. Each green adds a unique taste. Feel free to mix and match to find your favorite combination. This blog post provides a clear guide to making classic Italian Wedding Soup. You learned about the key ingredients, cooking steps, and tips for perfect meatballs. I also shared ways to customize the soup and variations to fit your needs. Storing and reheating tips will help you enjoy leftovers, too. Remember, cooking is about creativity. Feel free to experiment with flavors and ingredients. Enjoy making this comforting dish for family or friends!

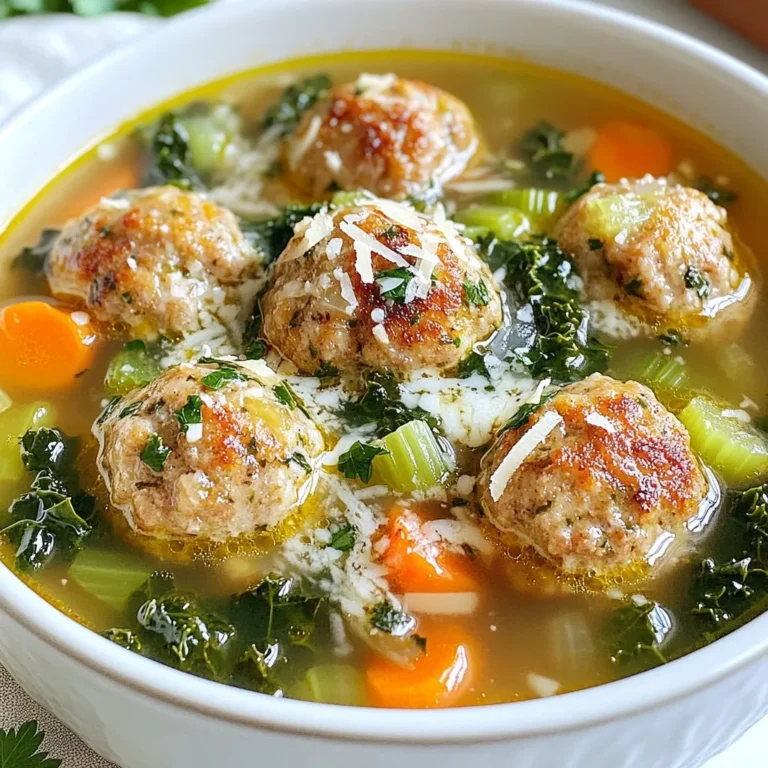
Classic Italian Wedding Soup Flavorful and Simple Meal

- 4 cups Rice Krispies cereal - 1 cup mini marshmallows - 1/4 cup unsalted butter - 10 oz white chocolate chips - 1/2 cup creamy peanut butter - 1/2 teaspoon vanilla extract - 1 cup colorful sprinkles White Chocolate Rice Krispie Balls are fun and easy to make. You will love how simple the ingredients are. The Rice Krispies cereal gives a nice crunch. The mini marshmallows add sweetness and softness. Unsalted butter helps everything stick together. White chocolate chips are key for that creamy, dreamy coating. Creamy peanut butter brings richness and flavor. A touch of vanilla extract gives it a warm aroma. Colorful sprinkles make these treats pop with color, making them perfect for any occasion. These ingredients blend to create a treat that looks good and tastes amazing. You can even switch up some ingredients if you want. Just remember, the balance of flavors is important. {{ingredient_image_2}} 1. Melting the butter Start by placing the unsalted butter in a large saucepan. Heat it over medium heat. Stir occasionally to prevent it from burning. Wait until the butter is fully melted and smooth. 2. Adding and melting marshmallows Once the butter melts, add the mini marshmallows to the pan. Keep stirring until the marshmallows melt and blend with the butter. You want a smooth and creamy mixture. 3. Incorporating peanut butter and vanilla Remove the pan from the heat. Quickly mix in the creamy peanut butter and the vanilla extract. Stir until everything combines well into a smooth mix. 1. Folding in Rice Krispies Gradually fold in the Rice Krispies cereal. Gently stir to coat each piece of cereal with the marshmallow mixture. Be careful not to crush the cereal. 2. Shaping the mixture Let the mixture cool for a few minutes. When it is cool enough to handle, grease your hands with butter or spray. Form small balls about 1-2 inches wide. 3. Placing on baking sheet Place each ball on a baking sheet lined with parchment paper. Make sure they are spaced out to avoid sticking. 1. Melting white chocolate In a microwave-safe bowl, melt the white chocolate chips. Heat them in 20-30 second intervals. Stir after each interval until the chocolate is smooth and creamy. 2. Dipping the balls Dip each Rice Krispie ball into the melted white chocolate. Roll it around to ensure it gets fully coated. Return the coated balls to the parchment paper. 3. Adding sprinkles decoration While the white chocolate is still warm, sprinkle colorful sprinkles on top of each ball. This adds a fun and festive touch. Let the chocolate set at room temperature or refrigerate for about 30 minutes until hard. Enjoy your delightful sweet treat! To ensure a smooth chocolate coating, melt the white chocolate carefully. Use a microwave in short bursts. Stir in between to avoid burning. This lets the chocolate melt evenly. Handling the mixture safely is key. After mixing the Rice Krispies, let it cool a bit. This makes it easier to form balls without burning your hands. Adjusting sweetness levels is simple. If you want less sweet, cut back on white chocolate. You can also use dark chocolate for a richer taste. For decorative serving suggestions, use a fun platter. A bright color will make your treats stand out. Arrange the Rice Krispie balls in a circle or in rows. Using themed sprinkles adds a special touch. For holidays, choose sprinkles that match the season. For a birthday, go with bright and colorful options. Ideas for platter arrangements can include clusters. Group the balls in small bunches. This creates a festive look. You can also sprinkle extra colorful sprinkles around the platter for flair. Pro Tips Use Fresh Ingredients: Always use fresh mini marshmallows and chocolate chips for the best flavor and texture in your Rice Krispie balls. Grease Hands for Shaping: To prevent the mixture from sticking, make sure to grease your hands with butter or non-stick spray while shaping the balls. Experiment with Toppings: Feel free to get creative with your toppings! Try crushed nuts, coconut flakes, or different types of sprinkles for a unique twist. Store Properly: Keep the Rice Krispie balls in an airtight container at room temperature for up to a week for optimal freshness. {{image_4}} You can change up your White Chocolate Rice Krispie Balls in fun ways. Here are some ideas: - Adding different types of nut butter: You can swap peanut butter for almond or cashew butter. This gives a new taste and can change the texture a bit. Each nut butter adds a unique flavor. - Incorporating flavored extracts: Try adding a bit of almond or coconut extract. Just a few drops can change the whole flavor of your treats. Experiment to find your favorite! - Including dried fruits or nuts: Add some chopped dried fruits like cranberries or apricots. You can also mix in chopped nuts for extra crunch. This makes your Rice Krispie balls more interesting and fun to eat. If you need to make changes for diet reasons, here are some options: - Gluten-free options: Rice Krispies are often gluten-free, but check the box to be sure. This makes your treat safe for those with gluten issues. - Vegan alternatives: You can use vegan butter and dark chocolate chips instead of white chocolate. This way, you keep it plant-based and still delicious! - Sugar-free variations: Use sugar-free chocolate chips and sugar substitutes in place of regular sugar. This makes a sweet treat that fits a low-sugar diet. These variations let you customize your Rice Krispie balls. Enjoy making them just the way you like! - Room temperature storage: You can keep these Rice Krispie balls in an airtight container at room temperature. They stay fresh for about two days. Make sure they are cool before sealing. - Refrigeration tips: If you want them to last longer, put them in the fridge. They stay good for up to a week this way. Just remember to store them in a sealed container to avoid drying out. - Freezing instructions: To freeze, place the balls in a single layer in an airtight container. They can last up to three months in the freezer. When ready to eat, let them thaw in the fridge overnight. - How long they last: At room temperature, the Rice Krispie balls last about two days. In the fridge, they last up to a week. In the freezer, they can stay fresh for three months. - Signs of spoilage: If the balls become hard or dry, they might be past their prime. Also, if you see any mold or an off smell, it’s time to toss them. Always trust your senses when it comes to food safety. Can I use a different type of chocolate? Yes, you can use milk or dark chocolate. Each type will change the flavor. Milk chocolate is sweeter, while dark chocolate adds richness. Try different types to find your favorite. How do I make the balls without peanut butter? You can replace peanut butter with almond butter or sunbutter. For a nut-free option, use a seed butter. The texture will remain similar and still taste great! Can I add other mix-ins to the recipe? Absolutely! You can add mini chocolate chips, dried fruit, or nuts. Be creative! Just make sure not to add too many, or the balls might fall apart. Why are my balls falling apart? Your mixture may be too dry or not mixed well. Make sure all ingredients combine fully. If it’s too crumbly, you can add a bit more melted butter or marshmallows. How can I fix chocolate that won’t melt? If chocolate gets lumpy, it may have overheated. Try adding a teaspoon of oil to smooth it out. Melt in shorter bursts next time to prevent this. What’s the best way to clean up sticky pans? Soak your pans in warm soapy water. This helps loosen the sticky bits. Using a non-stick spray next time can help prevent this issue. You can create delicious Rice Krispie balls using simple ingredients and steps. We covered the main ingredients, from Rice Krispies to colorful sprinkles. I explained the preparation, shaping, and coating for a sweet treat. Tips for perfecting your recipe and fun variations give you ways to customize. Store them easily and enjoy them longer. Whether you want to impress guests or treat yourself, this fun snack is simple and enjoyable. Get ready to make your own tasty Rice Krispie balls!

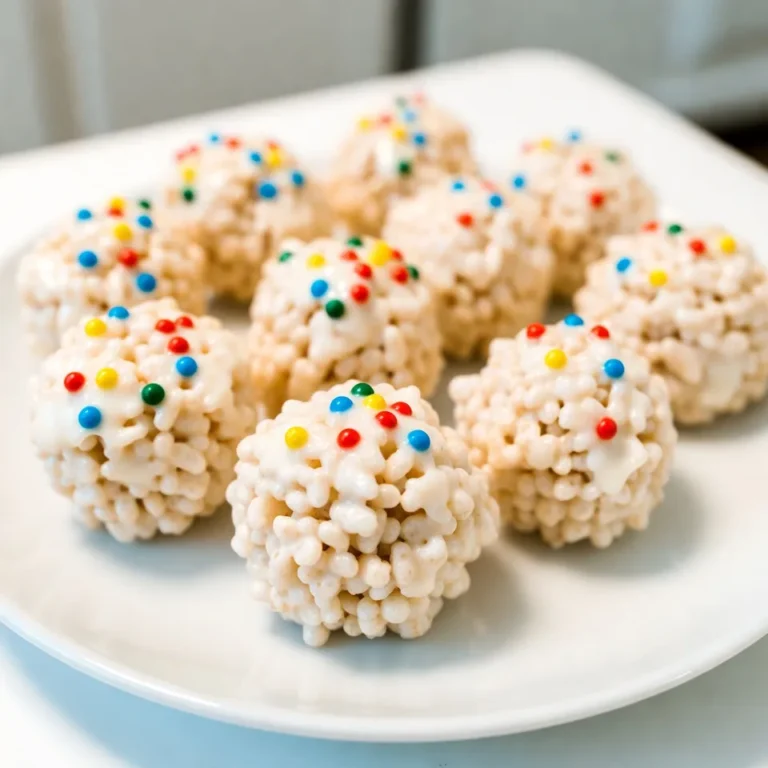
White Chocolate Rice Krispie Balls Easy Sweet Treat

- 1 pound sausage (spicy or mild) - 4 large eggs - 1 cup shredded cheddar cheese - 1/2 cup diced bell peppers - 1/2 cup chopped green onions - 1 teaspoon garlic powder - Salt and pepper to taste - 1 tablespoon olive oil - Refrigerated crescent dough rolls - Puff pastry as a substitution To create these tasty rolls, you need some key ingredients. First, choose your sausage. You can go for spicy for a kick or mild for a gentler taste. Next, grab four large eggs to bind it all together. Cheese is a must! I recommend one cup of shredded cheddar for a rich, creamy taste. Add some color and crunch with half a cup of diced bell peppers. Green onions give a fresh bite, so don’t forget half a cup of those! For flavor, use one teaspoon of garlic powder, plus salt and pepper to your liking. Now, for the dough, I love using refrigerated crescent dough rolls. They are easy and delicious. If you prefer a flaky option, puff pastry works well, too. With these ingredients ready, you set the stage for a quick and tasty treat! {{ingredient_image_2}} - Preheat oven to 375°F (190°C). - Prepare a baking sheet with parchment paper. This helps with easy cleanup. - In a large skillet, add the sausage. - Cook until it browns and crumbles, about 5-7 minutes. - If you see extra fat, drain it off. - Next, add the diced bell peppers to the skillet. - Sauté them with the sausage for 2-3 minutes. They should soften and smell great. - In a medium bowl, whisk the eggs. - Add garlic powder, salt, and pepper. Mix well. - Pour the egg mixture into the skillet with the sausage and peppers. - Cook gently for 3-4 minutes. Stir with a spatula until the eggs are fully scrambled. - Unroll the crescent dough on a floured surface. - Carefully separate each triangle and stretch them wider. - Take a spoonful of the sausage and egg mix. - Place it at the wide end of the triangle. - Roll it tightly from the wide end to the point, tucking in the edges. - Place the rolls seam side down on the baking sheet. - Brush the tops with olive oil. This gives them a nice color. - Bake in the preheated oven for 12-15 minutes. - Look for a golden brown color when done. - Ensure sausage is well-browned. This adds great flavor. Cook it for 5-7 minutes. - Mix egg until fully scrambled. Stir gently to avoid burning. This takes about 3-4 minutes. - Stretch dough for roomier pockets. This helps hold more filling and keeps it moist. - Brush dough for golden brown finish. Use olive oil to add color and crispness. - Garnish with green onions. This adds a fresh crunch and bright color. - Serve with hot sauce for added flavor. A little spice can make it exciting! Pro Tips Choose Your Sausage Wisely: Select between spicy or mild sausage based on your preference for flavor intensity; this choice can significantly impact the overall taste of your breakfast rolls. Customize Your Filling: Feel free to add other vegetables like spinach or mushrooms to the egg mixture for added nutrition and flavor variety. Perfectly Puff Your Rolls: For an extra flaky texture, try using puff pastry instead of crescent dough, and ensure you stretch the dough triangles before filling. Garnish for Presentation: Don’t forget to garnish your rolls with extra green onions and serve with hot sauce on the side for a pop of color and flavor! {{image_4}} You can swap the sausage for bacon or turkey sausage. Bacon brings a nice crunch and rich flavor. Turkey sausage gives you a lighter option while still being tasty. Both choices work great in the rolls. If you want a lighter meal, try using egg substitutes. They lower calories and cholesterol. For a vegetarian twist, replace the sausage with mushrooms. Mushrooms add a nice, earthy flavor and keep the rolls hearty. To kick up the flavor, add spices like paprika or chili powder. These spices give a nice kick to your breakfast rolls. You can also try different cheeses. Feta adds a tangy taste, while pepper jack gives a spicy twist. Mixing in these flavors makes the rolls even more exciting. Store your sausage egg breakfast rolls in an airtight container. They will stay fresh for up to three days in the fridge. This way, you can enjoy your tasty treat multiple times! You can freeze these rolls before baking. They can last up to two months in the freezer. When you're ready to eat them, just take them out and bake. This keeps them fresh and tasty. For the best texture, bake them from frozen. To reheat, you can bake or microwave the rolls. In the microwave, heat for one to two minutes. If you bake them, they will regain their crispiness. Baking gives you that golden, crunchy finish. Enjoy your rolls warm and delicious! Yes, you can prepare these rolls ahead of time. Just make the filling, then refrigerate it. You can also freeze the rolls before baking. This makes them easy to grab when you need a quick meal. These rolls pair well with many sides. You can serve them with fresh fruit or a simple salad. A dipping sauce like salsa also adds a nice kick. To check the rolls, look for a golden brown color. They should also appear puffed. This means they are fully baked and ready to enjoy. Absolutely! You can add your favorite veggies or cheeses. Try spinach, mushrooms, or even spicy cheese for a twist. Yes, these rolls are great for meal prep. They are easy to reheat and taste delicious. You can make a batch and enjoy them throughout the week. You learned how to make delicious sausage egg breakfast rolls from scratch. We covered ingredients, cooking steps, and storage tips. You can customize these rolls to fit your taste. Whether you need a quick meal or want to impress guests, this recipe works well. Enjoy making these tasty breakfast rolls and share them with others. With a few easy steps, you’ll create a dish everyone loves. Happy cooking!

Sausage Egg Breakfast Rolls Quick and Tasty Treat

Here’s what you will need for this delicious eggnog banana pudding: - 2 ripe bananas, sliced into rounds - 2 cups rich eggnog - 1/2 cup heavy cream - 1/4 cup granulated sugar - 1 teaspoon pure vanilla extract - 1/4 teaspoon ground nutmeg - 2 tablespoons cornstarch - 1/2 teaspoon salt - 1 package (14 oz) vanilla wafers - Whipped cream for topping These ingredients blend perfectly. The ripe bananas add a sweet touch. The eggnog gives a festive flavor, making this dessert special. The heavy cream creates a smooth texture, while the vanilla and nutmeg add warmth. Cornstarch helps thicken the pudding, giving it a nice body. I suggest using fresh bananas for the best taste. Look for ones that are ripe but not too soft. You can use any brand of eggnog you like, but choose a rich one for a creamy result. The vanilla wafers provide a crunchy layer, which contrasts nicely with the soft pudding. If you want to add a twist, consider using flavored eggnog or even a dairy-free version. You can also use different cookies instead of vanilla wafers. The key is to have ingredients you enjoy. This will make your eggnog banana pudding even more delightful. {{ingredient_image_2}} To start, grab a medium saucepan. Pour in the eggnog, and add the granulated sugar, ground nutmeg, and salt. Set the heat to medium. Stir the mixture gently until the sugar dissolves completely. Avoid letting it boil. This step creates a sweet and spiced base for your pudding. Next, you need to thicken the pudding. In a small bowl, mix cornstarch with a bit of the warm eggnog mixture. Whisk this until smooth. Then, slowly add this slurry back into the saucepan. Keep whisking over medium heat until it thickens and gently boils, which should take about 5-7 minutes. Once thickened, take it off the heat. This step makes the pudding rich and creamy. Now it's time for the whipped cream. In a separate bowl, whip the heavy cream with pure vanilla extract using an electric mixer. Continue until soft peaks form. This fluffy cream will lighten the eggnog mixture. Carefully fold in half of the whipped cream into the eggnog pudding. Then, fold in the rest until smooth. This gives your pudding a light and airy texture. Now, let's layer our dessert. Take a glass dish or individual cups. Start with a layer of vanilla wafers. Next, add a layer of sliced bananas, followed by a generous layer of eggnog pudding. Repeat these layers until all your ingredients are used. Make sure the final layer is pudding. This layering creates a beautiful and tasty dessert. Cover your assembled dessert with plastic wrap. Refrigerate for at least 3 hours. This time helps the flavors meld and sets the pudding perfectly. Right before serving, add a dollop of whipped cream on top of each serving. Finish with a light sprinkle of ground nutmeg for extra flavor. Enjoy this creamy and delightful treat! To get the right pudding consistency, focus on the thickening process. You want it creamy, not too runny. When you heat the eggnog, stir gently. This helps the sugar dissolve without boiling. A smooth blend is key. The technique of folding is crucial when adding whipped cream. Folding keeps the air in the cream, making the pudding light. If you stir, you lose that airy texture. So, fold gently until everything is combined. Serving this pudding in clear glass cups is a must. It shows off those beautiful layers of bananas, wafers, and pudding. You can also stack them in a trifle dish for a big gathering. For a fun touch, decorate each cup with banana slices and a swirl of whipped cream. A light sprinkle of nutmeg on top adds flavor and looks pretty. This will impress your guests and make it special. If you don't have ground nutmeg, you can use allspice or cinnamon instead. Both will give a warm taste to the pudding. Just remember to adjust the amount to match your taste. Nutmeg can be strong, so start with less. You can always add more later. This way, you can make the flavor just right for you. Pro Tips Use Ripe Bananas: Choose bananas that are spotty and slightly soft for the best flavor and sweetness in your pudding. Chill the Pudding: Allow the assembled pudding to chill for longer than 3 hours if possible; overnight chilling enhances the flavors even more. Homemade Whipped Cream: For a richer taste, whip your own heavy cream instead of using store-bought, and add a touch of powdered sugar for sweetness. Garnish Creatively: Enhance presentation by adding caramel drizzle or crushed nuts on top along with the whipped cream and nutmeg for added texture and flavor. {{image_4}} You can make Eggnog Banana Pudding even more fun. Try adding chocolate or caramel layers. This adds a rich taste that pairs well with bananas. Just drizzle chocolate syrup or caramel sauce between layers. You can also mix in spices like cinnamon or ginger. Just a pinch can elevate the flavor profile. These spices bring warmth and a hint of holiday cheer. If you need a gluten-free option, swap the vanilla wafers with gluten-free cookies. Many brands offer tasty alternatives that work well. For a dairy-free version, use coconut or almond milk eggnog. You can also whip coconut cream instead of heavy cream. These swaps keep the dessert creamy without dairy. You can serve this dessert in many ways. Individual servings in small cups look great. They make it easy for guests to enjoy. You can also use a large trifle dish for a family gathering. Mini dessert cups are perfect for parties, too. They offer a fun bite-sized option that guests love. To store leftovers, place the eggnog banana pudding in an airtight container. This keeps it fresh and tasty. You should consume it within 3 to 4 days. The flavors improve as it sits, but don’t wait too long! Yes, you can freeze eggnog banana pudding! To freeze, cover it tightly with plastic wrap and then aluminum foil. This prevents freezer burn. It’s best to freeze it for up to 1 month. When you want to eat it, thaw the pudding in the fridge overnight. Avoid microwaving, as this can change the texture. After thawing, stir gently to bring back its creamy goodness. Enjoy the delightful treat! If you do not have eggnog, you can use milk or cream mixed with spices. A mix of whole milk, sugar, and a pinch of nutmeg works well. For a festive twist, try adding a splash of vanilla extract and a bit of cinnamon. You can also use store-bought non-dairy eggnog for a vegan option. This will keep the creaminess while allowing you to enjoy the flavors. This dessert can last in the fridge for about 3-4 days. Store it in an airtight container to keep it fresh. If you see any changes in texture or smell, it is best to discard it. Always check your dessert before serving, just to be safe! Yes, you can make this dessert a day in advance. This will let the flavors blend well together. Just store it in the fridge after assembling. The pudding will set nicely. However, the bananas may brown slightly, so you might want to add them just before serving. This keeps them fresh and bright. This dessert combines simple ingredients to create a tasty treat. You learned how to layer bananas, vanilla wafers, and a creamy eggnog pudding. Don't forget the whipped cream and nutmeg for that final touch. Experimenting with flavors and variations can make it your own. Storing leftovers is easy if you follow the guidelines. I hope you try this recipe soon and enjoy every bite!

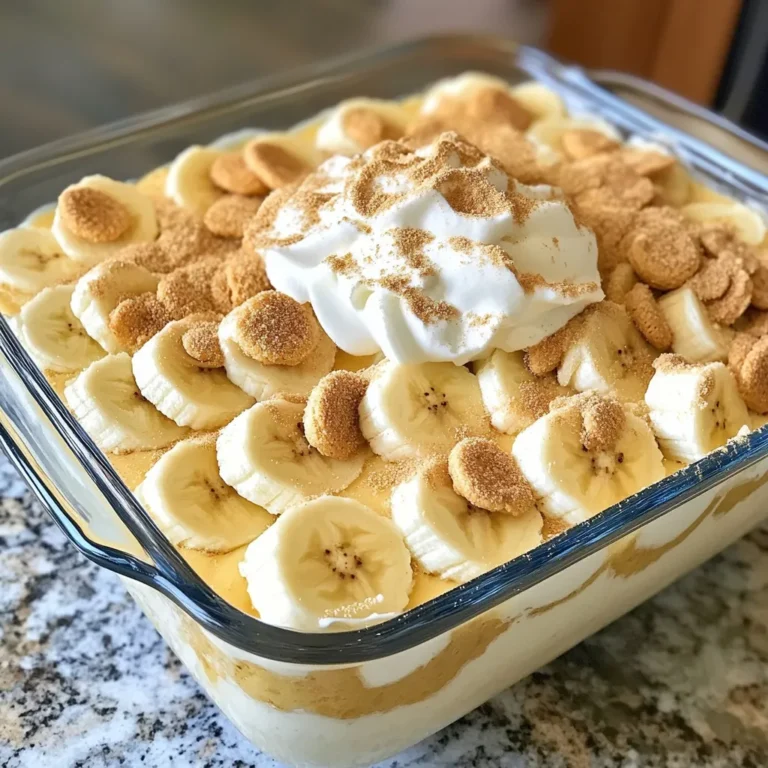
Eggnog Banana Pudding Creamy and Delightful Treat

PREV 1 … 43 44 45 … 48 NEXT
easy meal kitchen

explore

DessertsDinnerAppetizersDrinks

Our Policies

  • Cookie Policy
  • Copyright Policy
  • Disclaimer
  • GDPR Policy
  • Terms Of Use
Back to Top
  • About
  • Contact Us
  • Privacy Policy
© 2026 easy meal kitchen