FREE DINNER EBOOK! Get your copy!
  • Cookie Policy
  • GDPR Policy
  • Disclaimer
  • Terms Of Use
  • Visit my other site: Fun Cookie Recipes
easy meal kitchen
  • Home
  • Dinner
  • Desserts
  • Drinks
  • Appetizers
  • Contact
  • About
  • Privacy Policy
  • Home
  • Dinner
  • Desserts
  • Drinks
  • Appetizers
  • Contact
  • About
  • Privacy Policy
  • Cookie Policy
  • GDPR Policy
  • Disclaimer
  • Terms Of Use
Visit my other site: Fun Cookie Recipes

HOME / CATEGORIES /

Latest

To make the perfect cake-covering ganache, you need a few key ingredients: - 8 oz (230g) dark chocolate, finely chopped - 1 cup (240ml) heavy cream - 2 tablespoons unsalted butter, softened to room temperature - 1 teaspoon pure vanilla extract - Pinch of salt These ingredients work together to create a rich, smooth ganache that coats your cakes beautifully. You can add your own twist to the ganache. Here are some optional ingredients: - Espresso powder for a coffee flavor - Orange zest for a citrus kick - Mint extract for a refreshing taste Feel free to experiment with these flavors to suit your taste. If you need to make substitutions, don’t worry! Here are some ideas: - Use milk chocolate instead of dark chocolate for a sweeter ganache. - Coconut cream can replace heavy cream for a dairy-free version. - Vegan butter works well if you want a plant-based option. These substitutions can help you create a ganache that fits your dietary needs without losing flavor. {{ingredient_image_2}} Start by chopping the dark chocolate into small pieces. Make sure they are uniform in size. This helps them melt evenly. Place the chopped chocolate in a heatproof bowl. It is ready for the cream. Next, take a medium saucepan and pour in the heavy cream. Heat it over medium heat. Watch closely as the cream heats up. When it starts to simmer, remove it from heat. Don’t let it boil. Boiling can change the cream's texture. Carefully pour the hot cream over the chocolate. Make sure all the chocolate pieces are in the cream. Let it sit for about 3 to 5 minutes. This resting time helps the chocolate melt. After that, take a spatula or whisk. Stir gently in small circles. Keep stirring until the chocolate is fully melted. You want a smooth and glossy ganache. Now, add the softened butter, vanilla extract, and a pinch of salt. Stir until everything is mixed well. The ganache should look shiny and luxurious. Let it cool at room temperature. If you want it thicker, put it in the fridge for about 30 to 60 minutes. It should be pourable but slightly thickened. Once it reaches your desired thickness, it is ready to cover your cakes! To get the right texture for ganache, pay attention to the cooling time. After mixing, let it cool at room temperature for about 15 to 30 minutes. If you want it thicker, chill it in the fridge for 30 to 60 minutes. When it's ready, it should flow smoothly but not be too runny. If you whip it, it will turn fluffy, giving you a perfect frosting. To keep your ganache smooth, avoid boiling the cream. Simmering is key. After pouring the hot cream over the chocolate, let it rest before stirring. This helps the chocolate melt evenly. If you notice separation, gently reheat it while stirring. Adding a touch of cream can help bring it back together. For a beautiful finish, pour ganache over a chilled cake. This helps it set nicely. Start from the center and let it flow to the edges. Use a spatula to smooth any uneven spots. For a classy touch, add chocolate shavings or fresh berries on top. This makes your cake look as good as it tastes! Pro Tips Choose Quality Chocolate: The flavor and texture of your ganache depend greatly on the quality of chocolate used. Opt for high-quality dark chocolate with a cocoa content of at least 60% for the best results. Control the Temperature: Make sure the cream is hot but not boiling. This helps melt the chocolate smoothly without burning it, ensuring a silky texture. Whipping for Texture: If you want a lighter, airy ganache, allow it to cool slightly before whipping it with a hand mixer. This will create a fluffy frosting perfect for cakes and cupcakes. Flavor Variations: Experiment with flavors by infusing the cream with herbs, spices, or citrus zest before mixing it with chocolate. This adds a unique twist to your ganache. {{image_4}} To make white chocolate ganache, use white chocolate instead of dark chocolate. Follow these steps: - Use 8 oz (230g) of finely chopped white chocolate. - Heat 1 cup (240ml) of heavy cream until just simmering. - Pour the hot cream over the white chocolate. - Let it sit for 3 to 5 minutes. - Stir until smooth. - Add 2 tablespoons of soft butter and 1 teaspoon of vanilla. This ganache is sweet and creamy, perfect for a lighter cake. You can add flavors to your ganache for fun twists. Here are a few ideas: - For espresso ganache, mix in 1-2 tablespoons of espresso or coffee. - For mint flavor, add 1 teaspoon of mint extract. - For orange, mix in some orange zest and a drop of orange oil. Experiment with spices like cinnamon or even chili for a kick! Each flavor brings its own unique touch to your cake. You can make a vegan ganache using simple swaps. Here’s how: - Replace dark chocolate with dairy-free chocolate. - Use coconut cream instead of heavy cream. - Follow the same heating and mixing steps. This vegan ganache is rich and smooth, perfect for anyone who wants a plant-based option. You won't miss the dairy at all! I recommend storing ganache in an airtight container. Place it in the fridge. This keeps it fresh and tasty. If you have leftover ganache, it will stay good for later use. Make sure to let it cool before sealing the container. To reheat ganache, place it in a microwave-safe bowl. Heat it in short bursts of 10 to 15 seconds. Stir between each burst until it's warm and smooth. You can also use a double boiler for a more gentle heat. Just be careful not to overheat it, as it can separate. Ganache lasts about one week in the fridge. If you notice any changes, it might be spoiled. Look for these signs: - Off smell - Change in color - Unusual texture If you see any of these, it's best to throw it away. Keeping ganache stored properly helps you enjoy its rich flavor for longer! The best chocolate for ganache is dark chocolate. I recommend at least 60% cacao. This gives your ganache a rich taste. The higher the cacao, the deeper the flavor. You can also use semi-sweet chocolate. Just avoid chocolate with low cocoa content. Yes, you can use milk chocolate. However, it will make your ganache sweeter and creamier. Adjust the sugar in your cake recipe if you use milk chocolate. It’s all about balance. Milk chocolate ganache also pairs well with fruity cakes. For thick ganache, add a bit of warm cream. Stir it in slowly until it reaches your desired consistency. If your ganache is too thin, chill it in the fridge for a bit. You can also add more chopped chocolate to thicken it. Absolutely! Ganache works great for frosting cupcakes. You can use it as a pourable glaze or whip it to make it fluffier. If you whip it, let it cool first. This gives it a light and airy texture. You can keep ganache in the fridge for up to one week. Be sure to store it in an airtight container. If you want to use it later, just reheat it gently. Stir well to bring back its silky texture. In this post, we explored how to make the perfect cake-covering ganache. We examined key ingredients, step-by-step preparation, and essential tips. Variations like white chocolate and vegan options enhance creativity. Storing and reheating ganache ensures it stays fresh. Remember, ganache is versatile and satisfying. With practice, you’ll master this skill. Enjoy your baking journey!

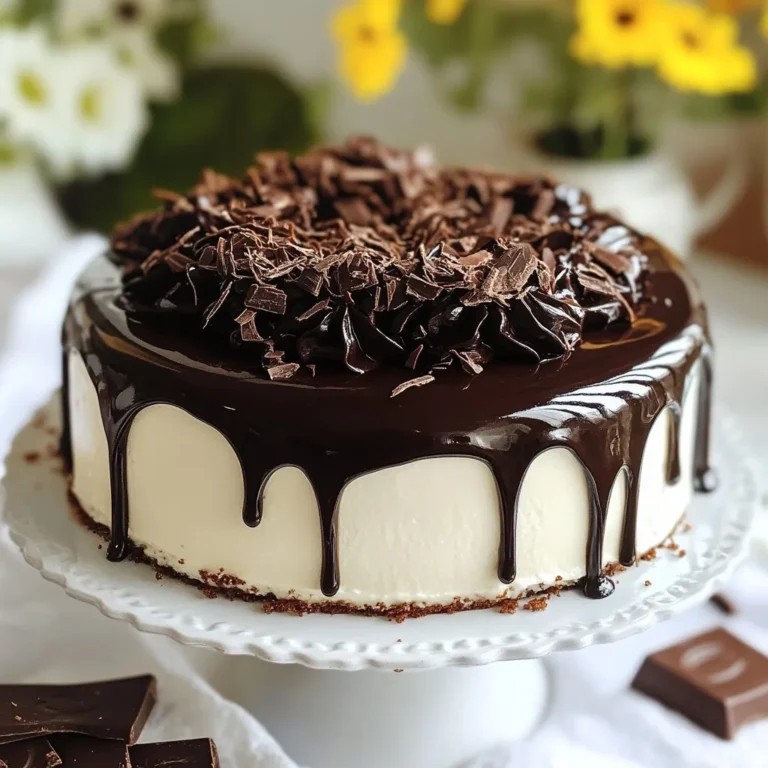
Perfect Cake-Covering Ganache Simple Recipe Guide

To make Crispy General Tso’s Chicken, gather these main ingredients: - 1 lb chicken breasts, cut into bite-sized pieces - ½ cup cornstarch - ½ cup all-purpose flour - 1 teaspoon baking powder - 1 teaspoon garlic powder - 1 teaspoon ginger powder - 1 teaspoon salt - 1 tablespoon sesame oil - 2 large eggs, beaten - Oil for frying These ingredients create a crunchy coating that gives the chicken a delightful texture. The combination of cornstarch and flour helps achieve that crispy outer layer. For the tasty sauce, you’ll need: - ¼ cup soy sauce - 2 tablespoons rice vinegar - 2 tablespoons sugar - 1 tablespoon hoisin sauce - 1 tablespoon cornstarch mixed with 2 tablespoons water - 2 cloves garlic, minced - 1 teaspoon fresh ginger, grated - 2-3 dried red chilies, crushed (adjust for spice level) This sauce is sweet, tangy, and spicy. It enhances the chicken’s flavor and makes each bite packed with taste. You can add some fun garnishes to your dish: - 1 tablespoon green onions, chopped (for garnish) Chopped green onions add a fresh crunch and a pop of color. Feel free to get creative with your garnishes! {{ingredient_image_2}} Start by cutting 1 pound of chicken breasts into small bite-sized pieces. This helps the chicken cook evenly and remain tender. In a medium bowl, mix together ½ cup of cornstarch, ½ cup of all-purpose flour, 1 teaspoon of baking powder, 1 teaspoon of garlic powder, 1 teaspoon of ginger powder, and 1 teaspoon of salt. Whisk it until combined. In another bowl, whisk 2 large eggs with 1 tablespoon of sesame oil until smooth. This will help the coating stick. Take your chicken pieces and dip them into the egg mixture. Make sure each piece is fully coated. This step is key for a crispy crust. Next, move the chicken to the flour mixture. Coat each piece well, pressing gently to help the coating adhere. This double-layer of coating gives the chicken its signature crunch. In a large skillet or wok, pour enough oil to reach a depth of about 2 inches. Heat the oil over medium-high heat. It should shimmer when hot, which means it's ready for frying. Carefully add the coated chicken in batches. Avoid overcrowding the pan. Fry each batch for about 4 to 5 minutes, or until the chicken turns golden brown and crispy. Use a slotted spoon to remove the chicken and place it on paper towels. This helps soak up any extra oil, keeping your chicken crispy. To get that perfect crunch, use a double coating. First, dip the chicken pieces in the egg mixture. Then, coat them with the flour mix. Press gently to help the coating stick. This method traps air, leading to extra crispiness during frying. Also, ensure your oil is hot enough. If it's too cool, the chicken will soak up oil and become soggy. Fry in small batches. If you add too many chicken pieces at once, the oil cools down. This leads to uneven cooking and less crispiness. Use a deep skillet or wok, and fill it with at least 2 inches of oil. Keep the heat at medium-high. This helps maintain the oil temperature while cooking the chicken. Use a slotted spoon to remove the chicken and let it drain on paper towels. The right sauce texture is key. To thicken it, mix cornstarch with water before adding it to the sauce. Stir it in slowly while the sauce simmers. This prevents lumps and helps achieve a smooth finish. If the sauce is too thick, add a little water or broth to loosen it up. You want it to cling to the chicken without being runny. Pro Tips Double Frying: For extra crispiness, consider frying the chicken pieces twice. First, fry them until they are lightly golden, then remove and let them rest for a few minutes before frying them again until they are deeply golden and crispy. Spice Adjustment: Feel free to adjust the number of dried red chilies based on your spice tolerance. You can also add some fresh chili peppers for extra heat or flavor. Marinate for Flavor: For even more flavor, marinate the chicken pieces in a mixture of soy sauce, ginger, and garlic for at least 30 minutes before coating and frying. Serve Immediately: This dish is best served hot and fresh. To maintain its crispiness, serve the chicken immediately after tossing it in the sauce. {{image_4}} You can spice up General Tso’s Chicken easily. Add more dried red chilies to the sauce. You can also use chili paste for an extra kick. Adjust the heat to your taste. Some like it hot, while others prefer mild. Try adding fresh chili slices for a fresh flavor. If you want a lighter dish, bake the chicken instead of frying it. Preheat your oven to 400°F (204°C). Coat the chicken pieces as usual, then place them on a baking sheet. Bake for about 20 minutes, flipping halfway. You can still enjoy the crunchy texture without all the oil. For a vegetarian twist, swap chicken for tofu. Use firm tofu for the best results. Press it to remove excess water, then cut it into bites. Coat and fry the tofu just like the chicken. It absorbs the sauce well and gives a delicious taste. Enjoy this fresh take on a classic dish! To store leftovers, let the chicken cool down first. Place it in an airtight container. Keep it in the fridge for up to three days. This helps maintain its flavor and texture. Make sure to separate the chicken from the sauce. This keeps the chicken crispy. Reheat the chicken in an oven for the best results. Set the oven to 350°F (175°C). Place the chicken on a baking sheet for about 10-15 minutes. This will help restore its crispiness. Alternatively, use an air fryer at 350°F for around 5-8 minutes. Avoid microwaving, as it may make the chicken soggy. If you want to freeze the chicken, first cool it completely. Place the chicken in a freezer-safe bag or container. Make sure to remove as much air as possible. You can freeze it for up to three months. For the best taste, freeze the chicken without the sauce. When ready, thaw it in the fridge before reheating. General Tso's Chicken is a popular Chinese dish. It features crispy fried chicken pieces. These pieces are tossed in a sweet and spicy sauce. The dish often has garlic, ginger, and soy sauce. It is named after a Chinese general, Tso Tsung-t'ang. People enjoy this dish for its bold flavors and crunchy texture. It pairs well with rice or vegetables. Yes, you can make General Tso's Chicken gluten-free. Use gluten-free soy sauce instead of regular soy sauce. You can swap all-purpose flour with gluten-free flour. Cornstarch is already gluten-free, so you can keep that. Make sure to check all other ingredients for hidden gluten. This way, you can enjoy a tasty meal without gluten. Crispy General Tso's Chicken goes well with many sides. Here are some great options: - Steamed white rice - Fried rice with vegetables - Stir-fried broccoli or bok choy - Egg rolls or spring rolls - A fresh salad with sesame dressing These sides add color and balance to your plate. They also complement the chicken's flavors nicely. Enjoy your meal! This guide showed you how to make crispy General Tso’s Chicken from scratch. We covered the main ingredients, the sauce, and garnishes. You learned the best steps for cooking and tips for extra crispiness. Variations like spicy options and healthier choices were also discussed. Lastly, we shared easy storage methods. Now you can enjoy this classic dish your way and impress your friends!

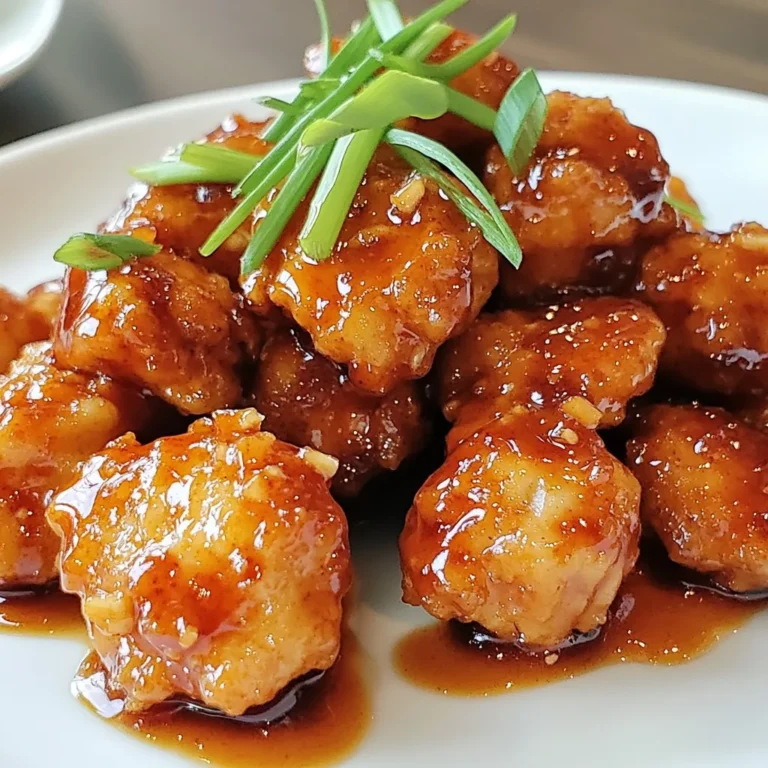
Crispy General Tso’s Chicken Flavorful and Easy Dish

To make Lemon Curd Thumbprint Cookies, you will need the following ingredients: - 1 cup unsalted butter, softened to room temperature - ½ cup granulated sugar - 1 teaspoon pure vanilla extract - 2 cups all-purpose flour - ¼ teaspoon fine sea salt - ½ cup lemon curd (you can use store-bought or homemade) - Zest of 1 fresh lemon - 1 large egg yolk - ¼ cup powdered sugar (for dusting on top) Each of these ingredients plays a key role in the flavor and texture of the cookies. The unsalted butter gives a rich taste. Granulated sugar adds sweetness, while vanilla extract brings warmth to each bite. All-purpose flour forms the cookie base, and fine sea salt enhances all the flavors. Lemon curd is the star of the show. It provides a bright and tangy filling that contrasts beautifully with the sweet cookie. Fresh lemon zest adds a burst of citrus aroma. The egg yolk helps bind the dough, making it tender. Lastly, powdered sugar gives a lovely touch when dusted on top. These ingredients come together to create a delightful treat that is sure to impress! {{ingredient_image_2}} First, preheat your oven to 350°F (175°C). This is crucial for even baking. While the oven heats, line a baking sheet with parchment paper. This helps the cookies slide off easily after baking. Next, take 1 cup of softened unsalted butter and ½ cup of granulated sugar. In a large mixing bowl, beat them together. Use a hand mixer or a stand mixer. Mix until the mixture is light, fluffy, and pale, about 3-4 minutes. Now, add 1 teaspoon of pure vanilla extract and 1 large egg yolk. Mix until everything is well combined. This step adds flavor and richness to your cookies. In a separate bowl, whisk together 2 cups of all-purpose flour and ¼ teaspoon of fine sea salt. Gradually add this dry mix to the wet ingredients. Mix until just combined. Be careful not to overwork the dough, or the cookies may turn out tough. Add the zest of 1 fresh lemon into the dough. Fold it in gently. This will bring a bright, fresh flavor to your cookies. The zest makes a big difference! Using a tablespoon or cookie scoop, take portions of dough and roll them into balls. Place each ball on the baking sheet. Make sure to space them about 2 inches apart. This allows room for spreading. With your thumb or the back of a rounded measuring teaspoon, press down in the center of each cookie. This creates a small indentation, known as a thumbprint. Now, carefully spoon a small amount of lemon curd into each thumbprint. Avoid overfilling to prevent bubbling. Put the baking sheet in your preheated oven. Bake the cookies for 12-15 minutes. Watch them closely. They should have light golden edges but soft centers. After baking, let the cookies cool on the baking sheet for a few minutes. Then, transfer them to a wire rack to cool completely. Once cooled, dust the tops with ¼ cup of powdered sugar. This adds a sweet touch and makes them look lovely. To get the right texture for your Lemon Curd Thumbprint Cookies, start with softened butter. Room temperature butter mixes well with sugar to create a light and fluffy dough. This airiness helps the cookies rise nicely. Mix until it looks pale and fluffy. Mix the dry and wet ingredients until just combined. If you mix too much, the cookies get tough. Use a gentle folding motion to combine the dough. This keeps the cookies tender and soft. When filling the cookies, use about a teaspoon of lemon curd. This amount helps it stay in the thumbprint without spilling over. Make sure the curd is smooth and not too thick. This will help it spread evenly while baking. After baking, let the cookies cool on the pan for a few minutes. This helps them set. Then, transfer them to a wire rack. Cooling on a rack lets air circulate, keeping the cookies fresh. Dust with powdered sugar once they are cool for a lovely finish. Pro Tips Chill the Dough: For extra tender cookies, chill the dough for about 30 minutes before shaping. This helps the cookies maintain their shape while baking. Use Fresh Lemon Zest: Always use fresh lemon zest for the best flavor. The oils in the zest contribute to a more vibrant taste in your cookies. Mind the Filling: When adding lemon curd, avoid overfilling the thumbprints to prevent spilling over during baking, which can make a mess. Store Properly: Store any leftover cookies in an airtight container at room temperature for up to a week to keep them fresh and delicious. {{image_4}} You can swap some ingredients for a twist. Substitute unsalted butter with coconut oil for a dairy-free option. Use light brown sugar instead of granulated sugar for a deeper flavor. If you want a gluten-free version, try almond flour or a gluten-free blend. Add fun flavors to your cookies! Mix in some chopped nuts, like walnuts or almonds, for crunch. You can also fold in dried fruits, such as cranberries or blueberries, for a fruity burst. For a zingier taste, add a bit of lime zest along with the lemon zest. Making your cookies look pretty is fun! You can drizzle melted white chocolate over the tops for a sweet touch. Use colorful sprinkles to make them festive. Arrange them on a platter with edible flowers for an elegant display. Fresh mint leaves can add color and freshness to your setup. To keep your Lemon Curd Thumbprint Cookies fresh, store them in an airtight container. Place parchment paper between layers to avoid sticking. Keep the cookies at room temperature for the best taste and texture. Avoid placing them in direct sunlight or heat. You can freeze these cookies to enjoy later. To freeze, first let them cool completely. Then, place them in a single layer on a baking sheet and freeze for about an hour. Once frozen, transfer them to a freezer-safe bag or container. Be sure to label the container with the date. Lemon Curd Thumbprint Cookies last about one week at room temperature. If stored well in the fridge, they can last up to two weeks. In the freezer, they can stay fresh for up to three months. For best flavor, enjoy them sooner rather than later! Yes, you can use homemade lemon curd. It adds a personal touch. Homemade curd often has a fresh taste. If you have time, I recommend making it yourself. Just follow a simple recipe to ensure you get the right flavor. To make these cookies gluten-free, swap all-purpose flour for a gluten-free blend. Look for a blend that includes xanthan gum. This helps mimic the texture of regular flour. You can also use almond flour, but it may change the cookie's texture slightly. If you need a substitute for unsalted butter, you can use coconut oil. It should be solid but soft. You can also try margarine or a vegan butter alternative. Each will change the flavor slightly, but they work well. To boost lemon flavor, add more lemon zest to the dough. You can also increase the lemon curd in the thumbprint. If you like a tart taste, consider adding a bit of lemon juice. This will brighten the cookies even more. We explored how to create delicious lemon curd cookies from start to finish. You learned about key ingredients, step-by-step instructions, tips, and variations. Each part plays a role in making your cookies flavorful and fun. Remember, these cookies are easy to customize and store well. Enjoy baking and experimenting with different flavors! By trying new things, you can create a treat everyone loves. Get started, and let your baking adventure unfold!

Lemon Curd Thumbprint Cookies Delightful Treats

For this recipe, you need one sheet of puff pastry. Make sure it is thawed. You can find it in the freezer section of your grocery store. Puff pastry gives the tart its flaky and light texture. Use three medium-sized apples for the filling. I suggest Granny Smith or Honeycrisp apples. Granny Smith adds a nice tartness, while Honeycrisp is sweet and crisp. Peel and slice them thin for even cooking. You will need these ingredients to enhance the flavor: - 1/4 cup granulated sugar - 1 teaspoon ground cinnamon - 1 tablespoon fresh lemon juice - 1 tablespoon unsalted butter, melted - 1 egg (for egg wash) - Optional: powdered sugar for dusting - Optional: vanilla ice cream for serving The sugar adds sweetness, while the cinnamon brings warmth. Lemon juice brightens the flavors, and butter helps the apples caramelize. The egg wash gives the crust a golden color. {{ingredient_image_2}} Start by preheating your oven to 400°F (200°C). This step is key for a perfect tart. While the oven heats, line a baking sheet with parchment paper to make clean-up easy. Take your sheet of puff pastry out of the fridge. Let it thaw until soft but still cold. On a lightly floured surface, roll it out to about 1/8 inch thick. Gently lay it on your lined baking sheet. This will be the base for your delightful tart. Next, grab three medium-sized apples. I recommend Granny Smith or Honeycrisp. Peel and thinly slice them. In a large bowl, mix the apple slices with 1/4 cup of granulated sugar, 1 teaspoon of ground cinnamon, 1 tablespoon of fresh lemon juice, and 1 tablespoon of melted butter. Toss to coat the apples well. This mix adds flavor and sweetness. Now it's time to assemble! Use a sharp knife to lightly score a border about 1 inch from the edges of the pastry. Be careful not to cut all the way through. Spread the apple mixture evenly within this border. Overlap the slices slightly for a beautiful look. In a small bowl, beat 1 egg and brush it over the outer edges of the pastry. This helps create a golden finish. Place the tart in the preheated oven and bake for 25-30 minutes. You want the pastry to be golden brown and flaky, and the apples tender. Once baked, take the tart out of the oven. Let it cool for a few minutes on the baking sheet. This resting time allows the flavors to settle. For a lovely finish, dust the tart with powdered sugar. Serve it warm with a scoop of vanilla ice cream for a truly indulgent treat! For the best flavor, I recommend using Granny Smith or Honeycrisp apples. These types add a nice balance of sweet and tart. You want apples that hold their shape when cooked. Avoid soft apples like Red Delicious, as they can turn mushy. To get that perfect crust, make sure to roll out the puff pastry evenly. A thickness of about 1/8 inch works best. Also, remember to brush the edges with egg wash. This step gives the crust a shiny, golden finish. Bake at 400°F for 25-30 minutes to achieve that flaky texture. You can prepare the tart in advance. Assemble the tart and cover it with plastic wrap. Store it in the fridge for up to a day. When you’re ready, bake it straight from the fridge. It will still taste fresh and delicious. Pro Tips Choose the Right Apples: For the best flavor and texture, opt for tart apples like Granny Smith or Honeycrisp. They hold their shape well during baking and provide a nice contrast to the sweetness of the sugar. Prevent Soggy Pastry: To keep the puff pastry crisp, consider sprinkling a thin layer of cornstarch or breadcrumbs on the pastry before adding the apples. This helps absorb excess moisture from the fruit. Egg Wash for Shine: For an extra glossy finish, make sure to brush the egg wash not just on the edges but also lightly over the surface of the pastry. This will enhance the golden color when baked. Serve with Style: Elevate your dessert by serving the tart warm with a scoop of vanilla ice cream and a drizzle of caramel sauce. This adds a delightful richness that complements the apples perfectly. {{image_4}} You can add nuts for a nice crunch. I like to use walnuts or pecans. Chop them finely and mix them in with the apples. This adds texture and a rich flavor to your tart. Try about 1/4 cup of nuts for the perfect balance. Spices can change the taste of your apple tart. Cinnamon is classic, but you can try nutmeg or ginger for warmth. A dash of allspice can also add a nice twist. Mix in your chosen spice with the sugar before adding it to the apples. This gives every bite a lovely flavor. Serving your tart with ice cream is a must. Vanilla ice cream pairs well with the warm tart. The cold ice cream melts slightly on the hot dessert, creating a creamy blend. You can also try caramel or cinnamon ice cream for extra flavor. Just scoop a generous portion on top or beside the tart for a delightful treat. After you enjoy your puff pastry apple tart, store any leftovers in the fridge. Place the tart in an airtight container. If you do not have one, cover it with plastic wrap. This helps keep it fresh for up to three days. Make sure it cools completely before you cover it. If you leave it out, it can become soggy. When you want to enjoy your leftover tart, you can reheat it easily. Preheat your oven to 350°F (175°C). Place the tart on a baking sheet lined with parchment paper. Heat it for about 10-15 minutes, or until it warms through. This method keeps the crust crispy and flaky. You can also microwave it, but the crust may not be as nice. If you want to save your tart for later, you can freeze it. Make sure it cools completely first. Wrap it tightly in plastic wrap or foil. Then, place it in a freezer-safe bag or container. The tart can last up to three months in the freezer. To enjoy it later, thaw it in the fridge overnight. Then, reheat it in the oven for the best taste and texture. Yes, you can use frozen puff pastry. It works great for this tart. Just thaw it overnight in the fridge. You can also let it sit at room temperature for about 30 minutes. This makes it easy to roll out and shape. Granny Smith and Honeycrisp apples are the best choices for apple tart. Granny Smith gives a nice tart flavor, while Honeycrisp adds sweetness. You can mix both for a balanced taste. The tart is done when the pastry is golden brown and flaky. The apples should be tender but not mushy. It usually takes about 25 to 30 minutes in the oven. Keep an eye on it for the best results. Yes, you can add other fruits! Pears or berries pair well with apples. Just make sure to adjust the sugar if needed. This adds more flavor and variety to your tart. You can store the tart for up to three days. Keep it in an airtight container at room temperature. If you want to keep it longer, you can freeze it for up to a month. Just make sure to wrap it well to avoid freezer burn. You learned how to make a delicious apple tart using puff pastry and fresh apples. I shared tips on choosing the best apples, achieving a flaky crust, and storing leftovers. Remember, you can add nuts or spices for more flavor. This tart pairs well with ice cream too! Making this dessert is simple and fun. I hope you enjoy baking and sharing it with others. Your kitchen will smell amazing, and the end result will impress everyone. Happy baking!

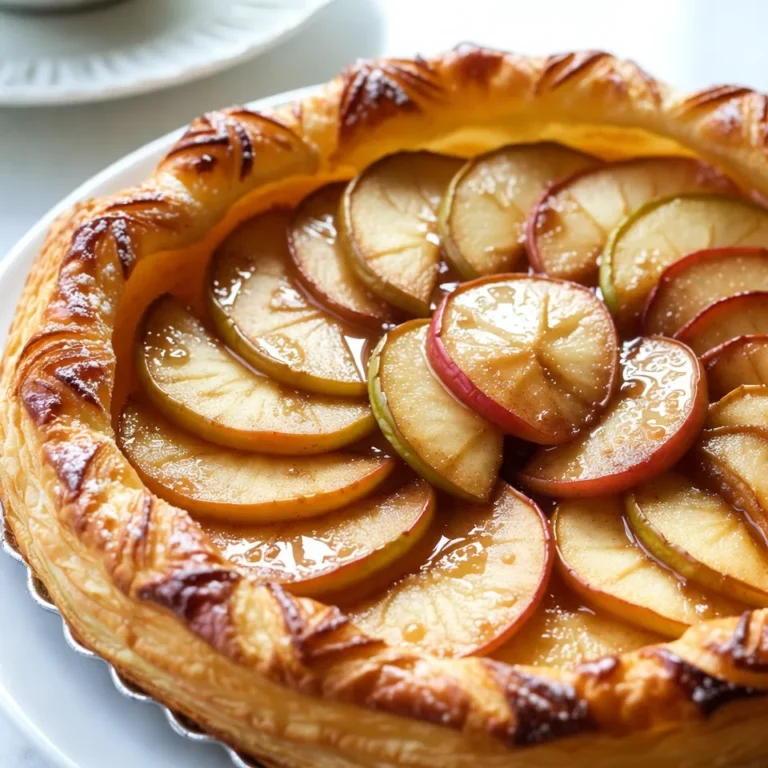
Puff Pastry Apple Tart Delightful Dessert Recipe

To make crispy Korean potatoes, you will need: - 1 lb baby potatoes, halved - 3 tablespoons corn starch - 2 tablespoons vegetable oil - 2 tablespoons gochugaru (Korean red chili flakes) - 1 tablespoon garlic powder - 1 tablespoon soy sauce - 1 teaspoon sesame oil - 2 green onions, chopped - Sesame seeds for garnish - Salt to taste Each ingredient plays a key role in making these potatoes delicious and crispy. - Baby potatoes: They have a creamy texture and hold their shape well. - Corn starch: It creates a crunchy coating when baked. - Vegetable oil: It helps the potatoes brown and crisp up in the oven. - Gochugaru: This adds a spicy, smoky flavor that is classic in Korean cooking. - Garlic powder: It gives a savory depth to the dish. - Soy sauce: It adds saltiness and umami, enhancing the potatoes’ flavor. - Sesame oil: This gives a nutty aroma, making the dish more aromatic. - Green onions: They add freshness and a slight crunch as a garnish. - Sesame seeds: These provide a nutty finish and a nice visual appeal. - Salt: It enhances all the ingredients' flavors. You can elevate your crispy Korean potatoes with some simple additions. Try: - Chili oil: For a spicier kick. - Lime juice: It adds a zesty brightness. - Fresh herbs: Such as cilantro or parsley for a fresh twist. - Cheese: A sprinkle of cheese can make it creamy and rich. - Other vegetables: Toss in bell peppers or carrots for added color and crunch. These additions can help you tailor the dish to your taste and make it even more enjoyable. {{ingredient_image_2}} To make crispy Korean potatoes, start with one pound of baby potatoes. Cut them in half and put them in a pot of salted water. Bring the water to a boil and cook the potatoes for about 15 minutes. You want them fork-tender but not mushy. Drain the potatoes and let them cool for a few minutes. While the potatoes cool, preheat your oven to 425°F (220°C). Line a baking sheet with parchment paper to prevent sticking. This step is key for easy cleanup and crispiness. In a large bowl, add the cooled potatoes. Sprinkle three tablespoons of corn starch over them. Toss gently until all potatoes are coated. This coating helps create that amazing crunch. Next, pour in two tablespoons of vegetable oil, followed by two tablespoons of gochugaru, one tablespoon of garlic powder, one tablespoon of soy sauce, and one teaspoon of sesame oil. Add a pinch of salt too. Toss everything together until each potato is covered in the tasty mix. Now, spread the seasoned potatoes on the prepared baking sheet. Make sure they are in a single layer. This helps them cook evenly. Bake for 25 to 30 minutes. Turn the potatoes halfway through to ensure they get golden brown on all sides. Once they are crispy, take them out of the oven. Sprinkle with chopped green onions and sesame seeds. This adds a pop of flavor and makes them look great. To get that perfect crunch, the key is in the corn starch and oil. The corn starch forms a barrier that helps keep moisture out. This lets the potatoes crisp up nicely in the oven. Using high heat is also important. The oven temperature of 425°F (220°C) helps create a golden crust. Turning the potatoes halfway through ensures even cooking and crispiness all around. One common mistake is overcrowding the baking sheet. If the potatoes are too close together, they will steam rather than crisp. Always arrange them in a single layer. Another mistake is not letting the potatoes cool after boiling. This step is crucial for achieving a crispy texture. If you skip it, you may end up with soggy potatoes. Finally, be careful with the seasoning. Too much salt or spice can overpower the flavor. Use the measurements given, and adjust to your taste. To get that perfect crisp, the key is parboiling. Cook your baby potatoes until they are just fork-tender. This step helps them get nice and soft inside. After boiling, let them cool for a few minutes. Then, coat them with corn starch. This gives you that crunch we all love. Make sure to toss them well so every potato is covered. When you bake them, spread them out in a single layer. This way, they cook evenly and become crispy all over. If you want your potatoes to be less spicy, reduce the amount of gochugaru. You can start with just one tablespoon. Taste your mixture before you bake the potatoes. If you want more heat, add more gochugaru slowly. Remember, you can always add spice, but it’s hard to take it away. You can also serve them with a cooling dip, like yogurt or sour cream, to balance the heat. These crispy potatoes shine as a side dish. They pair well with grilled meats or spicy dishes. You can also enjoy them as a snack with your favorite dipping sauce. Try serving them with kimchi or a spicy mayo for a twist. For a fun presentation, use a rustic bowl. Drizzle some sesame oil on top and sprinkle with extra green onions. This not only looks great but adds more flavor. Enjoy these crispy delights hot, and watch them disappear! Pro Tips Choose the Right Potatoes: For the crispiest results, opt for waxy potatoes like baby Yukon Gold or red potatoes, as they hold their shape well during cooking. Ensure Even Coating: When tossing the potatoes with corn starch, make sure each piece is evenly coated. This will help achieve that perfect crispy texture. Don’t Overcrowd the Baking Sheet: Arrange the potatoes in a single layer with space between them. This allows hot air to circulate and ensures they crisp up beautifully. Serve Immediately: These potatoes are best enjoyed fresh from the oven. If they sit too long, they may lose their crispiness. {{image_4}} You can change the flavor of your crispy Korean potatoes easily. Try using sweet potatoes instead of baby potatoes for a sweeter taste. You can also swap gochugaru for paprika for a milder heat. If you want more zest, add lemon zest to the mix. For a cheesy twist, sprinkle grated cheese before baking. Each change gives a new taste and keeps things fun! You don’t have to bake these potatoes. You can use an air fryer for a quicker, crispier result. Preheat your air fryer to 400°F (200°C). Toss the seasoned potatoes as you would for baking, then place them in the air fryer basket. Cook for about 20 minutes, shaking the basket halfway through. If you want to use a stovetop, heat oil in a pan. Fry the potatoes until golden brown. Both methods give you crispy, tasty potatoes! Seasonal ingredients can add a fresh twist to your dish. In spring, add fresh asparagus or peas for a pop of color. Summer is great for ripe cherry tomatoes or fresh corn. In fall, roasted garlic or pumpkin spice can enhance the flavor. During winter, you can add roasted root vegetables like carrots or parsnips. Using seasonal produce keeps your crispy Korean potatoes exciting all year! To keep your crispy Korean potatoes fresh, store them in an airtight container. Let them cool completely before sealing. This step prevents moisture build-up, which can make them soggy. Place a paper towel at the bottom of the container to absorb excess moisture. If you have a lot of leftovers, consider using multiple containers to avoid overcrowding. Reheating can be tricky. I recommend using an oven or air fryer. Preheat your oven to 375°F (190°C). Spread the potatoes on a baking sheet in a single layer. Bake for about 10 to 15 minutes. This method helps restore their crispiness. If using an air fryer, heat it to 350°F (175°C) and fry for about 5 to 7 minutes. Avoid using a microwave, as it tends to make them soft. Crispy Korean potatoes can last in the fridge for about 3 to 4 days. After that, their texture may decline. If you want to keep them longer, consider freezing them. They can last up to 2 months in the freezer. However, freezing may change their crispiness. Always check for any signs of spoilage before consuming. Crispy Korean Potatoes come from Korea, where they are known as gamja-tang. They are a popular street food and side dish. These little potatoes are loved for their crispy texture and spicy flavor. They mix well with Korean spices, making them a tasty treat. You will often find them at markets and food stalls in Korea. Yes, you can make Crispy Korean Potatoes vegan. Just replace the soy sauce with a plant-based option. You can also skip the sesame oil if you prefer. Use vegetable oil for cooking, and the potatoes will still taste great. The gochugaru adds a nice kick without any animal products. Crispy Korean Potatoes go well with many dips. You can try a spicy mayo or a tangy soy sauce dip. Another great option is a garlic aioli. If you want something fresh, a cucumber yogurt dip works too. These dips enhance the flavors and add a fun twist to the dish. Crispy Korean potatoes are a delightful dish worth making. We explored the key ingredients that make them tasty and crispy. I shared step-by-step instructions, key cooking tips, and common mistakes to watch for. Variations let you change flavors and cooking methods to match your taste. Proper storage and reheating keep leftovers crisp and flavorful. With these insights, you can create a dish that impresses every time. Enjoy your cooking journey with these crispy delights.

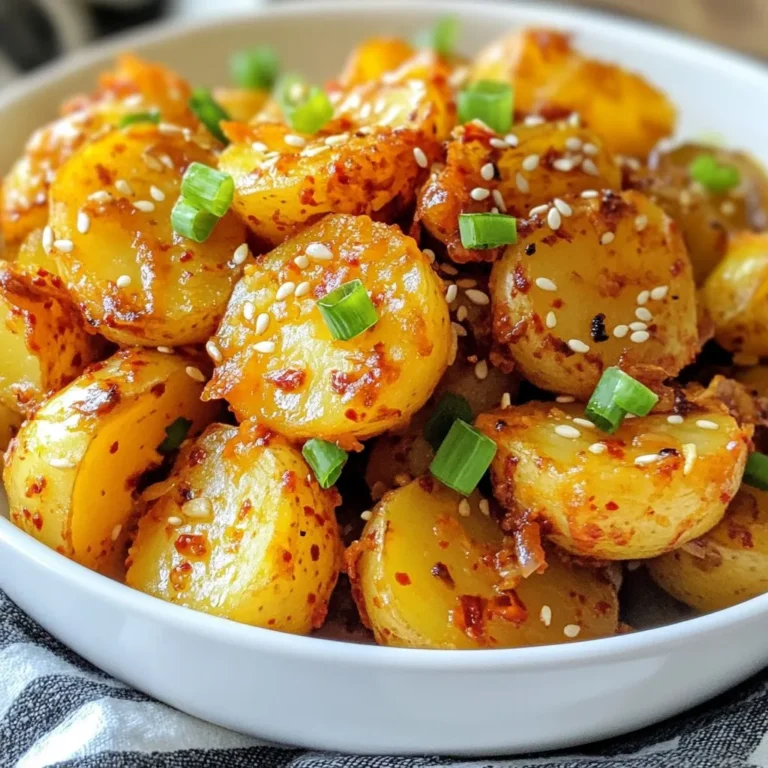
Crispy Korean Potatoes Perfect for Any Meal

For this hearty vegetable orzo soup, gather these ingredients: - 1 cup orzo pasta - 2 tablespoons olive oil - 1 medium onion, finely diced - 2 garlic cloves, minced - 2 medium carrots, peeled and diced - 2 stalks celery, diced - 1 bell pepper, diced (your choice of color) - 1 medium zucchini, diced - 1 can (14 oz) diced tomatoes with juices - 6 cups vegetable broth - 1 teaspoon dried thyme - 1 teaspoon dried basil - Salt and black pepper, to taste - 2 cups fresh spinach, roughly chopped - Juice of 1 fresh lemon - Fresh parsley, chopped, for garnishing Using fresh ingredients brings great taste and nutrition. Fresh vegetables like carrots, celery, and zucchini add crunch and color. They also keep the soup vibrant. Canned ingredients save time. Diced tomatoes in a can provide flavor and convenience. You can mix both fresh and canned for a balanced soup. You can swap ingredients based on what you have. If you don’t have orzo, try small pasta or rice. For broth, vegetable or chicken broth works well. Fresh herbs like thyme and basil can be replaced with dried ones. Just use less, as dried herbs are stronger. Always taste and adjust the seasoning to fit your palate. {{ingredient_image_2}} 1. Start by heating 2 tablespoons of olive oil in a large pot over medium heat. 2. Add 1 cup of finely diced onion and cook for 4-5 minutes, until soft. 3. Toss in 2 minced garlic cloves and stir for one minute until fragrant. 4. Now, add 2 diced carrots, 2 stalks of diced celery, and 1 diced bell pepper. Cook for 5-7 minutes until they soften. 5. Next, stir in 1 diced zucchini and let it cook for another 3 minutes. 6. Pour in 1 can of diced tomatoes with their juices and 6 cups of vegetable broth. Mix well. 7. Season with 1 teaspoon of dried thyme, 1 teaspoon of dried basil, and add salt and black pepper to taste. 8. Bring the soup to a gentle boil, then add 1 cup of orzo pasta. Reduce heat to low and simmer for about 10 minutes. 9. In the last 2 minutes, fold in 2 cups of chopped spinach and the juice of 1 lemon. 10. Taste the soup, adjusting salt, pepper, or lemon juice as needed. 11. Serve in bowls and garnish with fresh parsley. - Chop all vegetables before you start cooking. This will save you time as you cook. - Use pre-diced vegetables from the store if you're short on time. - Keep your broth warm in another pot to speed up cooking time. - You can cook the orzo separately and add it later to avoid overcooking. - Don't skip sautéing the onion and garlic; this builds great flavor. - Watch the orzo while it cooks. Stir it to prevent it from sticking. - Adding spinach too early can make it soggy; wait until the last two minutes. - Remember to taste your soup! Adjusting seasoning enhances the final dish. To boost the flavor of your Vegetable Orzo Soup, use fresh herbs. Fresh thyme or basil adds a bright taste. You can also try a splash of soy sauce or a sprinkle of parmesan cheese for depth. Lemon juice brightens the soup, so add it just before serving. For a spicy kick, include red pepper flakes. Letting the soup sit for a few hours or overnight can deepen the flavors too. Cooking orzo is simple, but timing is key. Add the orzo to the soup when it boils. Stir it gently to keep it from sticking. Cook it until it’s al dente, about 10 minutes. If you prefer a firmer texture, reduce the cooking time slightly. If you overcook it, the orzo may become mushy and lose its shape. Serve the Vegetable Orzo Soup hot in bowls. Garnish with fresh parsley for color and taste. This soup pairs well with crusty bread or a light salad. A drizzle of olive oil on top can enhance the flavor too. For a complete meal, try adding a protein like grilled chicken or chickpeas. Enjoy this cozy dish on a cold day or whenever you need comfort! Pro Tips Use Fresh Herbs: Fresh herbs like thyme and basil enhance the flavor profile of the soup significantly compared to dried herbs. Add them towards the end of cooking for maximum freshness. Adjust Consistency: If you prefer a thicker soup, you can blend a portion of the soup and return it to the pot. This will create a creamy texture without adding any dairy. Meal Prep Friendly: This soup can be made in larger batches and stored in the fridge for up to 5 days. It also freezes well, making it a great option for meal prep. Enhance with Protein: For a heartier meal, consider adding cooked chicken, beans, or lentils to the soup. This not only boosts protein but also adds more texture. {{image_4}} You can add proteins to this soup for extra heartiness. Cooked chicken, turkey, or shrimp work well. Just add them in the last few minutes of cooking. This keeps the protein tender. For a plant-based option, try chickpeas or white beans. They add protein and fiber while keeping it delicious. This soup is naturally vegetarian. To make it vegan, use vegetable broth and skip any chicken or cheese toppings. You can also add tofu for protein. Firm tofu works best. Just cube it and stir it in during the last few minutes. This way, it warms up without breaking apart. You can change the vegetables based on what’s in season. In spring, add asparagus or peas for a fresh taste. In summer, use corn or tomatoes for sweetness. Autumn calls for root veggies like sweet potatoes or butternut squash. In winter, kale or hearty greens bring warmth and nutrition. Adjust your soup to match the season for the best flavors! To keep your vegetable orzo soup fresh, store it in an airtight container. Let the soup cool to room temperature before sealing. This helps prevent condensation, which can make the soup watery. Use glass or BPA-free plastic containers for safe storage. Always label your containers with the date you made the soup. You can freeze vegetable orzo soup for up to three months. When freezing, leave some space in the container for expansion. To reheat, thaw it in the fridge overnight or use the microwave. Heat on low to avoid overcooking the orzo. Stir often while reheating. If the soup seems thick, add a splash of broth or water to loosen it. Most of the fresh ingredients in your soup have a good shelf life. Here’s a quick guide: - Orzo pasta: Lasts up to 2 years if kept dry. - Fresh vegetables: Use within a week for best flavor and texture. - Canned tomatoes: Check the can for a date, but they often last 1-2 years unopened. - Vegetable broth: Once opened, use within 4-7 days if stored in the fridge. By following these tips, you’ll enjoy your bold and flavorful vegetable orzo soup whenever you want! Yes, you can use other pasta in this soup. Small pasta shapes work best. Try ditalini, elbow macaroni, or even small shells. Just remember to adjust the cooking time based on the pasta you choose. To add heat, sprinkle in some red pepper flakes. You can also use chopped jalapeños or a dash of hot sauce. Start small and taste as you go. This way, you can control the spice level. Absolutely! This soup is packed with veggies like carrots, celery, and spinach. It has fiber, vitamins, and minerals. Using vegetable broth keeps it light, while orzo gives you energy. This dish is a great choice for a healthy meal. Yes, this soup is great for meal prep. You can make it a day or two ahead. Just store it in the fridge. The flavors blend better after a day. However, it's best to add fresh spinach just before serving. To thicken the soup, you have a few options. You can add more orzo or some mashed potatoes. Another way is to blend a portion of the soup and mix it back in. This will make it creamy and hearty without adding cream. We covered key ingredients and tips for making soup. You learned about using fresh or canned items and creative substitutions. I shared step-by-step cooking instructions and time-saving tips. Enhancing flavors and perfecting orzo made the soup even better. You also explored variations to fit your diet. Remember proper storage and reheating tips to keep your soup fresh. Use these insights to create delicious meals and enjoy cooking. Your new skills will make your kitchen a happier place!

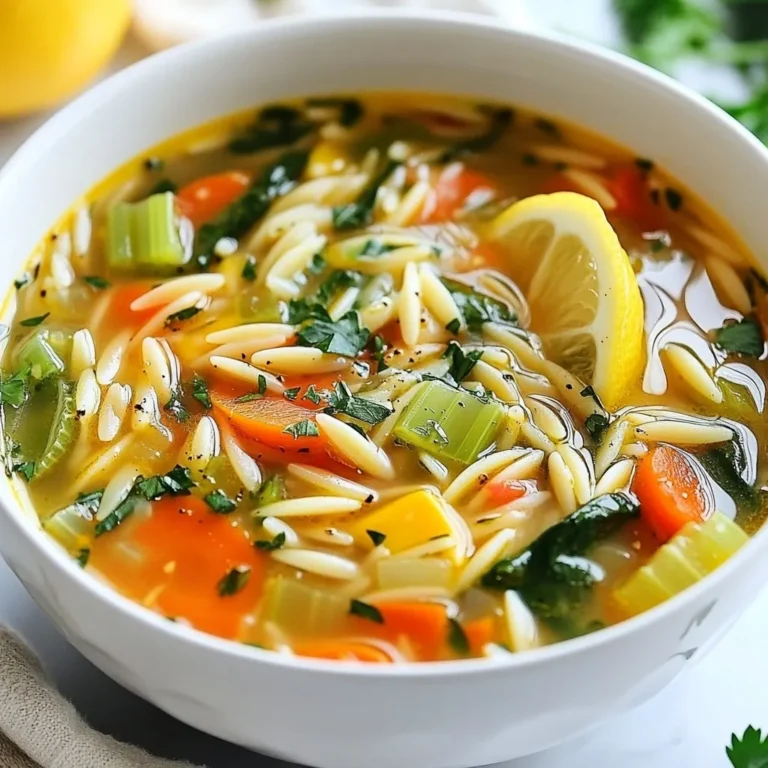
Vegetable Orzo Soup Bold and Flavorful Comfort Dish

To make this delicious Potato Sausage Chowder, you need the following items: - 4 large russet potatoes, peeled and diced into 1-inch cubes - 1 pound smoked chicken sausage, sliced into rounds - 1 medium onion, finely diced - 2 cloves garlic, minced - 3 cups high-quality chicken broth - 1 cup heavy cream - 1 cup corn kernels - 2 tablespoons olive oil - 1 teaspoon dried thyme - 1 teaspoon paprika - Salt and pepper to taste - 1/4 cup fresh chives or parsley, chopped for garnish This chowder is flexible! You can swap or add ingredients to suit your taste: - Use turkey or veggie sausage for a lighter dish. - Swap russet potatoes for Yukon Gold for a creamier texture. - Add diced carrots or celery for extra veggies. - Replace heavy cream with coconut milk for a dairy-free version. Choosing quality ingredients makes a big difference. Here are my top picks: - Potatoes: Look for organic russets from local farmers’ markets. - Sausage: Aidells and Applegate offer great options for smoked chicken sausage. - Broth: Swanson and Pacific Foods have rich, flavorful chicken broth. - Cream: Organic Valley has a great heavy cream that is rich and thick. Using the best ingredients enhances the flavors and makes your chowder even more comforting! {{ingredient_image_2}} Start by heating 2 tablespoons of olive oil in a large pot over medium heat. Once the oil shimmers, add 1 medium onion, finely diced. Cook the onion for about 5 minutes. Stir occasionally until the onion turns translucent and fragrant. This step creates a tasty foundation for your chowder. Next, stir in 2 cloves of minced garlic and 1 pound of sliced smoked chicken sausage. Cook for another 3 to 4 minutes. This allows the sausage to warm and get a nice brown edge. The garlic will also release its wonderful aroma, making your kitchen smell amazing. Now, add 4 large russet potatoes, diced into 1-inch cubes. Sprinkle in 1 teaspoon of dried thyme, 1 teaspoon of paprika, and a generous pinch of salt and pepper. Stir well to coat everything with spices. Pour in 3 cups of chicken broth and bring the mixture to a gentle boil. When it boils, reduce the heat to low and cover the pot. Let it simmer for 15 to 20 minutes, or until the potatoes are fork-tender. After the potatoes soften, stir in 1 cup of corn kernels and 1 cup of heavy cream. Heat through on low for another 5 minutes. Be sure to stir occasionally to avoid sticking. Taste the chowder and adjust the seasoning with more salt and pepper if needed. Finally, remove the pot from heat. Ladle the chowder into bowls and garnish with fresh chives or parsley. Enjoy your rich and comforting potato sausage chowder! When making Potato Sausage Chowder, avoid these common pitfalls: - Overcooking the potatoes. They should be tender but not mushy. - Skipping the sautéing step. This builds flavor. Cooking the onion and sausage first is key. - Using low-quality broth. Good broth makes a big difference in taste. - Not tasting before serving. Always adjust salt and pepper to your liking. To boost the flavor of your chowder, try these tips: - Add fresh herbs. Fresh thyme or parsley adds brightness. - Use smoked paprika. This gives the chowder a deeper, richer taste. - Finish with a squeeze of lemon. A little acidity brightens the dish. - Incorporate a splash of hot sauce. This gives a nice kick without overpowering. For the best texture in your chowder, follow these steps: - Use a heavy-bottomed pot. This helps heat evenly and prevents sticking. - Simmer gently. A slow simmer allows flavors to meld together. - Stir occasionally. This helps prevent sticking and ensures even cooking. - Add cream at the end. This keeps it rich and prevents separation. Pro Tips Use Fresh Ingredients: Whenever possible, opt for fresh potatoes and herbs to enhance the flavor profile of your chowder. Adjust the Thickness: For a thicker chowder, mash a few of the cooked potatoes against the side of the pot before adding the cream. Flavor Depth: Consider adding a splash of white wine after sautéing the sausage for an extra layer of flavor. Storage Tips: If you have leftovers, store them in an airtight container in the fridge for up to 3 days. Reheat gently on the stove. {{image_4}} You can make this chowder vegetarian by skipping the meat. Use vegetable broth instead of chicken broth. Replace the sausage with plant-based sausage. You can also add more veggies like carrots and bell peppers for extra flavor. For a creamy texture, use coconut milk or cashew cream. These swaps keep the chowder rich and tasty. Feel free to play with sausage types. Smoked chicken sausage gives a nice flavor, but other options work well too. Try Italian sausage for a spicy kick or bratwurst for a milder taste. You can also use turkey sausage for a leaner choice. Each type of sausage adds a unique twist to the chowder. To take your chowder to the next level, add some fun extras. Fresh herbs like rosemary or basil can brighten the taste. A splash of hot sauce adds heat if you like spice. Consider mixing in diced bell peppers or mushrooms for added texture. For a smoky flavor, try using smoked paprika instead of regular paprika. These small changes can make a big impact on your chowder. To store leftover chowder, let it cool first. Once cool, pour it into an airtight container. Make sure to seal it well. Store the container in the fridge. It will last about 3 to 4 days. If you want to enjoy it later, freezing it is a great option. If you want to freeze chowder, use freezer-safe containers. Leave some space at the top for expansion. This chowder can stay good for up to 3 months. When you are ready to eat it, just thaw it in the fridge overnight. This helps keep the flavors intact. To reheat the chowder, pour it into a pot over medium heat. Stir it often to heat evenly. You can also microwave it in a bowl. Cover it loosely to prevent splatters. Heat in short bursts, stirring in between, until hot. If it seems thick, add a splash of broth or cream for a smoother texture. Yes, you can make this chowder in advance. It tastes even better the next day. After cooking, let it cool. Then store it in an airtight container in the fridge. It will keep for about 3-4 days. When you're ready to eat, just reheat it on the stove. Add a splash of cream if it seems too thick. You can use vegetable broth as a great substitute for chicken broth. This will keep the chowder lush and full of flavor. If you want a richer taste, try using beef broth. You can also use water, but add more spices to boost flavor. Homemade broth is always a nice touch, too. To thicken the chowder, you have a few options. One way is to mash some of the potatoes with a fork or potato masher. This will give the chowder a creamier texture. Another method is to add a slurry of cornstarch mixed with cold water. Stir in this mixture while the chowder simmers. It will thicken nicely. You can also add more cream for richness. This blog post provided a clear guide to making chowder. We covered the main ingredients, alternatives, and top brands for quality. You learned step-by-step instructions from preparing the base to finalizing the dish. We shared tips on avoiding common mistakes and enhancing flavor. You also found variations, storage tips, and answers to common questions. Chowder can fit anyone's taste or diet. By following this guide, you can create a perfect bowl every time. Enjoy your cooking!

Potato Sausage Chowder Rich and Comforting Recipe

To make smoky roasted pumpkin seeds, you need just a few key items: - 2 cups raw pumpkin seeds (pepitas) - 2 tablespoons olive oil - 1 teaspoon smoked paprika - 1 teaspoon garlic powder - 1 teaspoon onion powder - ½ teaspoon cayenne pepper - 1 teaspoon salt These ingredients form the base of your recipe. Each one plays a part in creating a rich, smoky flavor. The raw pumpkin seeds bring the crunch, while olive oil helps the spices stick. Smoked paprika gives that lovely smoke flavor. Once you have the main ingredients, you can get creative with the flavors. Here are some ideas to try: - Sweet & Spicy: Add chili powder and a bit more maple syrup. - Curry Twist: Mix in curry powder for a warm, exotic taste. - Cinnamon Sugar: Combine cinnamon with sugar for a sweet treat. - Garlic Herb: Use dried rosemary or thyme for an herbal kick. - Tex-Mex: Taco seasoning and lime zest create a fun twist. - Zesty Lemon Pepper: Lemon zest and black pepper add brightness. - Spicy Sriracha: Drizzle Sriracha and sugar for a spicy-sweet mix. - Smoky Mesquite: Swap smoked paprika for mesquite seasoning. These variations let you tailor the seeds to your taste. Feel free to experiment and invent your own blends! If you like a hint of sweetness, consider adding: - 1 tablespoon maple syrup This optional ingredient balances the savory spices nicely. It enhances the overall flavor while adding a touch of sweetness. {{ingredient_image_2}} First, you need to preheat your oven. Set it to 350°F (175°C). This step is key. A hot oven helps the seeds cook evenly and become crunchy. If you have fresh pumpkin seeds, scoop them from the pumpkin. Be sure to remove all pumpkin pulp. Rinse the seeds in cold water, then dry them well with a towel. This keeps them from getting soggy. In a big bowl, mix your cleaned pumpkin seeds with olive oil. Add smoked paprika, garlic powder, onion powder, cayenne pepper, and salt. If you like a hint of sweetness, pour in some maple syrup. This gives a nice balance to the flavors. Next, divide the seasoned seeds into eight bowls. This is where you can have fun! Add different spices to each bowl for unique flavors: - Sweet & Spicy: Add chili powder and a bit more maple syrup. - Curry Twist: Mix in curry powder and a dash of salt. - Cinnamon Sugar: Combine cinnamon and sugar for a sweet treat. - Garlic Herb: Add dried rosemary or thyme for extra flavor. - Tex-Mex: Use taco seasoning and lime zest for a vibrant taste. - Zesty Lemon Pepper: Stir in lemon zest and black pepper. - Spicy Sriracha: Drizzle Sriracha and sprinkle sugar for balance. - Smoky Mesquite: Swap smoked paprika for mesquite seasoning. Spread each flavored batch on a lined baking sheet. Make sure they are in a single layer. Roast them in the oven for 15-20 minutes. Stir every 5 minutes so they cook evenly. They are done when they turn golden brown and smell great. Once roasted, take out the seeds from the oven. Let them cool completely on the baking sheet. They will get crispier as they cool. Enjoy your smoky roasted pumpkin seeds as a tasty snack! To get the best crunch from your pumpkin seeds, even roasting is key. Start by preheating your oven to 350°F (175°C). This warms the air and helps the seeds cook evenly. Spread the seeds in a single layer on a baking sheet. This way, each seed gets equal heat. Stir the seeds every five minutes while they roast. This helps them brown all over. You’ll know they are ready when they look golden brown. Pumpkin seeds are fun to flavor. Use the basic seasoning mix of olive oil, smoked paprika, garlic powder, onion powder, cayenne pepper, and salt. Then, divide the seeds into eight bowls. You can add different spices to each. Here are some ideas: - Sweet & Spicy: Add chili powder and a bit more maple syrup. - Curry Twist: Mix in curry powder for a warm flavor. - Cinnamon Sugar: Combine cinnamon with sugar for a sweet snack. - Garlic Herb: Toss in dried rosemary or thyme for extra flavor. - Tex-Mex: Use taco seasoning and lime zest for a zesty kick. - Zesty Lemon Pepper: Add lemon zest and black pepper for brightness. - Spicy Sriracha: Drizzle Sriracha and sprinkle sugar for balance. - Smoky Mesquite: Replace smoked paprika with mesquite seasoning for depth. When serving your roasted seeds, make it look nice! Arrange them in small bowls on a pretty platter. You can use different colors to show off the flavors. For a fresh touch, add herbs or lime wedges as a garnish. This makes your display pop and invites guests to taste. A well-presented dish adds to the fun of eating! Pro Tips Use Fresh Seeds: For the best flavor and crunch, use fresh pumpkin seeds instead of pre-packaged ones. Fresh seeds will have a nuttier taste and better texture. Experiment with Flavors: Don’t hesitate to mix different spices and herbs to find your perfect flavor combination. The possibilities are endless, so have fun with it! Storage Matters: To maintain the freshness and crunchiness of your roasted seeds, store them in an airtight container in a cool, dark place. Mind the Roast Time: Keep a close eye on the seeds while roasting, as they can quickly go from perfectly toasted to burnt. Stir them every 5 minutes for even roasting. {{image_4}} For a fun twist, try a sweet and spicy mix. You can add chili powder and maple syrup to your seeds. This combo gives a nice kick and sweet touch. The heat from the chili powder balances out the sweetness, making each bite exciting. Want to take your seeds further? Try curry powder for a unique taste. Just one teaspoon will change everything. For a Tex-Mex vibe, mix in taco seasoning. A hint of lime zest makes it lively and fresh. These bold flavors will make your taste buds dance. For a bright zing, add zesty lemon pepper. The lemon zest wakes up the seeds. If you love smoky flavors, swap smoked paprika for mesquite seasoning. This gives a deep, rich taste that's hard to resist. Each variation brings its own charm, so let your creativity flow! Store your roasted pumpkin seeds in an airtight container. This keeps them fresh and crunchy. You can use glass jars or plastic bags. Make sure to let the seeds cool completely before sealing them. This prevents moisture buildup, which can make them soggy. If stored properly, roasted pumpkin seeds can last up to two weeks. Keep them in a cool, dark place. A pantry or cupboard works well. Avoid direct sunlight and heat, which can spoil the seeds faster. If you want to keep them longer, consider freezing them. If you want to enjoy your seeds warm again, preheat your oven to 350°F. Spread the seeds on a baking sheet in a single layer. Heat them for about 5 to 10 minutes. This will help restore their crunch. Be sure to check them often to avoid burning. Homemade pumpkin seeds can last up to two weeks when stored properly. Place them in an airtight container. This helps keep them fresh and crunchy. If you keep them in a cool, dry place, they may last even longer. Yes, you can use many spices to change the flavor. Here are some great options: - Chili powder for heat - Curry powder for warmth - Cinnamon for sweetness - Ground ginger for a zing Feel free to mix and match spices to create your favorite flavors! Yes, there is a big difference! Raw pumpkin seeds are soft and chewy. Roasted pumpkin seeds are crunchy and full of flavor. Roasting them enhances their taste and makes them a great snack. Plus, roasting can help you digest them better. Pumpkin seeds are packed with good stuff. They are high in protein, healthy fats, and fiber. They also contain vitamins like vitamin K and minerals like magnesium and zinc. Eating them can support heart health and boost your immune system. Enjoy them guilt-free! Smoky roasted pumpkin seeds are simple and fun to make. We covered the main ingredients, tasty seasonings, and how to customize flavors. I shared easy steps for roasting and cooling your seeds. You can explore sweet, spicy, and bold options, too. Remember to store them right for the best taste. Use this guide to create your favorite pumpkin seed snacks. Enjoy your crunchy treats and explore new flavors!

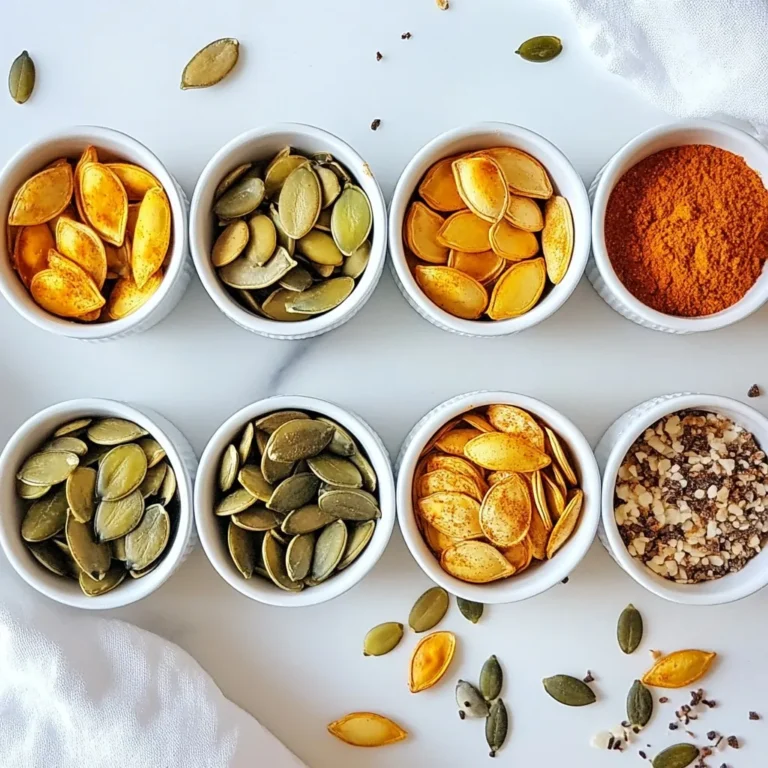
Smoky Roasted Pumpkin Seeds 8 Ways To Delight Tastebuds

- 1 cup red lentils, rinsed and drained - 1 medium onion, finely chopped - 2 cloves garlic, minced - 1 tablespoon fresh ginger, grated - 1 tablespoon coconut oil - 1 teaspoon cumin seeds - 1 teaspoon mustard seeds - 1 teaspoon turmeric powder - 1 teaspoon garam masala - 1 can (14 oz) diced tomatoes, with juices - 4 cups vegetable broth - 1 cup fresh spinach, chopped - Salt, to taste - Fresh cilantro leaves, for garnish - Juice of 1 lime If you lack some items, don't fret! You can replace red lentils with yellow lentils. Instead of coconut oil, use olive oil or butter. In a pinch, fresh ginger can swap with ground ginger. For the broth, water works too. You can use frozen spinach if fresh isn't available. Canned tomatoes can be replaced with fresh, chopped tomatoes. Using fresh ingredients makes a big difference. Fresh veggies give better taste and nutrients. The vibrant colors of fresh spinach and cilantro add appeal. Fresh lime juice brightens flavors, making the dish lively. I always recommend using fresh items when possible. They enhance not just the flavor but also the overall joy of cooking! {{ingredient_image_2}} 1. Start by rinsing and draining 1 cup of red lentils. This removes dirt and makes them clean. 2. Chop 1 medium onion finely. The smaller the pieces, the faster they cook. 3. Mince 2 cloves of garlic. You want small bits to spread the flavor. 4. Grate 1 tablespoon of fresh ginger. Fresh ginger adds a nice kick. 5. Gather your other ingredients: coconut oil, cumin seeds, mustard seeds, turmeric, garam masala, diced tomatoes, vegetable broth, fresh spinach, salt, cilantro, and lime. 1. In a large pot, melt 1 tablespoon of coconut oil over medium heat. 2. Add 1 teaspoon each of cumin and mustard seeds. Sauté for about 1 minute until they pop. 3. Add the chopped onion and sauté for 3-4 minutes until it is soft and clear. 4. Stir in the minced garlic and grated ginger. Cook for 1-2 minutes until the smell is strong. 5. Mix in 1 teaspoon of turmeric and garam masala. Let the spices cook for another minute. 6. Pour in a can of diced tomatoes with their juices. Stir for about 2 minutes to combine. 7. Add the rinsed red lentils and 4 cups of vegetable broth. Bring to a boil, then lower the heat to simmer. 8. Cover the pot and simmer for 20 minutes. Stir often to keep it from sticking. 9. Once the lentils are soft, fold in 1 cup of chopped spinach. Add salt to taste and let the spinach wilt for 2 minutes. 10. Remove from heat and stir in the juice of 1 lime. This adds a bright flavor. 11. Serve hot, garnished with fresh cilantro leaves. - If the dahl seems too thick, add a little more vegetable broth. - For a creamier texture, blend a portion of the dahl before adding spinach. - Stir frequently to avoid any sticking or burning on the bottom. To make your Red Lentil Dahl even tastier, try these ideas: - Cook spices longer: Sauté your cumin and mustard seeds until they pop. This brings out their oils and flavors. - Add more herbs: Fresh herbs like thyme or bay leaves can deepen the taste. - Spice it up: If you want heat, add a chopped chili or a pinch of cayenne pepper. - Use homemade broth: Homemade vegetable broth gives a richer taste than store-bought. Each of these tips can elevate your dahl and make it your own. Garnishing adds both beauty and flavor. Here are some fun ideas: - Fresh cilantro: A sprinkle on top brightens up the dish. - Lime wedges: Serve lime on the side for a zesty kick. - Yogurt: A dollop of yogurt can add creaminess and balance the spices. - Nuts or seeds: Toasted pumpkin seeds or cashews add crunch and texture. These garnishes make your dahl look and taste amazing. Avoid these common pitfalls for the best results: - Not rinsing lentils: Always rinse lentils before cooking. This removes dust and improves texture. - Overcooking: Keep an eye on the lentils. They should be tender but not mushy. - Skipping salt: Add salt at the end, but don’t skip it entirely. It enhances all the flavors. - Ignoring consistency: If the dahl is too thick, add more broth. If too thin, let it cook a bit longer. By steering clear of these mistakes, you can create a perfect Red Lentil Dahl every time. Pro Tips Use Fresh Spices: For the best flavor, use freshly ground spices rather than pre-ground ones. Freshly ground spices have a more potent aroma and taste. Adjust Consistency: If you prefer a thinner dahl, feel free to add more vegetable broth or water during cooking. Adjust according to your desired texture. Extra Flavor: For an added depth of flavor, consider adding a splash of coconut milk towards the end of cooking. This will create a creamy texture. Garnish Creatively: Enhance the presentation by garnishing with roasted nuts or seeds, such as pumpkin seeds or cashews, for a delightful crunch. {{image_4}} This recipe is already vegan and gluten-free. Red lentils are a great source of protein. To keep it that way, ensure all your spices and broth are gluten-free. You can use vegetable broth to add depth to the flavors. This makes a hearty meal that fits many diets. If you like heat, add some spice! You can mix in a chopped green chili when you sauté the onions. Alternatively, add a pinch of cayenne pepper with the turmeric. This will give your dahl a nice kick. Adjust the spice to suit your taste. You can always serve chili flakes on the side for those who want more heat. Feel free to get creative with your ingredients! Swap the spinach for kale or chard. You can also use coconut milk instead of broth for a creamier texture. For a different flavor, try adding carrots or bell peppers. Each swap can change the taste and make it fun. Experimenting with ingredients keeps the dish fresh and exciting. After enjoying your red lentil dahl, let it cool down first. Store leftovers in airtight containers. Place them in the fridge for up to 5 days. Keep the dahl away from strong-smelling foods to maintain its flavor. To reheat, pour the dahl into a pot. Add a splash of water or broth to avoid dryness. Heat it on low, stirring often, until it warms up. You can also use a microwave. Place the dahl in a microwave-safe bowl. Cover it loosely and heat it in 1-minute intervals. Stir between each interval until hot. If you want to save some dahl for later, freezing is a great option. Let it cool completely before freezing. Use freezer-safe containers or bags. It can last up to 3 months in the freezer. When ready to eat, thaw it in the fridge overnight. Reheat it on the stove or in the microwave. Add a bit of water to get the right consistency again. Red lentils are small, orange legumes. They cook fast and are soft when done. They are high in protein, fiber, and iron, making them a great food choice. Eating red lentils can help with digestion and keep you full longer. They also have antioxidants that help protect your body. Red lentils are low in fat and can fit into many diets, including vegan and gluten-free. Yes, you can make red lentil dahl ahead of time. It stores well in the fridge for up to five days. Just let it cool before putting it in a container. When ready to eat, you can reheat it on the stove or in the microwave. The flavors often get better after sitting. If it seems too thick, add a splash of water or broth when reheating. Red lentil dahl pairs well with many foods. You can serve it with rice or quinoa for a filling meal. Naan or flatbread is great for dipping. Fresh salad or sautéed vegetables add nice crunch. For a refreshing taste, serve it with lime wedges and yogurt. You can also enjoy it as a soup with crusty bread on the side. This post outlined how to make delicious red lentil dahl from start to finish. We discussed key ingredients, preparation steps, and ways to boost flavor. I shared tips for storing, reheating, and presenting your dish. I also covered variations, ensuring everyone can find a recipe they love. Remember, using fresh ingredients truly makes a difference. Don’t hesitate to experiment with flavors. By mastering this dish, you gain a tasty option for any meal. Enjoy cooking and savor every bite!

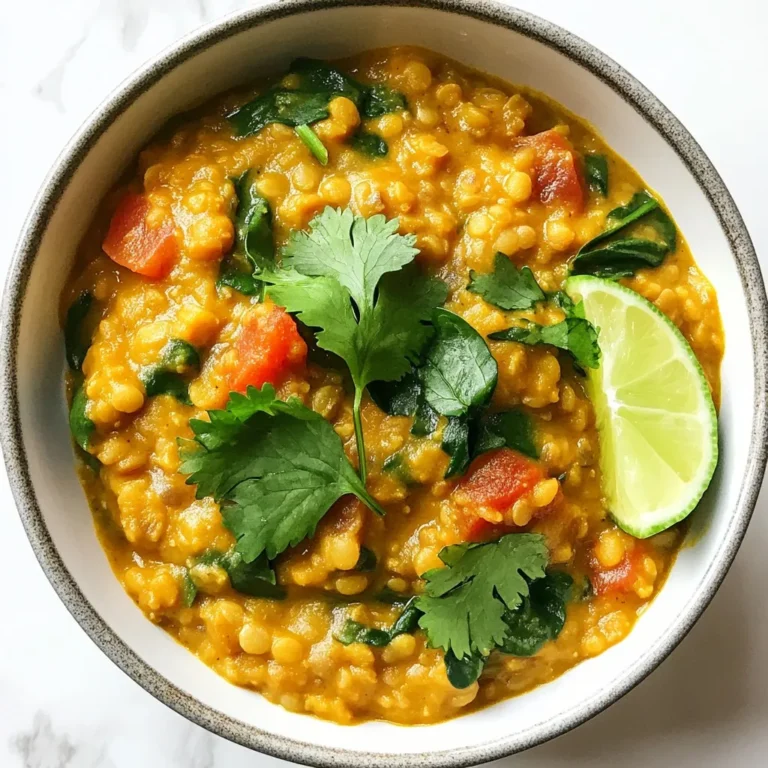
Red Lentil 30-Minute Dahl Quick and Flavorful Recipe

- 2 cups shredded cooked chicken - 1 package (8 oz) cream cheese, softened - 1/2 cup ranch dressing - 1/2 cup buffalo sauce - 1 cup shredded cheddar cheese - 1/2 cup crumbled blue cheese (optional) - 1/4 cup fresh green onions, chopped - Serving Suggestions: tortilla chips or celery sticks To make the Ultimate Buffalo Chicken Dip, gather these ingredients. You need shredded cooked chicken. Using rotisserie chicken saves time. Cream cheese gives the dip its creamy texture. Ranch dressing adds a cool flavor. Buffalo sauce brings the heat. Adjust it for your spice level. Cheddar cheese adds richness. Blue cheese gives a sharp taste, but it’s optional. Fresh green onions brighten the dip. Serve it with crunchy tortilla chips or fresh celery sticks. These make great dippers that balance the dip's richness. This recipe is simple, yet it packs a punch of flavor! {{ingredient_image_2}} - Preheat oven to 350°F (175°C). - Prepare your baking dish by lightly greasing it. This helps with easy serving. - In a bowl, combine the softened cream cheese and ranch dressing. - Use a hand mixer or whisk to blend until smooth. - Carefully add the shredded chicken and buffalo sauce. Stir gently until coated. - Fold in the shredded cheddar cheese. If you like, add crumbled blue cheese for extra flavor. - Transfer the mixture to your prepared baking dish. Spread it evenly. - Bake for 20-25 minutes until the dip is bubbly and golden. - Let the dip rest for a few minutes before serving. This helps avoid burns. Presentation tip: Sprinkle chopped green onions on top before serving for a fresh look. You can adjust the buffalo sauce to fit your taste. If you love spice, add more! If you prefer mild, use less. Another great trick is to use smoked chicken. It adds a nice depth to the dip. Serve your buffalo chicken dip in a cast-iron skillet. It keeps the dip warm and looks great. You can also garnish with extra green onions. They add a fresh pop of color and flavor. For mixing, use a hand mixer or a whisk. These tools help blend the cream cheese and ranch dressing smoothly. Choose a sturdy baking dish for even cooking. A glass or ceramic dish works well. Pro Tips Adjust the Heat: Modify the amount of buffalo sauce based on your heat preference. Start with less and add more if you like it spicier! Mix and Match Cheeses: Feel free to experiment with different types of cheese such as pepper jack for an extra kick or mozzarella for a milder flavor. Make Ahead: Prepare the dip a day in advance, cover it, and store it in the fridge. When ready to serve, just bake until bubbly. Garnish for Flair: Besides green onions, consider topping your dip with diced tomatoes or even jalapeño slices for added color and flavor. {{image_4}} You can change the heat level of your dip. Adding jalapeños makes it spicier. Chop them finely, then mix them in with the chicken. You can also try different hot sauce brands. Each brand adds its own flavor. Some are tangy, while others are fiery. Find one that you love! Cheese is key to the dip's flavor. You can swap mozzarella for cheddar if you prefer. Mozzarella gives a milder taste but still melts well. If you want more spice, try pepper jack cheese. It adds a nice kick while keeping the creamy texture. If you need to change the recipe for diet reasons, you can make it gluten-free. Check the ranch dressing and buffalo sauce labels for gluten. You can also make a vegetarian version. Use plant-based chicken instead of regular chicken. This keeps the great taste while fitting your diet. Store leftovers in an airtight container. This keeps the dip fresh. You can place it in the fridge for up to three days. To maintain its taste, cover it tightly. If you notice a change in smell or color, it’s best to toss it. Yes, you can freeze Buffalo Chicken Dip! It’s easy to do. First, let the dip cool completely. Then, transfer it to a freezer-safe container. Be sure to leave some space at the top for expansion. The dip will last in the freezer for up to two months. When ready to enjoy, move it to the fridge overnight to thaw. Reheat the dip in the oven for the best flavor. Set your oven to 350°F (175°C) and place the dip in a baking dish. Heat it for about 15-20 minutes until it’s warm and bubbly. You can also use the microwave. Heat it in short bursts, about 30 seconds at a time, stirring in between. Make sure it reaches at least 165°F (74°C) for safe eating. Buffalo chicken dip lasts about 3 to 5 days in the fridge. To store it, place the dip in an airtight container. This keeps it fresh and prevents odors from mixing. Always let it cool to room temperature before sealing. If you see any changes in color or smell, it's best to toss it. Yes, you can make this dip ahead of time. Prepare the dip up to the baking step. Store it in the fridge for up to 24 hours. When you're ready to bake, just take it out and pop it in the oven. This saves time on game day or any gathering. This recipe works well for meal prep. Portion the dip into small containers. You can pair it with tortilla chips or celery sticks. This way, you have a quick snack ready to go. Just remember to store it in the fridge and finish it within a week for the best taste. Buffalo Chicken Dip is a tasty, fun dish made with simple ingredients. We mixed cooked chicken, cream cheese, ranch dressing, and buffalo sauce, creating a creamy delight. Baking it until bubbly makes it irresistible. Remember, you can add jalapeños for spice or use different cheeses to suit your taste. Store leftovers properly to keep them fresh. Overall, this dip is great for parties, game nights, or snack time. Enjoy every bite!

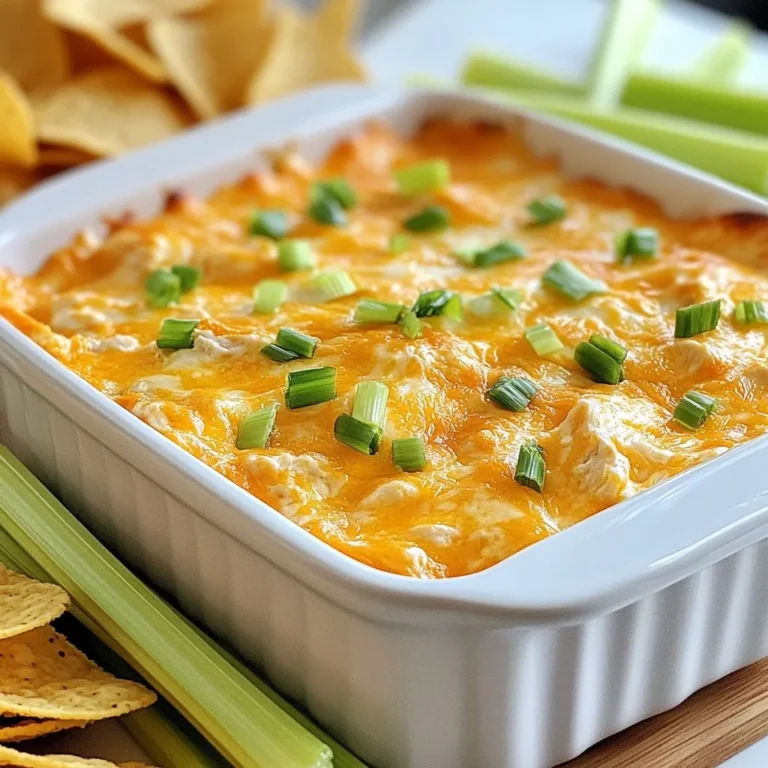
Ultimate Buffalo Chicken Dip Savory and Simple Recipe

PREV 1 … 46 47 48 NEXT
easy meal kitchen

explore

DessertsDinnerAppetizersDrinks

Our Policies

  • Cookie Policy
  • Copyright Policy
  • Disclaimer
  • GDPR Policy
  • Terms Of Use
Back to Top
  • About
  • Contact Us
  • Privacy Policy
© 2026 easy meal kitchen