FREE DINNER EBOOK! Get your copy!
  • Cookie Policy
  • GDPR Policy
  • Disclaimer
  • Terms Of Use
  • Visit my other site: Fun Cookie Recipes
easy meal kitchen
  • Home
  • Dinner
  • Desserts
  • Drinks
  • Appetizers
  • Contact
  • About
  • Privacy Policy
  • Home
  • Dinner
  • Desserts
  • Drinks
  • Appetizers
  • Contact
  • About
  • Privacy Policy
  • Cookie Policy
  • GDPR Policy
  • Disclaimer
  • Terms Of Use
Visit my other site: Fun Cookie Recipes

HOME / CATEGORIES /

Latest

- 1 tablespoon olive oil - 1 small onion, finely diced - 2 cloves garlic, minced I start with olive oil for a rich base. Its flavor shines when heated. I finely dice one small onion and add it to the pot. Cooking it makes the kitchen smell great. After about three minutes, I stir in two minced garlic cloves. This adds depth and aroma to the soup. - 4 cups vegetable broth - 1 cup heavy cream Next, I pour in four cups of vegetable broth. This adds a warm, savory flavor. I then lower the heat and add one cup of heavy cream. This makes the soup creamy and rich, giving it a lovely texture. - 1 cup basil pesto - Grated Parmesan cheese Now comes the star of the dish: one cup of basil pesto. This brings a fresh, herby taste. I mix it well into the soup. For serving, I sprinkle grated Parmesan cheese on top. This adds a salty kick and makes it even more delicious. To start, heat 1 tablespoon of olive oil in a large pot over medium heat. Add 1 small onion, finely diced, and sauté for about 3-4 minutes. You want the onion to become soft and fragrant. Next, stir in 2 cloves of minced garlic. Sauté for another minute, stirring constantly. This step builds a great base for your soup. Now, carefully pour in 4 cups of vegetable broth. Increase the heat until it reaches a gentle boil. Once boiling, reduce the heat again. Stir in 1 cup of heavy cream and 1 cup of basil pesto. Mix well until they blend smoothly. This creates a rich and creamy soup base. Add a 9 oz package of cheese tortellini to the pot. Cook according to the package instructions. It usually takes about 5-7 minutes. You want the tortellini to be al dente, tender yet firm. To test, take one out and give it a bite. After the tortellini is cooked, gently fold in 1 cup of halved cherry tomatoes. Also, add in 2 cups of fresh spinach, rinsed and dried. Cook for an extra 2-3 minutes. This allows the spinach to wilt and the tomatoes to soften slightly. These veggies add color and nutrition to the soup. Now, taste your soup and adjust with salt and black pepper. This step is key for flavor balance. Once seasoned, ladle the soup into bowls. Garnish with grated Parmesan cheese and fresh basil leaves. This will make your dish look and taste amazing. To enhance the taste of your soup, always use fresh ingredients. Fresh basil adds a bright note. A sprinkle of lemon juice can also boost the flavor. Remember, the key to great soup is in proper seasoning. Always taste your soup before serving. Adjust salt and pepper as needed for a balanced taste. To prevent overcooked tortellini, follow the package instructions closely. Cook the tortellini until it's al dente, or firm to the bite. This keeps it from becoming mushy in the soup. To maintain a creamy texture, add the cream and pesto after the broth boils. Stir gently to blend without breaking the tortellini. Garnishing can elevate your soup's look. Top it with grated Parmesan cheese and fresh basil leaves. This not only adds flavor but also makes it appealing. For serving, use deep bowls to hold the soup. Pair it with crusty bread for a complete meal. Enjoy the comforting and delicious experience of your creation! {{image_4}} You can swap out tortellini for other pasta types. Try using small shells or bowtie pasta. These options still hold the creamy sauce well. You can also use vegetable-based pasta for a fun twist. For vegetables, consider adding zucchini, carrots, or bell peppers. These veggies add both color and nutrients. You can sauté them with the onion for extra flavor. For a vegan version, replace heavy cream with coconut milk or cashew cream. Use vegan pesto instead of basil pesto. You can find many brands in stores or make your own. If you need a gluten-free option, choose gluten-free pasta. Most grocery stores offer great choices today. Always check the packaging to ensure it's gluten-free. Adding proteins can make your soup heartier. Cook diced chicken or shrimp in the pot before adding the broth. They will soak up the flavors as they cook. You can also experiment with different types of pesto. Try sun-dried tomato pesto or arugula pesto for a unique taste. Each type brings its own flavor profile to the dish. Store your leftover soup right after it cools. Use airtight containers for best results. Glass or plastic containers work well. Avoid metal containers, as they can react with the soup. Keep the soup in the fridge for up to three days. To freeze the soup, let it cool completely. Use freezer-safe containers or bags. Leave some space at the top, as the soup will expand. When ready to eat, thaw it overnight in the fridge. Reheat on the stove or in the microwave until hot. Stir well to ensure even heating. In the fridge, the soup lasts about three days. Look for signs of spoilage, like a sour smell or mold. If you see any of these, throw it away. Always trust your senses to keep it safe. Can I use different pasta? Yes, you can use any pasta you like. Try penne, farfalle, or even whole wheat pasta. Just make sure to adjust the cooking time. You want your pasta to be tender but not mushy. How spicy is the pesto? Most pesto is mild, but it can vary. If you use store-bought pesto, check the label. If you prefer more heat, add a pinch of red pepper flakes when cooking. This adds a nice kick without overpowering the dish. What can I add for more nutrition? You can add more veggies like zucchini, carrots, or bell peppers. They boost vitamins and fiber. Beans or lentils are great for extra protein too. Just toss them in with the tortellini and cook until tender. Can this be made ahead of time? Yes, you can make this soup ahead. Just store it in the fridge for up to three days. When ready to eat, reheat it on the stove. Add a splash of broth if it seems too thick. What to serve with this soup? This soup pairs well with crusty bread or a fresh salad. A simple green salad with a light vinaigrette works great. The crunch balances the creamy soup. Ideal sides for a complete meal Consider garlic bread or a side of roasted vegetables. Both add flavor and texture. You can also serve a light dessert like fruit salad to finish your meal. This soup combines simple ingredients like olive oil, garlic, and creamy broth. You prepare by sautéing aromatics and creating a base with broth and pesto. Adding tortellini and fresh vegetables brings it all together. You can tweak flavors and adjust for diets, ensuring everyone enjoys it. Store any leftovers properly for future meals. This recipe is flexible and perfect for sharing. Try it yourself, and discover how easy it is to make a delicious meal. Enjoy your soup journey!

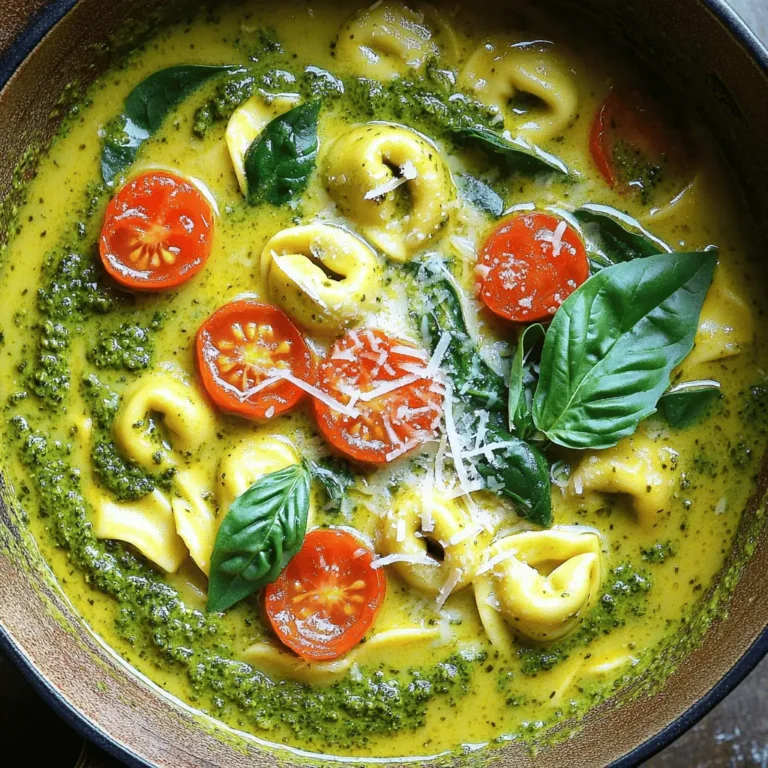
One-Pot Creamy Pesto Tortellini Soup Delight

- 1 cup unsalted butter, melted - 2 cups granulated sugar - 4 large eggs - 1 teaspoon vanilla extract - 1 cup all-purpose flour - 1 cup unsweetened cocoa powder - 1 teaspoon baking powder - 1/2 teaspoon salt - 1 cup pumpkin puree - 1 teaspoon pumpkin spice - 8 oz cream cheese, softened - 1/2 cup powdered sugar The unsalted butter adds rich flavor and helps create a moist brownie. Granulated sugar gives the brownies sweetness and texture. Eggs bind the mix, giving it a nice rise. Pumpkin puree keeps the brownies soft and adds a warm, fall taste. Cream cheese adds a creamy and tangy swirl that balances the sweetness. Pumpkin spice brings warmth and a cozy aroma, perfect for autumn. If you want a dairy-free option, use coconut oil instead of butter. You can swap granulated sugar for coconut sugar for a lower glycemic index. For a gluten-free version, try almond flour in place of all-purpose flour. You can also use Greek yogurt instead of cream cheese for a lighter texture. Start by gathering all your ingredients. This brownie recipe needs butter, sugar, eggs, and more. Preheat your oven to 350°F (175°C). Grease a 9x13 inch pan with butter or non-stick spray. This helps the brownies come out easily. 1. Make the Brownie Batter: In a large bowl, mix melted butter and granulated sugar. Whisk until smooth. Add eggs one by one, mixing well after each. Stir in vanilla extract for flavor. 2. Combine Dry Ingredients: In another bowl, sift all-purpose flour, cocoa powder, baking powder, and salt. This gets rid of lumps. Gently fold the dry mix into the wet mix. Be careful not to overmix; you want a nice batter. 3. Prepare the Pumpkin Mixture: In a separate bowl, blend pumpkin puree with pumpkin spice and softened cream cheese. Mix until smooth. Then add powdered sugar and stir until it is creamy. 4. Swirl Together: Pour half of the brownie batter into the pan. Spread it evenly. Spoon dollops of the pumpkin mix on top. Layer the rest of the brownie batter over it. Use a knife to gently swirl the pumpkin mixture into the brownie batter. 5. Bake the Brownies: Place the pan in the oven and bake for 30-35 minutes. To check if they are done, insert a toothpick into the center. If it comes out with a few moist crumbs, they are ready. 6. Cool and Serve: Once baked, take the pan out and let it cool on a wire rack. After it cools, cut into squares and serve. - Use a kitchen scale for dry ingredients like flour and sugar. This ensures the right amount. - For sticky ingredients like honey or syrup, spray your measuring cup with non-stick spray first. This helps them pour out easily. - Level off measuring cups with a knife for precise amounts. This avoids adding too much or too little. To make your brownies perfect, follow these tips: - Use room temperature ingredients: This helps your batter mix well. - Do not overmix: Mix just until combined. Overmixing can lead to tough brownies. - Check your oven temperature: An oven thermometer ensures your oven runs true to temperature. - Use the right pan: A 9x13 inch pan is best for even baking. Creating a lovely swirl takes practice. Here’s how to do it: - Prepare the cream cheese mixture well: Make sure it's smooth. This helps in easier swirling. - Layer carefully: Spoon dollops of the cream cheese mix over the brownie batter. - Swirl gently: Use a knife or skewer to make gentle, swirling motions. Too much mixing can blend the layers. Here are mistakes to watch out for: - Not measuring ingredients correctly: Accurate measurements lead to better results. - Skipping the cooling step: Let brownies cool fully for better cutting. - Using cold ingredients: Cold butter or eggs can affect the texture. - Overbaking: Keep an eye on them. A toothpick should come out with a few moist crumbs. By following these tips, you can make delicious Pumpkin Cream Cheese Swirl Brownies that impress everyone! {{image_4}} You can make these brownies gluten-free. Substitute all-purpose flour with a gluten-free blend. Look for one that works well for baking. Most blends can replace regular flour in a one-to-one ratio. This way, you still enjoy that rich, fudgy texture without gluten. Want a bit of crunch? Add nuts like pecans or walnuts. Chopped nuts add a nice texture. Mix in about half a cup into the brownie batter. You can also add chocolate chips for extra sweetness. Fold in the chips with the batter just before baking for a delightful surprise. You can play with flavors too! Add a pinch of cinnamon or nutmeg for warmth. A splash of almond or maple extract can change the whole vibe. Experiment with your favorite spices and extracts. Just remember to keep the balance so the pumpkin flavor shines through. To keep your Pumpkin Cream Cheese Swirl Brownies fresh, store them in an airtight container. You can place a piece of parchment paper between layers to avoid sticking. This method protects the creamy swirl and keeps your brownies soft. Store them at room temperature for up to three days. If you want to keep them longer, refrigeration is a good option. Just remember to bring them back to room temperature before serving for the best taste. Freezing these brownies is a smart way to save some for later. First, let the brownies cool completely. Then, cut them into squares. Wrap each square tightly in plastic wrap. Place them in a freezer-safe bag or container. They can last up to three months in the freezer. When you're ready to enjoy, remove a square and let it thaw in the fridge overnight. You can also warm it in the oven for a few minutes to bring back their gooey texture. These brownies have a great shelf life. At room temperature, they stay fresh for about three days. In the fridge, they last a week. For reheating, I suggest using an oven set to 350°F (175°C). Place the brownie on a baking sheet and heat for about 5-10 minutes. This warms them up and keeps the cream cheese swirl tasty. Avoid using a microwave, as it can make them rubbery. Enjoy your delicious brownies anytime! Yes, you can use canned pumpkin. It saves time and ensures a smooth texture. Just make sure to choose pure pumpkin puree, not pumpkin pie filling, which has added sugar and spices. You can check for doneness by using a toothpick. Insert it into the center of the brownies. If it comes out with a few moist crumbs, they are ready. If the toothpick has wet batter, bake them a bit longer. You can use mascarpone cheese or Greek yogurt as a substitute. Both will give a creamy texture. If you want a dairy-free option, try silken tofu blended until smooth. This blog covered making delicious pumpkin cream cheese swirl brownies. We reviewed ingredients, cooking steps, and handy tips. I also shared storage methods and answered common questions. These brownies are easy to make and fun to share. You can personalize them with your favorite flavors. Enjoy your baking journey, and don't hesitate to experiment! With these methods, you’ll create a tasty treat every time.

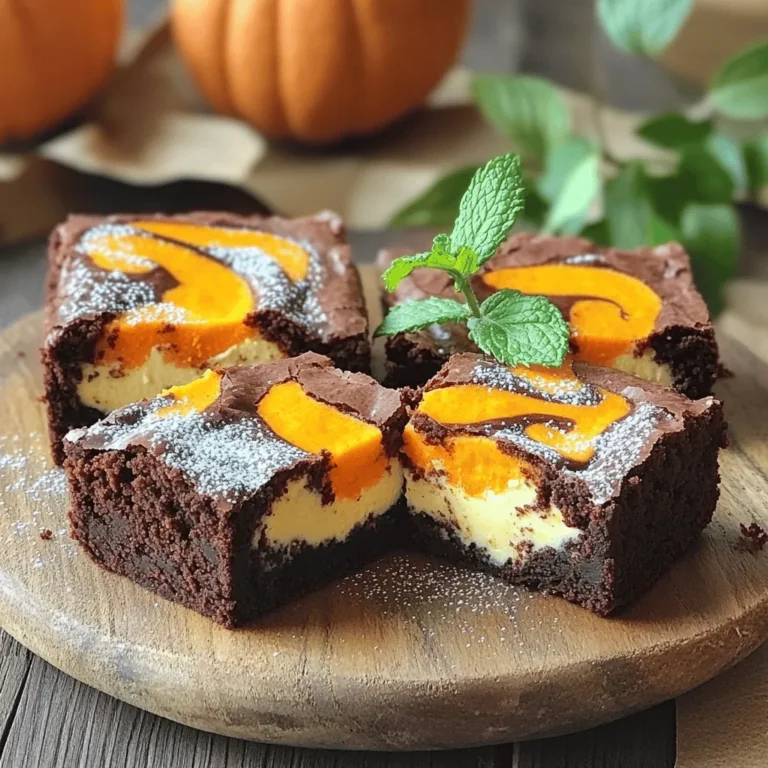
Pumpkin Cream Cheese Swirl Brownies Delightful Treat

To make Air Fryer Garlic Butter Steak Bites, gather these simple items: - 1 lb sirloin steak, trimmed and cut into bite-sized cubes - 4 tablespoons unsalted butter, divided - 4 cloves garlic, finely minced - 1 teaspoon smoked paprika - 1 teaspoon garlic powder - Salt and freshly ground black pepper, to taste - Fresh parsley, finely chopped (for garnish) - Lemon wedges (for a fresh serving suggestion) The seasonings in this dish are very important. I use smoked paprika for a warm, rich flavor. Garlic powder adds a nice kick without overpowering the meat. Salt and black pepper balance the dish perfectly. Together, these seasonings enhance the steak's natural taste, making every bite savory and delicious. For a pop of color and freshness, I like to use fresh parsley as a garnish. It adds a nice green touch to the plate. Serving lemon wedges on the side gives you a zesty option. A squeeze of fresh lemon juice brightens the steak bites, making them even more delightful! Start by preheating your air fryer to 400°F (200°C). This step takes about 5 minutes. A hot air fryer helps cook the steak bites evenly and quickly. In a mixing bowl, add 1 pound of cubed sirloin steak. Pour in 2 tablespoons of melted unsalted butter. Next, add 4 cloves of minced garlic, 1 teaspoon of smoked paprika, 1 teaspoon of garlic powder, and sprinkle salt and pepper to taste. Mix all the ingredients well. Use your hands or a spatula to coat the steak cubes evenly with the spices and butter. Place the seasoned steak bites in a single layer in the air fryer basket. Make sure not to overcrowd them. If your air fryer is small, cook in batches for the best results. Air fry the steak bites for 8 to 10 minutes. Shake the basket halfway through to help them brown evenly. Check for doneness; medium-rare takes about 8 minutes. While the steak bites cook, melt the remaining 2 tablespoons of butter in a small saucepan over low heat. If you want, add a pinch of salt and more minced garlic for extra flavor. Let it simmer gently to infuse the garlic aroma into the butter. Once the steak bites are cooked, drizzle the garlic butter over them. Toss the steak bites gently to coat them well in the sauce. Transfer the steak bites to a serving platter. Garnish with finely chopped fresh parsley for a pop of color. Serve immediately with lemon wedges for a fresh squeeze of flavor. To get your steak bites just right, check the time closely. I find that cooking for about 8 minutes usually gives a nice medium-rare. If you prefer it more done, add a minute or two. Use a meat thermometer if you have one. Aim for 130°F (54°C) for medium-rare and 140°F (60°C) for medium. Remember, the steak will keep cooking after you take it out, so pull it a bit early. Crowding the air fryer basket can lead to uneven cooking. Always arrange the steak bites in a single layer. If you have a lot, cook them in two or more batches. This step helps them brown nicely and stay juicy. It also allows the hot air to move freely, giving you that perfect crunch. You can boost the flavor of your steak bites with a few extra touches. Consider adding herbs like rosemary or thyme for a fresh taste. A splash of Worcestershire sauce can add depth, too. For heat, toss in some red pepper flakes. These small changes can take your dish to another level. Don’t be afraid to experiment! {{image_4}} You can use different cuts of steak for this recipe. Sirloin is great, but you can try ribeye or filet mignon. Each cut has a unique taste and texture. Ribeye is rich and tender, while filet mignon is lean and buttery. Just make sure you cut the steak into bite-sized pieces for even cooking. Feel free to change the seasonings based on your taste. If you love spice, add red pepper flakes or cayenne. For a smoky flavor, try adding more smoked paprika. You can also mix in some fresh herbs, like thyme or rosemary, to enhance the taste. Taste your mixture before cooking to find the right balance. These steak bites pair well with many sides. Serve them with a fresh salad for crunch. You can also enjoy them with mashed potatoes or roasted vegetables. For a fun twist, try them in a taco with avocado and salsa. Squeeze fresh lemon on top to brighten the flavors. Each bite will be a delicious mix of savory and fresh! After enjoying your air fryer garlic butter steak bites, you may have some left. Allow the steak bites to cool down before storing. Place them in an airtight container. They will stay fresh in the fridge for up to three days. Make sure to keep the garlic butter sauce separate if you have any left. This keeps the steak bites from getting soggy. To reheat your steak bites, the air fryer is your best friend. Set it to 350°F (175°C). Heat them for about 3-5 minutes. This helps keep them juicy and crispy. You can also use a microwave, but be careful. Microwaving can make them chewy. If you choose the microwave, heat in short bursts to avoid overcooking. If you want to save some for later, you can freeze the steak bites. Place them in a freezer-safe bag or container. They will last up to three months in the freezer. When you're ready to eat, thaw them overnight in the fridge. Reheat as mentioned above for the best results. Freezing does alter the texture a bit, but they still taste great! To get the perfect doneness, start with high-quality sirloin steak. For medium-rare, air fry for about 8 minutes. For medium, aim for 10 minutes. Use a meat thermometer for best results. The internal temperature should be around 130°F for medium-rare and 140°F for medium. Let the steak bites rest for a few minutes after cooking. This helps the juices settle and makes each bite tender and juicy. Yes, you can! If you don’t have an air fryer, you can still enjoy garlic butter steak bites. Simply use a skillet on medium-high heat. Add butter and let it melt. Then, add the seasoned steak cubes and cook for about 3-4 minutes on each side. This method gives you a nice sear and keeps the flavors intact. Just keep an eye on the doneness as it may cook faster than in the air fryer. Garlic butter steak bites pair well with many sides. Here are some great options: - Roasted vegetables like asparagus or Brussels sprouts - Creamy mashed potatoes for a comforting touch - A fresh garden salad with lemon vinaigrette - Rice or quinoa for a hearty base - Garlic bread for a delicious addition These sides complement the savory flavors and enhance your meal experience. This blog post covered all you need for tasty garlic butter steak bites. We discussed key ingredients, cooking steps, and important tips. Remember to check doneness and avoid overcrowding in your air fryer. You can also try different cuts of steak and adjust seasonings to match your taste. With proper storage and reheating, you can enjoy these bites later. Dive into this recipe for a delicious meal that's easy to make! You’ll impress family and friends with this flavorful dish.

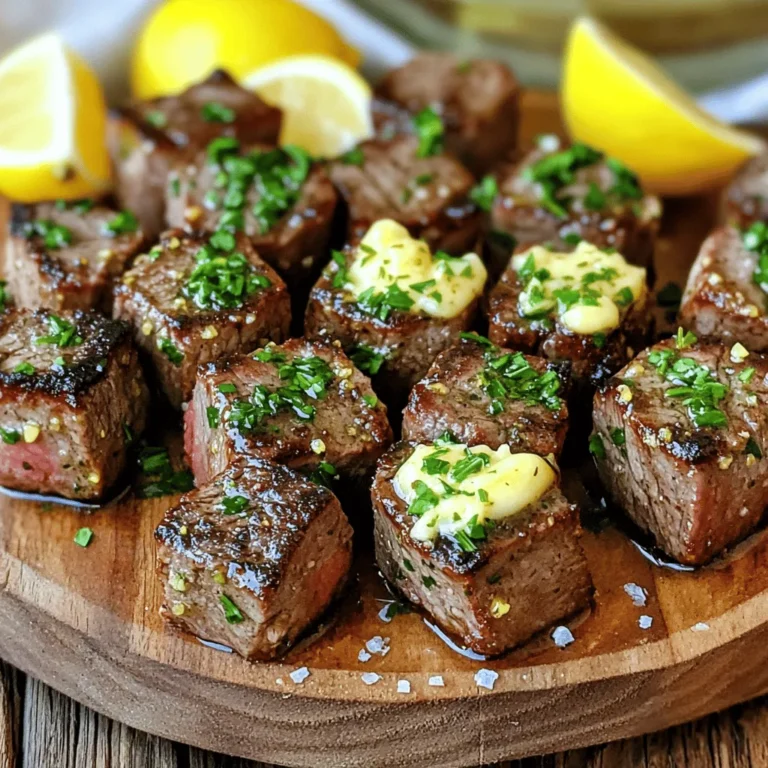
Air Fryer Garlic Butter Steak Bites Savory Flavor Boost

- 250g paneer, cubed - 2 tablespoons tandoori masala - 4 whole wheat tortillas - 1 tablespoon plain yogurt - 1 tablespoon olive oil - 1 bell pepper, sliced (any color) - 1 onion, sliced - Fresh coriander leaves, chopped for garnish - Mint chutney, for serving - Salt, to taste - Fresh lemon juice, for added flavor The main star of this dish is paneer. It gives a creamy texture and absorbs flavors well. Tandoori masala adds a warm and spicy taste that makes every bite exciting. Whole wheat tortillas are my go-to for a healthy wrap that holds everything together. I also use yogurt for marinating. It helps tenderize the paneer and adds tanginess. Olive oil adds richness and helps the vegetables cook perfectly. The bell pepper and onion bring crunch and sweetness, balancing the spices. For garnishes, fresh coriander leaves brighten the wrap. Mint chutney gives a refreshing kick. A squeeze of lemon juice adds zest and enhances all the flavors. These ingredients combine to create a vibrant and tasty meal that you can enjoy anytime. First, grab a mixing bowl. Add the cubed paneer, tandoori masala, yogurt, lemon juice, olive oil, and a pinch of salt. Stir well to coat the paneer evenly. Marinating is key; it makes the paneer flavorful. Let it sit for at least 30 minutes. This time allows the spices to soak in and enhance the taste. Set your air fryer to 200°C (390°F). Preheat it for about 5 minutes. This step is important for crisping the paneer. A hot air fryer helps achieve that perfect texture we want. Once the air fryer is hot, place the marinated paneer in a single layer in the basket. Air fry for 12-15 minutes. Halfway through, shake the basket. This helps the paneer cook evenly and get that golden color. Check for a nice char on the edges when done. While the paneer cooks, warm the whole wheat tortillas. You can do this in a pan over low heat or microwave them for about 10 seconds. This makes them soft and easy to work with. Now, lay out a tortilla on a clean surface. Add a generous amount of the tandoori paneer in the center. Top it with sautéed bell pepper and onion. Add fresh coriander leaves for an extra burst of flavor. If you like, drizzle some mint chutney on top. Fold in the sides of the tortilla and roll it up tightly. Enjoy your flavorful wrap! For the best flavor, let your paneer marinate for at least 30 minutes. This time allows the spices to soak in deeply. You can use plain yogurt for marination. Greek yogurt works well too, as it adds creaminess. Just make sure your yogurt is fresh for the best taste. Different air fryer models may cook at different speeds. If your air fryer runs hot, check the paneer at 10 minutes. If it’s cooking slower, you may need to add a few extra minutes. To check if the paneer is done, look for a golden color and slight charring on the edges. It should feel firm yet soft inside. When serving, arrange the wraps on a large platter. Cut them in half at an angle for a nice touch. This makes them easy to grab. Garnish with extra coriander leaves for color. Serve with a bowl of mint chutney for dipping. This adds a fresh flavor that pairs well with the spices. {{image_4}} You can switch paneer for tofu. Tofu absorbs flavor well and is a great option. Press the tofu to remove excess water. Marinate it just like you would the paneer. Adding more vegetables boosts nutrition and flavor. Try spinach, zucchini, or carrots. You can also mix in some mushrooms for extra texture. These veggies make your wrap colorful and tasty. Try adding more spices for a kick. Cumin and coriander add depth. If you like heat, include chili powder or cayenne. Fresh herbs like mint or cilantro brighten the wrap. You can also use different sauces. A spicy yogurt sauce or a tangy tamarind sauce adds unique tastes. Experiment with flavors to find what you love most. Switch up your tortillas for variety. Use corn tortillas for a gluten-free option. They add a different taste and texture. Lettuce wraps are great for a low-carb meal. Use large leaves like romaine or iceberg. They are crunchy and fresh, making your meal lighter without losing flavor. To keep your Air Fryer Tandoori Paneer Wraps fresh, follow these steps: - Place the wraps in an airtight container. - Store them in the fridge for up to 3 days. Proper storage helps maintain taste and texture. If you keep them too long, they may get soggy. Always check for freshness before eating. To enjoy your wraps again, here are some reheating tips: - Use the air fryer at 180°C (356°F) for about 5-7 minutes. This keeps them crispy. - If you don’t have an air fryer, you can use a microwave. Heat them on a plate for about 20-30 seconds. Both methods work well, but using the air fryer gives the best texture. Enjoy your delicious leftovers! Yes, you can use store-bought tandoori marination. Pros: - It saves time and effort. - It offers a consistent flavor. Cons: - It may lack freshness. - You might miss out on custom flavors. If you choose this option, look for a good brand. Check the ingredient list. Some may add preservatives or extra sugar. To adjust the recipe, you can easily double or halve the ingredients. - For double servings: Use 500g of paneer, 4 tablespoons of tandoori masala, and so on. - For half servings: Use 125g of paneer, 1 tablespoon of tandoori masala, etc. Make sure to keep the cooking time the same. Just check the paneer to ensure it cooks through. Tandoori Paneer Wraps taste great with various sides and drinks. Recommended side dishes: - Cucumber salad - Roasted vegetables - Mashed avocado Drinks to serve: - Mango lassi - Fresh lemonade - Iced tea These pairings enhance the meal and add extra flavor to your table. In this blog post, we explored how to make delicious Tandoori Paneer Wraps. We looked at key ingredients like paneer, tandoori masala, and whole wheat tortillas. I shared step-by-step instructions to perfect your wraps and tips to ensure great flavor. Remember, marination makes a big difference in taste, so don’t rush it. Whether you prefer vegetarian twists or different tortillas, the options are endless. Enjoy your cooking, and go ahead and impress your friends and family with these tasty wraps!

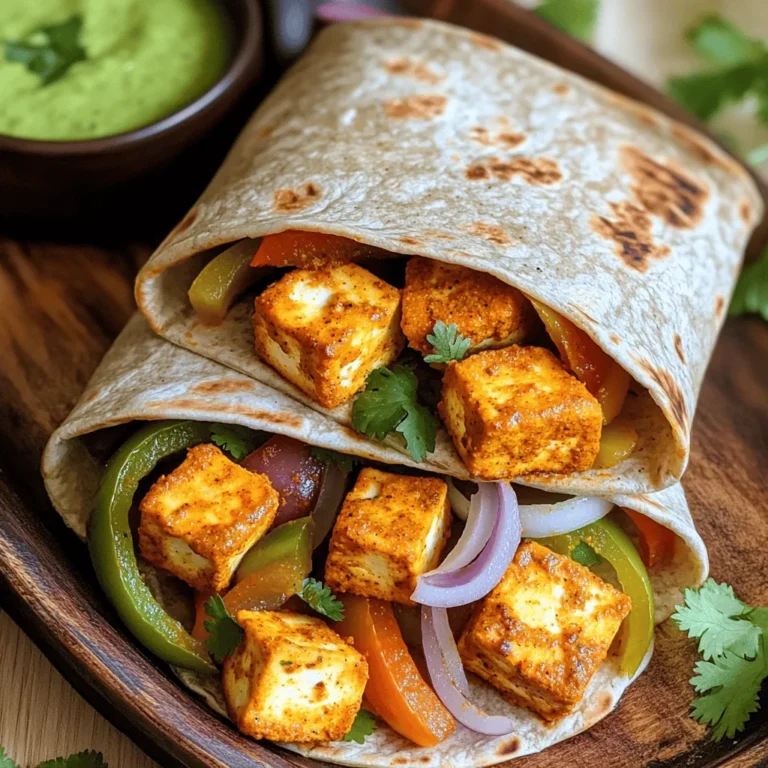
Air Fryer Tandoori Paneer Wraps Flavorful and Easy Meal

To create this dish, you'll need a few key items: - 8 oz ramen noodles - 1 lb shrimp, peeled and deveined - 1 can (14 oz) coconut milk - 1 cup chicken or vegetable broth - 2 tablespoons fresh lime juice - 1 tablespoon lime zest (from about 1 lime) - 2 garlic cloves, finely minced - 1 inch fresh ginger, grated - 1 tablespoon soy sauce - 1 tablespoon sesame oil - 1 red bell pepper, thinly sliced - 2 cups baby spinach - Fresh cilantro, roughly chopped, for garnish - Salt and pepper to taste These ingredients create a creamy, tangy broth that pairs perfectly with the shrimp and noodles. You can enhance your ramen by adding some optional items: - Sliced green onions for a fresh crunch - A dash of chili flakes for heat - Mushrooms for an earthy taste - Snow peas for a sweet snap - A soft-boiled egg for richness These options let you customize the dish to fit your taste. If you have dietary restrictions, here are some easy swaps: - Use tofu or tempeh instead of shrimp for a vegetarian option. - Swap coconut milk for almond milk for lower fat. - Use gluten-free ramen noodles if you're gluten intolerant. - Choose low-sodium broth to reduce salt intake. Making these substitutions can help you enjoy this meal without worry. Start with a large pot. Pour in your chicken or vegetable broth. Heat it on medium until it simmers gently. Stir it a bit to mix. Next, add one can of coconut milk to the pot. It brings a creamy richness. Then, add two minced garlic cloves and one inch of grated ginger. Now, squeeze in two tablespoons of fresh lime juice. Don’t forget the zest from one lime! Add one tablespoon of soy sauce and sesame oil too. Mix it all well until it’s hot and combined. Once your broth is ready, it’s time for the shrimp. Add one pound of peeled and deveined shrimp to the pot. Also, toss in one thinly sliced red bell pepper. Stir gently and let it cook for about 4 to 5 minutes. You want the shrimp to turn pink and opaque. Season with salt and pepper to taste. After the shrimp is done, fold in two cups of baby spinach. Cook for another 1 to 2 minutes. The spinach should wilt but stay bright green. While the shrimp and veggies cook, grab another pot. Boil water and cook eight ounces of ramen noodles according to the package. Once they are ready, drain them well. Set them aside for later. When everything is done, place the cooked ramen noodles into bowls. Ladle the coconut shrimp broth and vegetables over them. Add some fresh cilantro on top for a nice finish. Enjoy your Coconut Lime Shrimp Ramen! To boost flavors, use fresh ingredients. Fresh lime juice and zest add brightness. The ginger and garlic bring warmth and depth. If you want more heat, add sliced chili peppers during cooking. A splash of fish sauce can also deepen the taste. Perfect shrimp is key. Cook them just until they turn pink and opaque. Overcooked shrimp can become rubbery. Stir gently while they cook to ensure even heat. If you want extra flavor, marinate shrimp in lime juice and garlic for 15 minutes before cooking. Presentation matters in this dish. Serve in deep bowls to show off the broth and shrimp. Add bright green spinach for color. Top with fresh cilantro for aroma and a pop of freshness. Consider lime wedges on the side for extra zest. This not only looks good but also enhances the flavor experience. {{image_4}} You can easily make this dish vegetarian or vegan. Simply replace the shrimp with tofu or tempeh. Use vegetable broth instead of chicken broth. The coconut milk gives it a creamy texture, so it still tastes great. You can also add more vegetables like mushrooms or carrots. This way, you keep the flavor while making it plant-based. If you like heat, add red pepper flakes or sriracha. Start with a small amount and taste as you go. You can also add fresh chili peppers for a fresh kick. If you prefer less heat, skip the spicy elements. Adjusting the spice level lets everyone enjoy this dish. Feel free to swap out ingredients based on what you have. For example, use zucchini instead of bell peppers or spinach. You can also try different herbs like basil or mint for a twist. If you don’t have lime, lemon works too. These swaps keep the dish fresh and exciting. Keep your Coconut Lime Shrimp Ramen in a sealed container. This helps keep it fresh. Store it in the fridge for up to three days. Make sure the broth cools before you seal it. This step prevents condensation and soggy noodles. You can freeze this dish, but not with the noodles. The noodles can turn mushy when thawed. Instead, freeze the broth and shrimp mix. Place it in an airtight freezer bag. It can last up to three months. When ready to eat, thaw it in the fridge overnight. To reheat, warm the broth in a pot over medium heat. Stir gently to avoid sticking. If you stored noodles separately, cook them fresh for best texture. Once the broth is hot, combine it with the noodles. Serve with fresh cilantro on top for a burst of flavor. I recommend using fresh shrimp for the best taste. Look for large or extra-large shrimp. They cook quickly and stay juicy. If you can't find fresh shrimp, frozen shrimp works too. Just make sure they are peeled and deveined. Yes, you can use instant ramen noodles. They cook fast and fit well in this recipe. Just follow the package directions. Add them to the broth after cooking to soak up the flavor. To make this dish gluten-free, use gluten-free ramen noodles. You can also check the soy sauce. Look for a gluten-free brand or use tamari instead. These swaps keep the taste great without gluten. Serve this ramen with a simple side salad or steamed veggies. You can also add a light cucumber salad for crunch. Fresh spring rolls make a great choice too. They add a nice touch to your meal! This blog post guided you through making Coconut Lime Shrimp Ramen. We explored key ingredients, step-by-step cooking, and tips for better flavor. You learned how to adapt the recipe for different diets and what to do with leftovers. Coconut Lime Shrimp Ramen is versatile and can fit many tastes. Enjoy experimenting with flavors and making this dish your own. With some practice, you'll impress anyone at the table. Remember, cooking should be fun and creative!

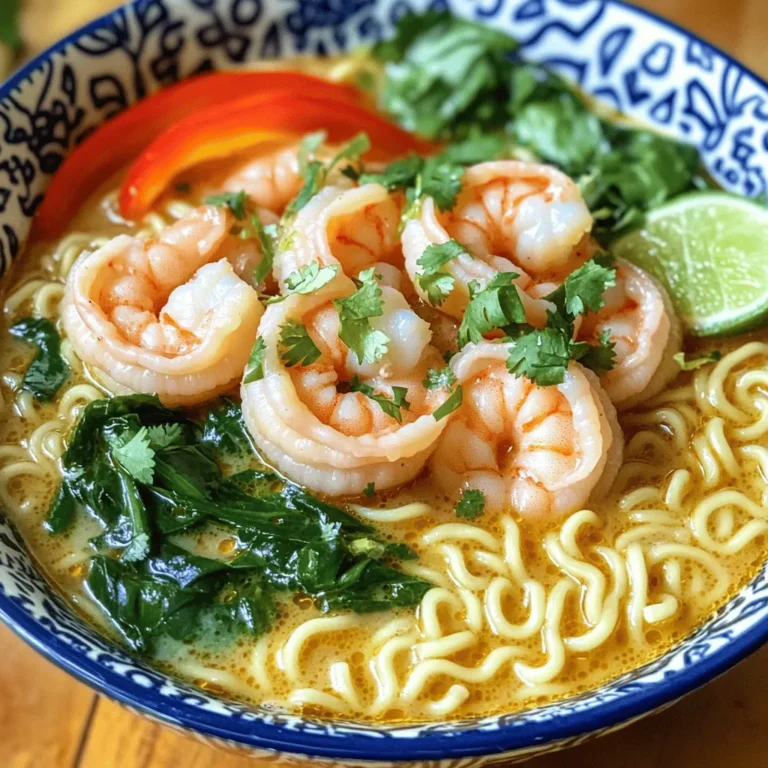
Coconut Lime Shrimp Ramen Flavorful Dinner Recipe

- 2 cups cooked jasmine rice (day-old preferred) - 1 cup chicken breast, diced into small cubes - 4 cloves garlic, minced finely - 2 large eggs, lightly beaten - 1 cup mixed peas and carrots - 3 green onions, chopped (separate the whites from the greens) - 3 tablespoons soy sauce - 1 tablespoon oyster sauce (optional, for added depth) - 1 teaspoon sesame oil - 1 teaspoon ground black pepper - Salt, to taste - 2 tablespoons vegetable oil (for frying) To make crispy garlic chicken fried rice, you need simple yet flavorful ingredients. First, use day-old jasmine rice. This rice has a better texture. Fresh rice can be sticky and clump together. Next, you will need chicken breast. Dice it into small cubes for even cooking. Garlic adds a strong flavor. Use four cloves, minced finely for the best taste. Eggs are key too. They add richness and protein. Lightly beat two large eggs before cooking. Mixed peas and carrots bring color and nutrients. Green onions add a fresh crunch. Chop three onions, separating the whites from the greens. For flavor, use soy sauce and optional oyster sauce. These sauces deepen the taste. A drizzle of sesame oil rounds it out. Finally, you need black pepper and salt to season your dish. You will use vegetable oil for frying. This oil has a high smoke point, perfect for stir-frying. With these ingredients, you can create a delicious and satisfying meal! First, heat 1 tablespoon of vegetable oil in a large skillet over medium-high heat. This will help cook the chicken evenly. Next, add the diced chicken breast to the hot oil. Season it with a pinch of salt and ground black pepper. Sauté the chicken for about 5 to 7 minutes. Stir occasionally until the chicken turns golden brown and is fully cooked. Once done, remove the chicken from the skillet and set it aside on a plate. In the same skillet, add another tablespoon of vegetable oil. When the oil is hot, add the minced garlic. Sauté it for about 30 seconds. You want to cook it until it becomes fragrant. Be careful not to burn the garlic, as this can ruin the flavor. Pour the lightly beaten eggs into the skillet with the garlic. Let them cook without stirring for a few seconds. Once the edges start to set, scramble the eggs until they are fully cooked. Mix them in well with the garlic. Now, toss in the mixed peas and carrots. Stir-fry them for about 2 to 3 minutes. You want the vegetables to be tender but still crisp. This adds great color and texture to your dish. Next, add the cooked jasmine rice to the skillet. Break up any clumps gently with a spatula. Stir-fry the rice with the vegetable mixture for about 3 to 4 minutes. This will warm the rice and help it get a bit crispy at the bottom. Return the cooked chicken to the skillet. Add the soy sauce and oyster sauce for extra flavor. Drizzle some sesame oil over the top. Mix everything well, ensuring the rice, chicken, and vegetables are evenly coated in the sauces. Stir in the white parts of the chopped green onions. This adds a nice crunch and flavor. Taste the fried rice and adjust the seasoning with more salt or soy sauce if needed. Plate the hot fried rice in a large bowl or on a platter. Garnish it generously with the green onion greens on top for that fresh finish. You can also serve lime wedges on the side for a zesty touch. - Use day-old rice: Day-old rice works best for fried rice. It dries out a bit in the fridge. This helps the grains stay separate and get crispy. Fresh rice can be too soft and sticky. - Achieve perfect crispness: To get the best crispiness, make sure your pan is hot. Use enough oil to coat the bottom. After adding the rice, let it sit undisturbed for a minute. This allows it to crisp up nicely. - Overcooking the garlic: Garlic adds great flavor, but it cooks fast. Sauté it for only 30 seconds. If it turns dark, it will taste bitter. - Not preheating the oil: Always preheat your oil before adding ingredients. This helps them cook evenly. If the oil isn’t hot, the food can become soggy. - Additional sauce options: You can try adding teriyaki sauce for a sweet touch. Hoisin sauce also adds a nice flavor. Just be careful not to use too much; it can make the dish too salty. - Suggested spices: For extra flavor, add a pinch of chili flakes for heat. You can also sprinkle some garlic powder or onion powder for depth. {{image_4}} You can easily change the protein in this dish. Shrimp adds a nice texture. Tofu is a great choice for a vegan option. If you have leftover proteins like beef or pork, those work too. Just chop them into small pieces and toss them in. This way, you avoid wasting food and create your own twist on the dish. Feel free to mix in seasonal vegetables for a fresh touch. Bell peppers bring color and sweetness. Broccoli adds a nice crunch and extra nutrition. Just chop them small and add them when you sauté the garlic. You can use whatever veggies you enjoy or have on hand. This makes the dish more fun and healthy. If you need gluten-free options, swap regular soy sauce for tamari. This keeps the flavor without the gluten. For a vegan version, skip the eggs and use tofu or chickpeas. You can also add more veggies to keep it hearty. These small changes make the dish fit your diet while keeping it delicious. To keep your crispy garlic chicken fried rice fresh, cool it first. Once cooled, place it in an airtight container. Make sure the lid fits tightly to block air. Store the container in the fridge. It stays good for about three to four days. For reheating, the best method is to use a skillet. Heat it over medium heat. Add a splash of water or broth to keep it moist. Stir often to avoid sticking. This helps keep the rice fluffy and prevents drying out. You can also use the microwave. Just cover it loosely with a microwave-safe lid or wrap. Heat in short intervals, stirring in between. You can freeze this fried rice for longer storage. Portion it into freezer-safe bags or containers. Remove as much air as possible before sealing. It can last for up to three months in the freezer. When you’re ready to eat it, thaw it overnight in the fridge. Reheat it in a skillet as mentioned before, or use the microwave. Add a little water if needed for moisture. Jasmine rice is the best choice for fried rice. It has a lovely aroma and a soft texture. Day-old jasmine rice works even better. This rice is less sticky and holds its shape well when you fry it. The grains separate nicely, creating a great base for your dish. Yes, you can make it without eggs. Use tofu or chickpeas as a protein swap. Both options add protein and flavor. You can also add more veggies for texture. Try using mushrooms or bell peppers for a tasty twist. This dish is not very spicy. The garlic and soy sauce give it a nice flavor. If you want more heat, add some crushed red pepper or sriracha. You can adjust the spice level to suit your taste. Start with a little and add more if you like it spicier. To prevent sticky rice, make sure to use day-old rice. Fresh rice can be too moist. When frying, break up any clumps gently. Keep the heat high while stirring. This helps the rice crisp up and stay separate. You can serve this dish with various sides. A simple cucumber salad adds freshness. You might enjoy some spring rolls for crunch. Pair it with a light soup for warmth. For drinks, try iced tea or a light beer. In this post, we explored the ingredients and steps to make tasty crispy garlic chicken fried rice. We covered everything from using day-old jasmine rice to sautéing chicken and mixing in vegetables. Remember to avoid common mistakes for the best results. Experiment with proteins and veggies to make this dish your own. Proper storage ensures your leftovers stay fresh, and reheating tips will keep the rice perfect. Enjoy your cooking, and share this recipe with friends for a delicious meal!

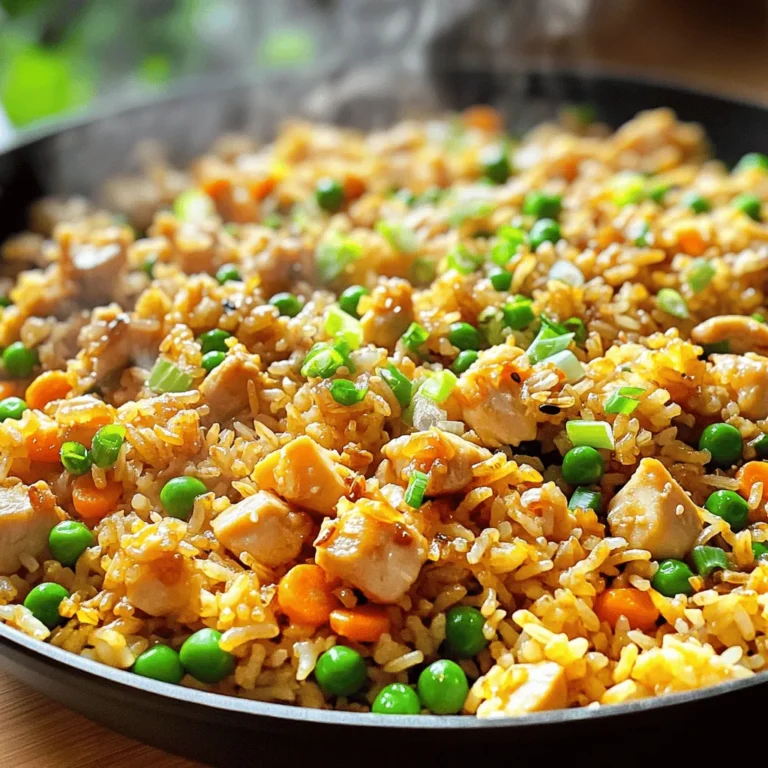
Crispy Garlic Chicken Fried Rice Flavorful Dish

- 200g ramen noodles - 300g boneless chicken breast, thinly sliced - 1 tablespoon sesame oil - 2 cups mixed vegetables (like bell peppers, carrots, and snap peas) - 3 cloves garlic, minced - 2 tablespoons soy sauce - 1 tablespoon teriyaki sauce - 1 teaspoon fresh ginger, grated - 2 green onions, finely chopped - Sesame seeds, for garnish - Salt and pepper to taste The main ingredients make this dish flavorful and fun. The ramen noodles serve as the base. Chicken breast adds protein, while mixed vegetables bring color and crunch. Garlic and ginger give it a nice kick. You need some pantry staples for this recipe. Sesame oil adds a rich taste. Soy sauce gives it saltiness, and teriyaki sauce adds sweetness. Salt and pepper are crucial to enhance all flavors. Feel free to get creative! You can add tofu for extra protein. If you like heat, add some chili flakes. Fresh herbs like cilantro or basil can brighten the dish. You might also try adding mushrooms or baby corn for extra texture. Experimenting with these add-ins makes your meal even more special! First, boil water in a pot. Add the ramen noodles and cook them as the package shows. This usually takes about 3-4 minutes. Once they are soft, drain the noodles and set them aside. They should be ready when you need them. Next, grab a large skillet or wok. Pour in 1 tablespoon of sesame oil and heat it on medium-high until it shimmers. Add the 300g of thinly sliced chicken breast. Season it with a pinch of salt and pepper. Stir-fry the chicken for 5-7 minutes until it turns white and is no longer pink inside. Now, add 3 cloves of minced garlic and 1 teaspoon of grated fresh ginger to the skillet. Cook them for 1-2 minutes. Stir often so they don’t burn. Next, toss in 2 cups of mixed vegetables, like bell peppers and snap peas. Stir-fry them for about 3-4 minutes. They should be bright and still a bit crunchy. Carefully pour in 2 tablespoons of soy sauce and 1 tablespoon of teriyaki sauce. Toss everything together well. Make sure the chicken and veggies are coated in the sauce. Then, gently add the cooked ramen noodles to the skillet. Fold them into the mix until everything is hot and combined. Remove from heat and serve in bowls, topping with chopped green onions and sesame seeds. Cook your ramen noodles in boiling water. Follow the package instructions for timing. Once they are soft, drain them right away. Rinse with cold water to stop cooking. This helps keep them from getting mushy. Always use a large pot for boiling. More water means better cooking. Let your stir-fry cool down first. Place it in an airtight container. Store it in the fridge for up to three days. If you want to keep it longer, freeze it. Use freezer-safe bags or containers. Make sure to remove excess air. This prevents freezer burn. Add extra flavors to your stir-fry. Try adding sriracha for heat. A splash of lime juice adds a bright taste. You can also mix in fresh herbs like cilantro or basil. They boost the freshness. For a nutty twist, sprinkle chopped peanuts on top. Keep experimenting to find your favorite combo! {{image_4}} You can make a tasty vegetarian version of this dish. Simply swap the chicken for tofu or tempeh. Tofu absorbs flavors well and adds a nice texture. Use firm tofu and cut it into cubes. Stir-fry it until golden brown. You can also add more vegetables like broccoli or mushrooms. This gives the dish extra flavor and nutrition. If chicken isn't your favorite, try other proteins. Shrimp or beef works great too. Use shrimp for a quick cook time. Just add them after the garlic and ginger. They need only a few minutes to cook. For beef, slice it thinly and cook it the same way as chicken. Each protein brings a unique taste to your ramen stir-fry. You can change the sauces based on your taste. For a spicy kick, add sriracha or chili paste. If you want a sweeter touch, use hoisin sauce instead of teriyaki. You might also try coconut aminos for a gluten-free option. Mixing soy sauce with rice vinegar gives a tangy flavor. Feel free to experiment with different sauces! You can store leftover Quick Chicken Ramen Stir-Fry in the fridge. Place it in an airtight container. This helps keep the flavors fresh. It lasts for up to three days. Before eating, check for any signs of spoilage. If it smells off or looks strange, don’t eat it. Freezing this dish is simple. Allow the stir-fry to cool completely. Then, pack it into freezer-safe bags or containers. Make sure to remove as much air as possible. This helps prevent freezer burn. You can freeze it for up to three months. When you’re ready to eat, thaw it overnight in the fridge. To reheat, use a microwave or a stovetop. If using a microwave, heat in short bursts. Stir between each burst to ensure even heating. If reheating on the stove, add a splash of water or broth. This keeps the noodles moist. Heat over medium until warmed through. Enjoy your meal! Yes, you can make this dish ahead of time. Cook and cool the stir-fry. Store it in an airtight container in the fridge. Reheat it on the stove or in the microwave when you are ready to enjoy. You can use any ramen noodles you like. Instant ramen works well. Fresh or dried noodles are also great options. Look for noodles that cook quickly for the best results. To add spice, you can mix in red pepper flakes. You could also use a splash of sriracha or chili oil. Adjust the amount to your taste. Start small and add more if needed. Yes, frozen vegetables work well in this recipe. They are convenient and save prep time. Just add them directly to the pan. Cook until they are heated through and bright in color. Many vegetables work great in this stir-fry. Try broccoli, zucchini, or mushrooms. You can also add baby corn or bok choy for extra crunch. Feel free to mix and match your favorites! This blog post walked you through creating a delicious ramen dish. We covered the essential ingredients, step-by-step instructions, and helpful tips. You learned how to store leftovers and try different variations. Remember, cooking is fun and flexible. Feel free to adjust the recipe to fit your taste. Enjoy your homemade ramen and share it with others. Keep experimenting, and you’ll find your perfect bowl!

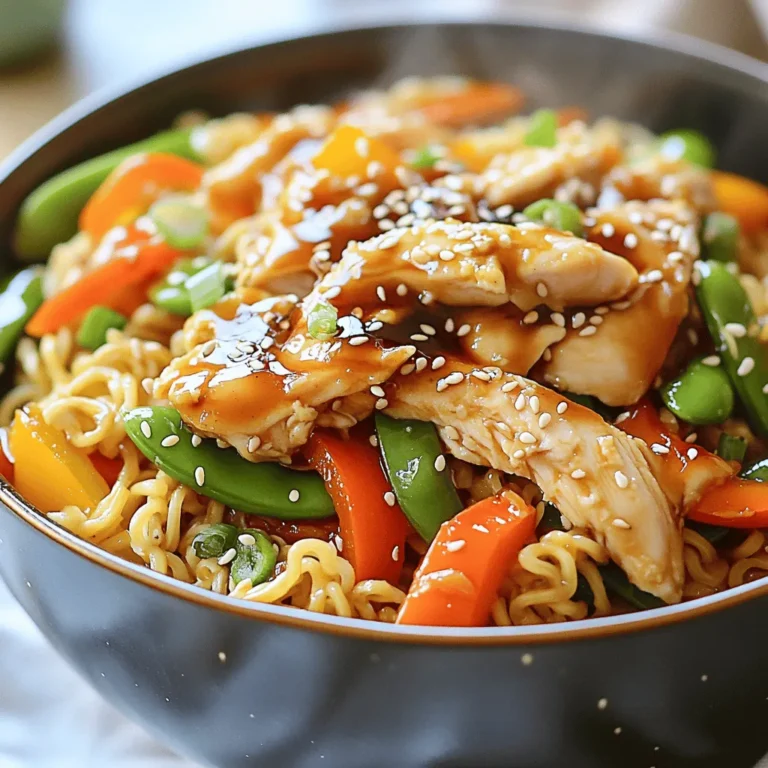
Quick Chicken Ramen Stir-Fry Flavorful and Easy Meal

- 3 ripe bananas, fully mashed - 1/3 cup unsalted butter, melted - 1 teaspoon pure vanilla extract - 1 cup granulated sugar - 1 large egg, at room temperature - 1 teaspoon baking soda - 1/4 teaspoon fine sea salt - 1 teaspoon ground cinnamon - 1 1/2 cups all-purpose flour - 1/3 cup packed brown sugar (for topping) - 1 teaspoon ground cinnamon (for topping) To make Snickerdoodle Banana Bread, gather these simple ingredients. Ripe bananas are key. They should be soft and sweet for the best flavor. Next, use unsalted butter for a rich taste. The vanilla extract adds depth, while granulated sugar brings sweetness. You need one egg to bind everything together. Baking soda helps the bread rise. Sea salt balances the flavors, and ground cinnamon gives that classic snickerdoodle taste. All-purpose flour creates the base of the bread. For a sweet topping, mix brown sugar and more cinnamon. This adds a tasty crunch on top. With these ingredients ready, you’ll create a delightful treat that’s fun to share. Enjoy the process of baking this delicious banana bread! 1. Preheat your oven to 350°F (175°C). Grease a 9x5 inch loaf pan or line it with parchment paper. This step helps the bread come out easily. 2. In a big mixing bowl, mash the 3 ripe bananas until they are smooth. Add the 1/3 cup melted unsalted butter to the bananas. Mix well until there are no lumps. 3. Next, add 1 cup granulated sugar, 1 large egg, and 1 teaspoon pure vanilla extract to the banana mix. Stir until everything is creamy and smooth. 4. In another bowl, whisk together 1 1/2 cups all-purpose flour, 1 teaspoon baking soda, 1/4 teaspoon fine sea salt, and 1 teaspoon ground cinnamon. This helps mix the dry ingredients evenly. 5. Gently fold the dry mix into the wet banana mixture. Mix until just combined. A few lumps are okay. Be careful not to overmix, or the bread may turn out dense. 6. For the topping, mix 1/3 cup packed brown sugar with 1 teaspoon ground cinnamon in a small bowl. This will create a sweet and spiced topping. 7. Pour half of the banana batter into the loaf pan. Spread it out evenly. Sprinkle half of the cinnamon-sugar topping over this layer. Then add the remaining batter on top and smooth it out gently. Finally, sprinkle the rest of the cinnamon-sugar mix on top. 8. Bake your banana bread in the preheated oven for 55-65 minutes. A toothpick inserted in the center should come out clean. If the top browns too much, cover it loosely with foil. 9. Once baked, let the bread cool in the pan for about 10 minutes. Carefully move it to a wire rack to cool completely before slicing. These steps will guide you to make a delicious Snickerdoodle Banana Bread. Enjoy the sweet smell as it bakes! To make the best Snickerdoodle Banana Bread, avoid overmixing the batter. When you mix too much, the bread becomes dense. Mix just until you see no dry flour. A few lumps are okay! Keep an eye on the bread as it bakes. The top may brown quickly. If it gets dark, cover it lightly with foil. This will help it bake evenly without burning. Serve your banana bread warm for the best taste. Slice it up and arrange it on a nice plate. You can drizzle honey on top for a sweet kick. Another fun option is to add a scoop of vanilla ice cream. The cold ice cream pairs well with the warm bread. You can sprinkle extra cinnamon on top for a lovely finish. Enjoy! {{image_4}} You can make your Snickerdoodle Banana Bread even more fun! Here are some great ideas: - Nuts and chocolate chips: Adding chopped nuts like walnuts or pecans gives a nice crunch. Chocolate chips can add sweetness and richness. Just fold them into the batter before baking for a tasty surprise in every slice. I love using semi-sweet chocolate chips, but you can choose dark or milk chocolate too. - Adding other spices: You can mix in spices like nutmeg or allspice for extra flavor. These spices add warmth and depth to your banana bread. Start with just a pinch and adjust to your taste. They can complement the cinnamon and make the bread even cozier. If you have dietary needs, you can still enjoy this banana bread. - Gluten-free flour substitutes: You can use gluten-free flour blends in place of all-purpose flour. Look for a blend that contains xanthan gum for better texture. This way, everyone can enjoy a slice, no matter their diet. - Plant-based egg alternatives: If you want a vegan option, try using flax eggs. To make one flax egg, mix 1 tablespoon of ground flaxseed with 2.5 tablespoons of water. Let it sit until it thickens. This simple swap works well in most baking recipes, including this one. To keep your Snickerdoodle Banana Bread fresh, store it properly. You can keep it at room temperature for a short time. Place it in an airtight container or wrap it in plastic wrap. It stays good for about two days this way. If you want to keep it longer, refrigeration is a good option. Wrap it tightly and place it in the fridge. This method can help it last for up to a week. Freezing banana bread is also great for later enjoyment. Slice the bread before freezing. Wrap each slice in plastic wrap and then place them in a freezer bag. This way, you can take out one slice at a time. The bread stays fresh in the freezer for up to three months. Just thaw it at room temperature when you are ready to eat. How long does Snickerdoodle Banana Bread last? If stored at room temperature, it stays fresh for about two days. In the fridge, it can last up to a week. When you freeze it, you can enjoy it for up to three months. Always check for signs of spoilage before eating. If it looks or smells off, it's best to toss it. Can I use frozen bananas for this recipe? Yes, you can use frozen bananas. Just thaw them first and mash them well. Frozen bananas add great flavor and moisture to the bread. What can I substitute for unsalted butter? You can use coconut oil or vegetable oil. Both work well and keep the bread moist. If you want a dairy-free option, these are great choices. How do I know when banana bread is done baking? Insert a toothpick into the center. If it comes out clean, the bread is done. If it has wet batter, bake a bit longer. Can I make mini loaves instead of one large loaf? Yes, you can! Pour the batter into mini loaf pans. Bake for about 25-30 minutes. Check with a toothpick for doneness. How can I make the banana bread healthier? You can use whole wheat flour instead of all-purpose flour. Also, reduce the sugar by a little. Adding nuts or oats can boost nutrition too. This blog post covered how to make Snickerdoodle Banana Bread. You learned about the key ingredients, step-by-step baking instructions, and handy tips for a perfect loaf. I shared storage tips and answered common questions too. Remember, this recipe is flexible. You can add your favorite flavors or dietary choices. Enjoy baking and sharing this tasty treat with friends and family!

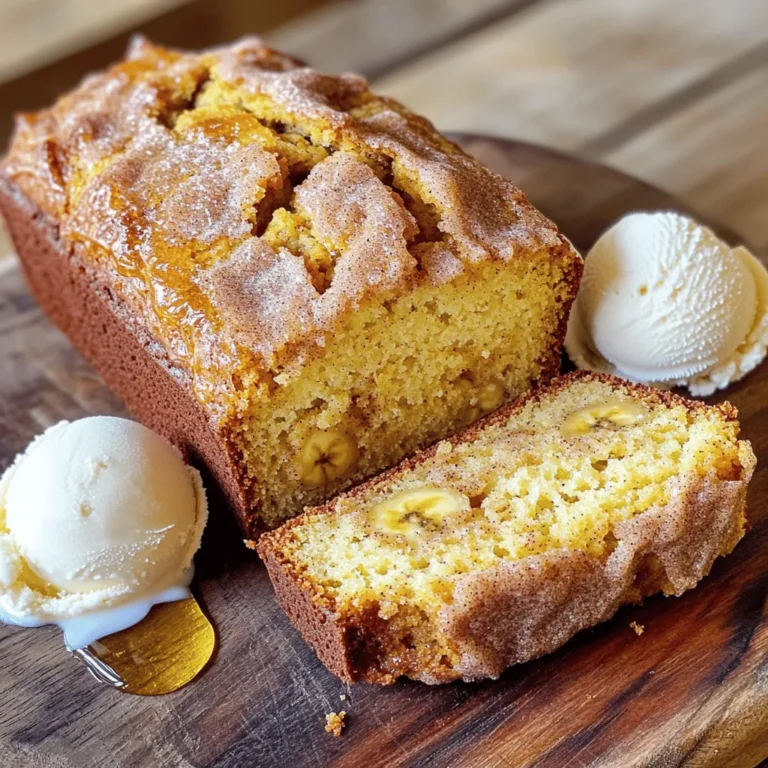
Snickerdoodle Banana Bread Tasty and Easy Recipe

- 2 cups fresh broccoli florets - 3 medium-sized russet potatoes, peeled and diced into 1-inch cubes - 1 cup sharp cheddar cheese, freshly grated - 1 medium yellow onion, finely chopped - 2 cloves garlic, minced - 4 cups vegetable broth (preferably low-sodium) - 1 cup milk (or your favorite non-dairy alternative, such as almond or oat milk) - 1 tablespoon extra-virgin olive oil - 1 teaspoon dried thyme (or 1 tablespoon fresh thyme) - Salt and freshly ground pepper, to taste - Optional: Croutons and additional cheese for garnish You can switch out some ingredients if you need to. For the cheese, try gouda or mozzarella. Instead of russet potatoes, use Yukon gold or red potatoes for a different flavor. If you’re out of broccoli, cauliflower can work too. You can also use low-fat milk or any plant-based milk for a lighter soup. Fresh ingredients make the best soup. Look for bright green broccoli without any yellow spots. Choose potatoes that are firm and smooth, with no blemishes. Use sharp cheddar for more flavor; it melts well too. If you can, buy organic vegetables for the best taste and quality. Always check the expiration date on your broth and milk to ensure freshness. Start by gathering all your ingredients. Wash the broccoli and cut it into small florets. Peel the potatoes and dice them into 1-inch cubes. Chop the onion finely, and mince the garlic. Having everything ready makes cooking smooth and easy. Heat the olive oil in a large pot over medium heat. Once it’s hot, add the chopped onion and minced garlic. Stir them for about five minutes until the onion is soft and clear. This step builds a strong base for your soup. Next, add the diced potatoes to the pot. Stir for two to three minutes to coat them with the onion and garlic mix. This helps the flavors blend well. Now, pour in the vegetable broth. Turn the heat up to bring it to a gentle boil. Once it boils, lower the heat and let it simmer for 15 to 20 minutes. Check if the potatoes are soft enough to pierce with a fork. After that, stir in the broccoli florets and thyme. Cook for another five to seven minutes. The broccoli should be bright green and tender but still a bit crisp. Remove the pot from heat. Use an immersion blender to blend the soup until it’s as smooth as you like. If you prefer some chunks, blend half of it and mix it back with the unblended part. Put the pot back on low heat. Pour in the milk and stir to mix. Gradually add the grated cheddar cheese while stirring. Keep mixing until the cheese melts and the soup becomes creamy. Finally, season with salt and ground pepper to taste. For a fun twist, add a pinch of nutmeg or smoked paprika. Stir everything well and let the soup simmer for another three to five minutes. This step lets all the flavors come together beautifully. To boost the taste of your soup, use fresh herbs. Fresh thyme adds a bright touch. You can also try adding a pinch of nutmeg or smoked paprika. These spices give a warm, rich flavor. For a twist, mix in a spoonful of Dijon mustard. It adds a nice tang. If you love garlic, sauté more cloves for a stronger taste. Always taste your soup before serving. Adjust salt and pepper as needed. For a creamier soup, add more cheese. Try using a mix of sharp and mild cheddar. If you want it extra rich, add a splash of heavy cream or more milk. For a lighter option, use less milk or choose a non-dairy milk. Almond or oat milk works well. Blend the soup longer if you want it very smooth. You can make this soup a day ahead. It tastes even better after sitting overnight. Store it in an airtight container in the fridge. When ready to eat, reheat gently on the stove. Stir often to prevent sticking. If it thickens too much, add a splash of broth or milk. Enjoy your creamy soup warm with fresh bread! {{image_4}} You can make this soup vegan and dairy-free easily. Use plant-based milk, like almond or oat milk, instead of regular milk. Swap the cheddar cheese with a dairy-free cheese. Nutritional yeast is a great option too. It adds a cheesy taste without dairy. These changes keep the soup tasty and creamy. Feel free to add more veggies to this soup. Carrots, cauliflower, or peas work well. Chop them small and add them with the potatoes. This boosts the nutrition and flavor. You can also mix in cooked quinoa or rice for added texture. Try adding some spinach for a pop of color and nutrients. While sharp cheddar is classic, you can experiment with other cheeses. Gruyère or Monterey Jack add great flavor. For a tangy twist, try using feta cheese. Just remember to adjust the amount since different cheeses melt differently. Blend in your choice of cheese slowly to find that perfect creamy texture. You can store leftover soup in the fridge. Use an airtight container. The soup stays good for up to three days. Before you store it, let it cool down. This helps keep the soup fresh and tasty. To freeze the soup, use a freezer-safe container. Leave some space at the top. This space allows the soup to expand as it freezes. The soup can last for up to three months in the freezer. When you’re ready to eat, thaw it in the fridge overnight. Reheat your soup on the stove for the best taste. Pour it into a pot over medium heat. Stir it often to avoid sticking. You can also use a microwave. Heat in short bursts, stirring in between. If the soup is too thick, add a splash of milk or broth. This helps bring back its creamy texture. You can serve this soup with many tasty sides. Here are some great ideas: - Crusty bread, perfect for dipping - Simple green salad for freshness - Grilled cheese sandwiches for extra comfort - Crispy croutons for a nice crunch - A sprinkle of extra cheddar on top Each option adds fun and flavor. Choose what you love most! Yes, you can use frozen broccoli. It works well and saves time. Just add it to the soup while cooking. Frozen broccoli cooks faster than fresh. Keep an eye on the cooking time. You want it bright green and tender. If your soup is too thin, here are a few ways to fix it: - Add more potatoes and let them cook down - Mix in some cornstarch or flour with water, then stir it in - Blend more of the soup to create a thicker base Each method will help you reach your desired thickness. Adjust to your taste! In this post, I covered the key ingredients for making Broccoli Cheddar Potato Soup. I shared tips on ingredient substitutes and how to choose quality items. I also provided simple step-by-step instructions for preparation and cooking. Enhancing flavor and adjusting creaminess can take your soup to the next level. Consider variations for vegan and dairy-free options as well. Finally, I included storage and reheating tips to keep your soup fresh. With these insights, you can create a delicious soup that everyone will love!

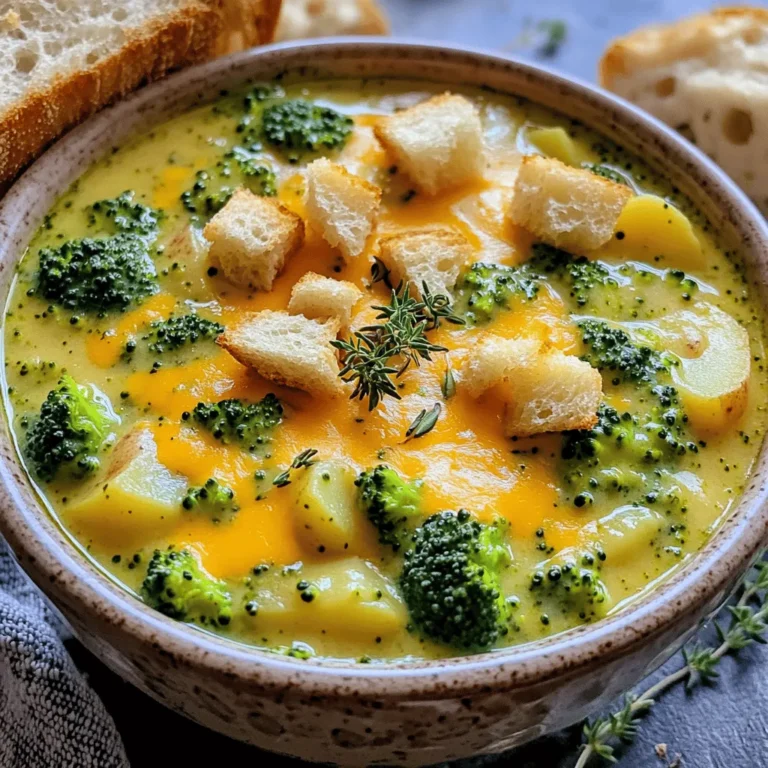
Flavorful Broccoli Cheddar Potato Soup Recipe Guide

- 1 lb ground beef - 4 large flour tortillas - 2 cups shredded cheddar cheese - 1 cup diced tomatoes - ½ cup sliced pickles - ½ cup shredded lettuce - ½ cup ketchup - ½ cup sour cream For this Smashburger Quesadilla recipe, the main ingredients create a flavorful base. The ground beef gives it a hearty taste, while flour tortillas hold everything together. I love using cheddar cheese for its rich flavor and meltability. You can add fun toppings to make each bite unique. Diced tomatoes add freshness. Sliced pickles bring a tangy crunch. Shredded lettuce gives a nice texture and color. Finally, condiments like ketchup and sour cream enhance the flavor. They provide a creamy and tangy finish that pairs well with the quesadilla. This simple ingredient list makes it easy for anyone to enjoy making this dish at home. Mixing the ingredients Start by taking 1 pound of ground beef. Add ½ teaspoon of garlic powder, ½ teaspoon of onion powder, and 1 teaspoon of chili powder. Don’t forget salt and pepper! Use your hands or a spoon. Mix until everything blends well. Shaping and cooking the patties Next, heat a large skillet over medium-high heat. Shape the beef mixture into small patties. Each should be about 2 to 3 inches wide. Use a spatula to smash each patty down. This gives it a crispy texture. Cook the patties for 3 to 4 minutes on each side. You want them well-browned and cooked through. Once done, place the patties on a plate. Layering cheese and beef In the same skillet, lower the heat to medium. Place one tortilla in the pan. Evenly sprinkle ½ cup of shredded cheddar cheese on top. Then, add 3 to 4 cooked beef patties over the cheese. Adding toppings Next, add diced tomatoes, sliced pickles, and a handful of shredded lettuce. Top it all off with another ½ cup of shredded cheese. Carefully place a second tortilla over everything. Cooking the first side Cook for about 3 to 4 minutes. This will make the bottom tortilla golden brown. The cheese should start melting. Flipping and finishing Now, carefully flip the quesadilla using a spatula. Make sure the filling stays inside. Cook the other side for another 3 to 4 minutes. This side should also be golden brown and crispy. Remove the quesadilla from the skillet. Let it cool for a minute, then slice it into wedges. Enjoy with ketchup and sour cream on the side! - Achieving the perfect patty texture: To get a great texture, mix the ground beef well. Use your hands to blend the spices into the meat. When you smash the patties, press firmly. This creates a crispy outside and a juicy inside. - Ideal skillet temperature: Heat the skillet on medium-high. A hot skillet helps the patties cook evenly and brown nicely. If the skillet is not hot enough, the patties might stick or not cook well. - Garnishing ideas: After slicing the quesadilla, sprinkle fresh herbs on top. Chopped cilantro or green onions add color and flavor. You can also add more diced tomatoes for a fresh touch. - Pairing options: Serve your quesadillas with crispy tortilla chips or a fresh salad. A side of guacamole or salsa can enhance the meal. These options add crunch and balance the flavors. - Prepping ingredients in advance: You can mix the beef and spices the night before. Cut the veggies ahead of time too. This way, when you’re ready to cook, everything is ready to go. - Cooking multiple quesadillas: If you have a big skillet, cook two quesadillas at once. This saves time and keeps everyone happy. Just make sure to flip them carefully! {{image_4}} You can change up the cheese for your Smashburger Quesadillas. Here are some tasty options: - Monterey Jack: This cheese melts well and adds a creamy texture. - Pepper Jack: This adds a nice kick with its jalapeño bits. - Mozzarella: It gives a mild taste and stretchy goodness. For protein, you have choices too: - Ground turkey: A leaner option that still tastes great. - Shredded chicken: Perfect for a different texture. - Black beans: A hearty vegetarian swap that packs protein. Want to spice things up? Here are some ideas for extra flavor: - Add sliced jalapeños for a spicy twist. They give a nice heat and crunch. - Use smoked paprika or cumin for a deeper taste. These spices add warmth and richness. If you need to make changes for diet reasons, here are some options: - Gluten-free tortillas are available at most stores. They taste great and hold the fillings well. - For a vegetarian version, use mushrooms or zucchini instead of beef. These veggies can add a nice texture and flavor. These swaps and enhancements make your Smashburger Quesadillas fun and unique. Enjoy experimenting! To keep your Smashburger Quesadillas fresh, store them in the fridge. Place them in an airtight container. This will help them stay tasty for up to three days. If you want to save them longer, freezing is a great option. Wrap each quesadilla tightly in plastic wrap. Then, place them in a freezer-safe bag. They can last up to three months in the freezer. When you're ready to eat your leftovers, reheating them properly is key. The best method is to use a skillet. Heat the skillet over medium heat. Place the quesadilla in the pan and cover it with a lid. This helps keep the heat in and warms it evenly. Cook for about 3-4 minutes on each side. To keep your quesadilla crispy, avoid using a microwave. Microwaving can make it soggy. Instead, use the skillet method for that crunchy texture. Enjoy your tasty quesadilla just like it was fresh! Popular side dishes include: - Crispy tortilla chips - Fresh guacamole - Spicy salsa - Steamed corn - Mixed green salad These sides add crunch and flavor. They balance the savory quesadilla. You can also try serving them with a refreshing drink, like lemonade or iced tea. Yes, you can prepare these quesadillas ahead. Here are some tips: - Cook the beef patties: You can cook them in advance and refrigerate. - Assemble before serving: Keep the tortillas and toppings separate until ready to cook. - Freeze for later: You can freeze unassembled quesadillas. Just layer them with parchment paper in between. When you're ready, just cook them in a skillet for a quick meal. You can easily personalize your quesadilla. Here are some suggestions: - Add different cheeses: Try pepper jack or mozzarella for a twist. - Change the protein: Use chicken, turkey, or even beans for a vegetarian option. - Include more veggies: Bell peppers, onions, or jalapeños add extra flavor. - Spice it up: Add hot sauce or your favorite seasoning blend. These ideas let you create a quesadilla that fits your taste perfectly. This blog post covered how to make delicious Smashburger Quesadillas. We discussed key ingredients like beef, tortillas, and cheese. You learned how to prepare patties and assemble the dish with tasty toppings. I shared cooking tips, storage methods, and fun variations. In conclusion, have fun customizing your quesadilla. Experiment with different flavors and enjoy your creation. Get ready to impress your friends and family with this tasty meal!

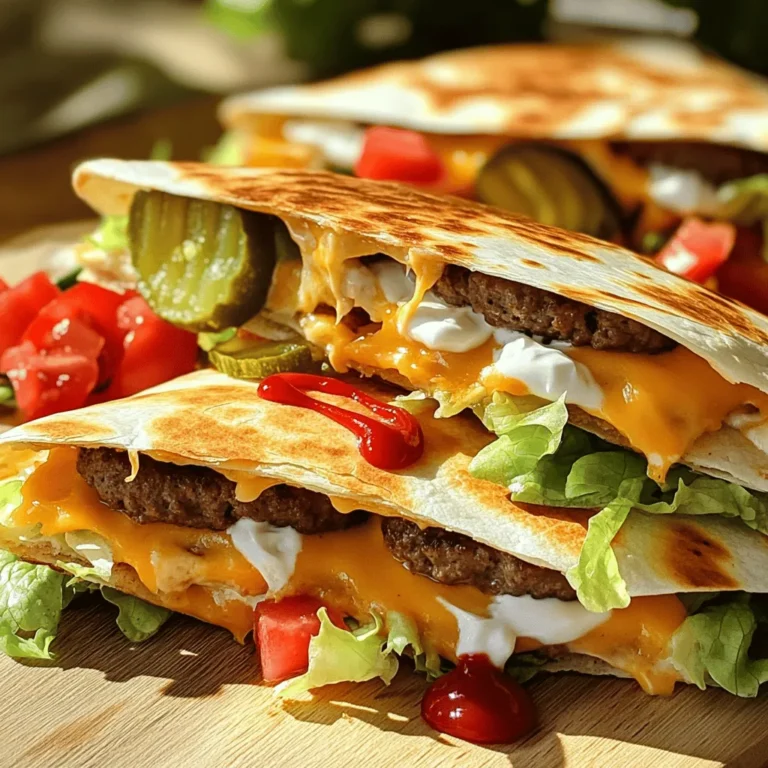
Smashburger Quesadillas Tasty and Simple Recipe

PREV 1 … 8 9 10 … 18 NEXT
easy meal kitchen

explore

DessertsDinnerAppetizersDrinks

Our Policies

  • Cookie Policy
  • Copyright Policy
  • Disclaimer
  • GDPR Policy
  • Terms Of Use
Back to Top
  • About
  • Contact Us
  • Privacy Policy
© 2025 easy meal kitchen