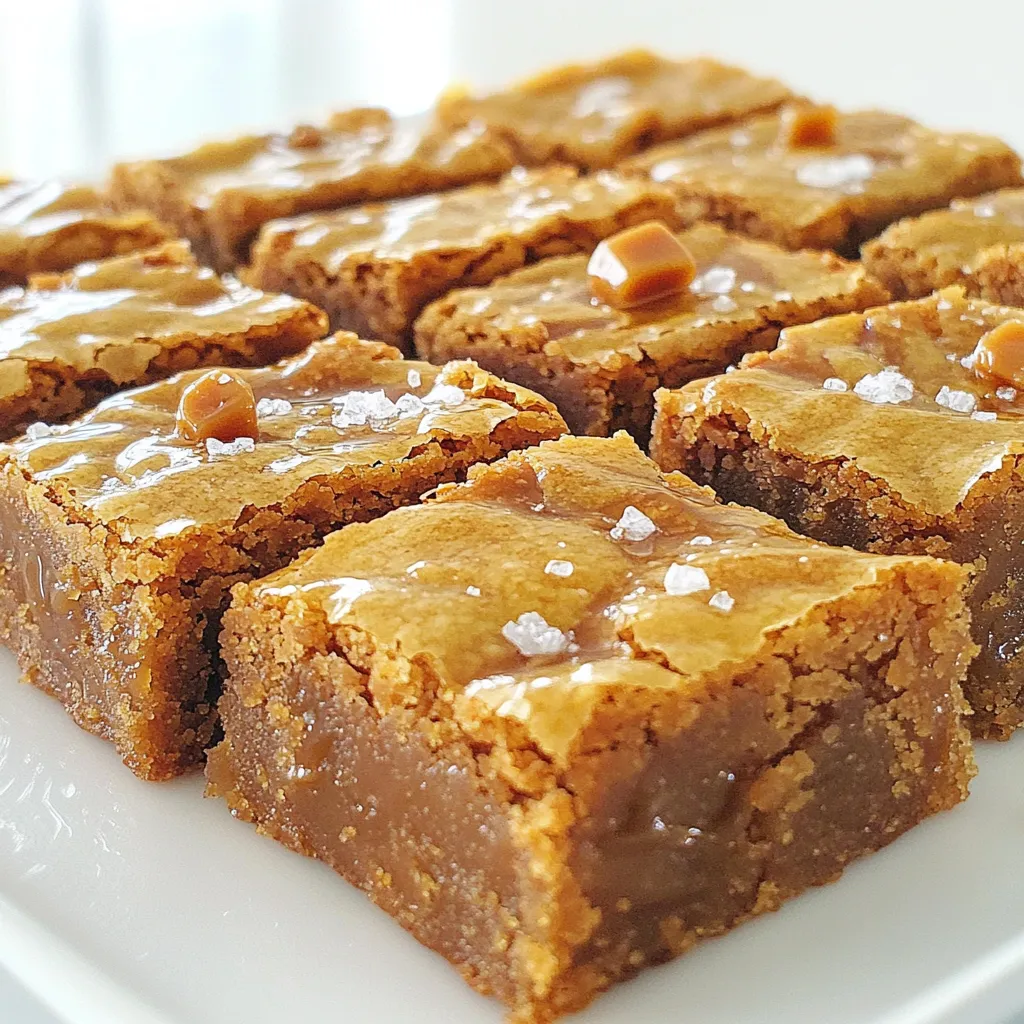
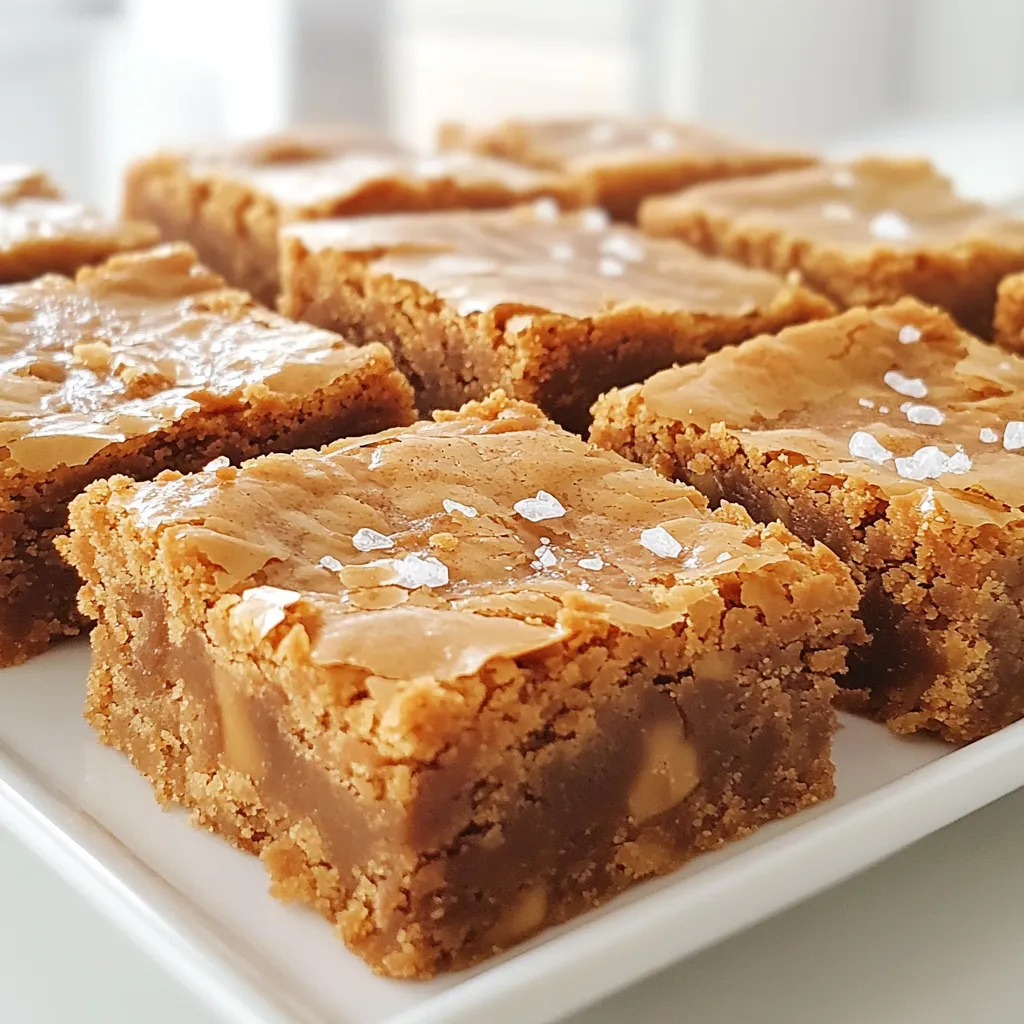
If you love sweet treats, you’ll adore my Brown Butter Salted Toffee Blondies! These golden goodness bars blend rich brown butter with chunks of toffee for a perfect bite. Whether you’re baking for a crowd or just treating yourself, you’ll want to stick around. I’ll share essential tips, easy steps, and delightful variations to make these blondies irresistible. Let’s dive into the sweet world of baking bliss!
Ingredients
Complete List of Ingredients
– 1 cup unsalted butter
– 2 cups brown sugar, tightly packed
– 2 large eggs, at room temperature
– 2 teaspoons pure vanilla extract
– 2 cups all-purpose flour
– 1 teaspoon baking powder
– 1/2 teaspoon baking soda
– 1/4 teaspoon fine sea salt
– 1 cup toffee bits (or roughly chopped toffee candy bars)
– Flaky sea salt, for garnish
Tips for Choosing Quality Ingredients
When I make Brown Butter Salted Toffee Blondies, I always choose high-quality butter. Unsalted butter gives you control over salt levels. Look for butter with a rich flavor and good fat content. For the brown sugar, use a tightly packed version. This makes the blondies moist and chewy. Fresh eggs are key, so check the date. Fresh eggs help create a fluffy texture. Use pure vanilla extract for a deeper flavor. Don’t settle for imitation.
Substitutions and Allergy Options
If you need to make swaps, here are some ideas. For dairy-free, use coconut oil or vegan butter. You can also use applesauce for moisture with fewer calories. If you’re gluten-free, replace all-purpose flour with a gluten-free blend. Always check for toffee bits that fit your needs. Some brands may contain gluten or dairy. If you have nut allergies, this recipe is safe, as it does not include nuts.
Step-by-Step Instructions
Prepping the Baking Pan
Start by preheating your oven to 350°F (175°C). Grab a 9×13 inch baking pan. Grease it well or line it with parchment paper. This helps you lift the blondies out easily after baking.
Browning the Butter
Next, take a medium saucepan and add 1 cup of unsalted butter. Turn the heat to medium. Stir the butter often as it melts and bubbles. Keep cooking it until it turns a rich golden brown color. This process takes about 5-7 minutes. Watch it closely so it doesn’t burn. The nutty smell means it’s ready!
Mixing Wet and Dry Ingredients
Once your butter is browned, remove the pan from heat. Let it cool for about 5 minutes. In a large bowl, pour in the warm brown butter. Add 2 cups of tightly packed brown sugar. Whisk them together until smooth and shiny. Now, crack in 2 large eggs one at a time. Beat them well after each egg. Finally, stir in 2 teaspoons of pure vanilla extract.
In another bowl, mix 2 cups of all-purpose flour, 1 teaspoon of baking powder, 1/2 teaspoon of baking soda, and 1/4 teaspoon of fine sea salt. Gradually add the dry mix to the wet mix. Fold gently until just combined. It’s okay if there are a few lumps.
Folding in Toffee Bits
Now, it’s time for the fun part! Take 1 cup of toffee bits and fold them into the batter. Make sure they spread evenly. This way, every bite will have sweet toffee goodness.
Baking and Cooling
Pour the batter into your prepared pan. Use a spatula to spread it out evenly. Before baking, sprinkle a light layer of flaky sea salt on top. This adds a nice touch! Place the pan in the oven and bake for 20 to 25 minutes. They are done when the edges are set. A toothpick should come out with a few moist crumbs.
After baking, let the blondies cool in the pan for at least 10 minutes. Gently move them to a wire rack to cool completely. Once cool, cut them into squares. Enjoy your Brown Butter Salted Toffee Blondies!
Tips & Tricks
Achieving the Perfect Blondie Texture
To get the best blondies, focus on the texture. Start with warm brown butter. It gives a rich flavor and moisture. Mix the wet and dry ingredients gently. Overmixing can make them tough. You want a soft, chewy center with slightly crispy edges. Bake until the edges are set but the center is still soft. This balance creates that perfect blondie texture.
Common Mistakes to Avoid
One big mistake is not browning the butter enough. If the butter is too light, you miss the deep flavor. Another issue is overbaking. Keep an eye on the time. Pull them out when a toothpick shows a few moist crumbs. Don’t forget to let them cool before cutting. This step helps keep them from falling apart.
Enhancing Flavor with Add-Ons
You can make these blondies even tastier. Consider adding nuts like walnuts or pecans. They add crunch and a nice contrast. You can also swap some toffee bits for chocolate chips. This gives a rich, sweet twist. For a seasonal touch, add spices like cinnamon or nutmeg. These simple add-ons can elevate the flavor and make your blondies shine.
Variations
Swapping Toffee with Other Mix-Ins
You can swap toffee bits for many tasty things. Try chocolate chips, nuts, or even dried fruit. Each mix-in brings a new flavor to your blondies. I love using dark chocolate chips for a richer taste. Nuts add a nice crunch, while fruits can give a hint of freshness. Just make sure to keep the amount the same as the toffee.
Making It Gluten-Free
You can make these blondies gluten-free with just a few changes. Use a gluten-free flour blend instead of all-purpose flour. Brands like Bob’s Red Mill or King Arthur Flour work well. Check the blend for xanthan gum; it’s key for texture. This way, everyone can enjoy these treats!
Alternative Flavors to Experiment With
Don’t be afraid to mix it up! You can add flavors like almond extract or coffee for depth. Spice it up with cinnamon or cardamom for a warm twist. You can also use browned butter for a nuttier taste. Each new flavor creates a unique treat that keeps everyone guessing. Enjoy experimenting with your favorite flavors!
Storage Info
How to Store Brown Butter Salted Toffee Blondies
To keep your Brown Butter Salted Toffee Blondies fresh, let them cool completely first. Once cooled, place the blondies in an airtight container. This keeps them moist. You can store them at room temperature for up to four days. If you want to enjoy them later, consider freezing.
Freezing for Later Enjoyment
Freezing blondies is simple. Cut them into squares before freezing. Wrap each square in plastic wrap. Then place them in a freezer-safe container. They’ll stay fresh for up to three months. When you’re ready to eat, thaw them in the fridge overnight. You can warm them in the microwave for a few seconds for a fresh-out-of-the-oven taste.
Best Containers for Storage
Choose airtight containers for storing your blondies. Glass containers work well and do not absorb odors. If you use plastic, make sure it’s BPA-free. You can also use resealable plastic bags. Just ensure to squeeze out as much air as possible. This prevents freezer burn. Enjoy your blondies any time you crave a sweet treat!
FAQs
What makes blondies different from brownies?
Blondies and brownies share a similar base but differ in flavor. Blondies use brown sugar for a rich, caramel taste. They lack cocoa, giving them a lighter color. Brownies are denser and chocolatey. You can think of blondies as a sweet, buttery treat. They offer a unique flavor that stands out.
How to tell when blondies are fully baked?
To check if your blondies are done, look for set edges and a slight jiggle in the center. Insert a toothpick into the middle. It should come out with a few moist crumbs, not wet batter. If the toothpick is clean, they might be overbaked. Ideal blondies are soft and chewy.
Can I make these ahead of time?
Yes, you can make blondies ahead of time. After baking, let them cool completely. Then, store them in an airtight container. They stay fresh for up to five days at room temperature. If you want to keep them longer, freeze them. Just wrap them tightly for best results.
What’s the best way to reheat blondies?
To reheat blondies, use the oven for best texture. Preheat it to 350°F (175°C). Place blondies on a baking sheet and warm for about 5 to 10 minutes. You can also use a microwave. Heat for 10-15 seconds. Check often to avoid overheating. Enjoy them warm for a gooey treat.
In this post, we explored how to make brown butter salted toffee blondies. We covered ingredients, step-by-step instructions, and tips for perfect texture. You learned about variations, storage, and answers to common questions.
Baking is easy with good ingredients and clear steps. Enjoy making your blondies!