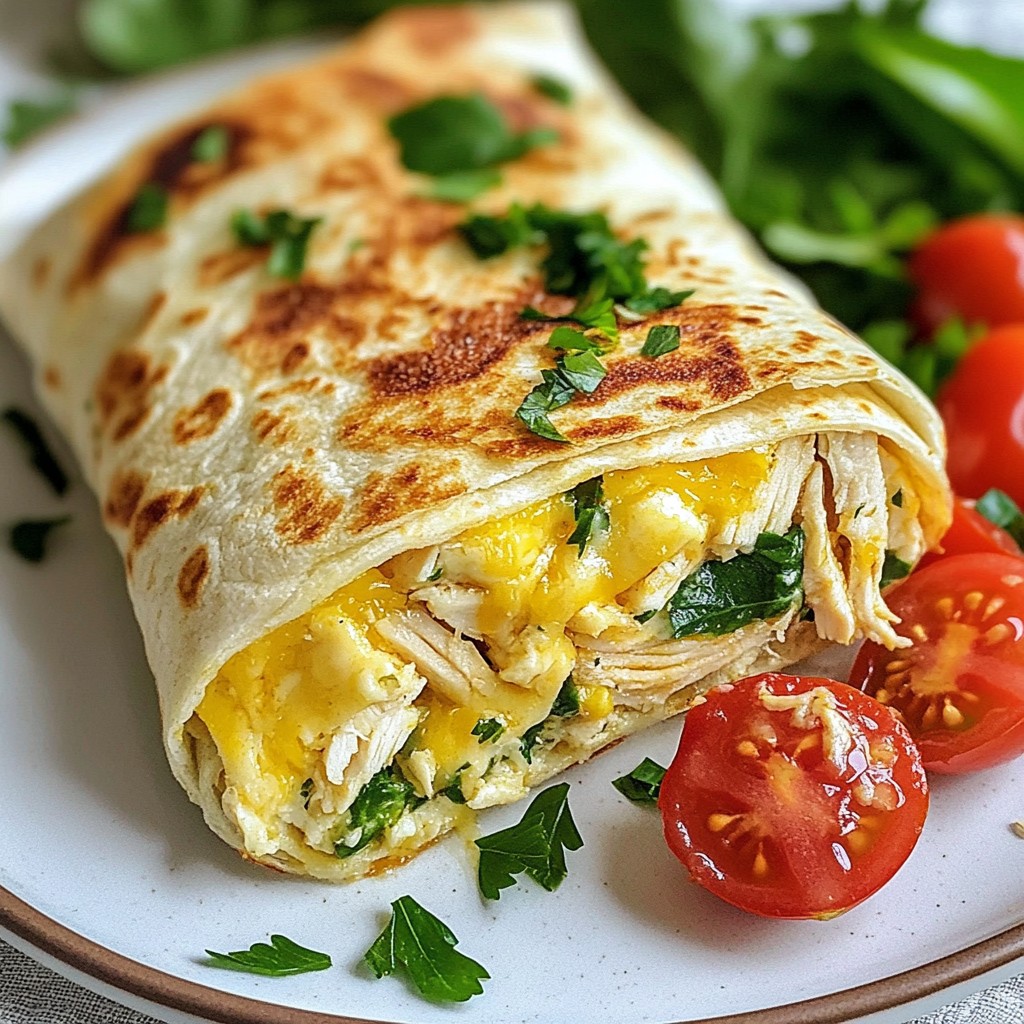
Craving a quick meal that’s full of flavor? Look no further! Cheesy Garlic Chicken Wraps are your answer. They’re easy to make and so delicious, you’ll want them in your regular meal rotation. With simple steps, fresh ingredients, and the perfect blend of cheese and garlic, these wraps promise satisfaction. Ready to dive in? Let’s make your next meal an amazing one!
Why I Love This Recipe
- Quick and Easy: This recipe comes together in just 25 minutes, making it perfect for busy weeknights or a last-minute meal.
- Cheesy Goodness: The combination of cream cheese and mozzarella creates a rich, creamy filling that is utterly delicious and satisfying.
- Fresh Ingredients: With fresh spinach and cherry tomatoes, each bite is not only tasty but also packed with nutrients and vibrant colors.
- Versatile Wrap: These wraps can be customized with your favorite veggies or sauces, making them a flexible option for any meal.
Ingredients
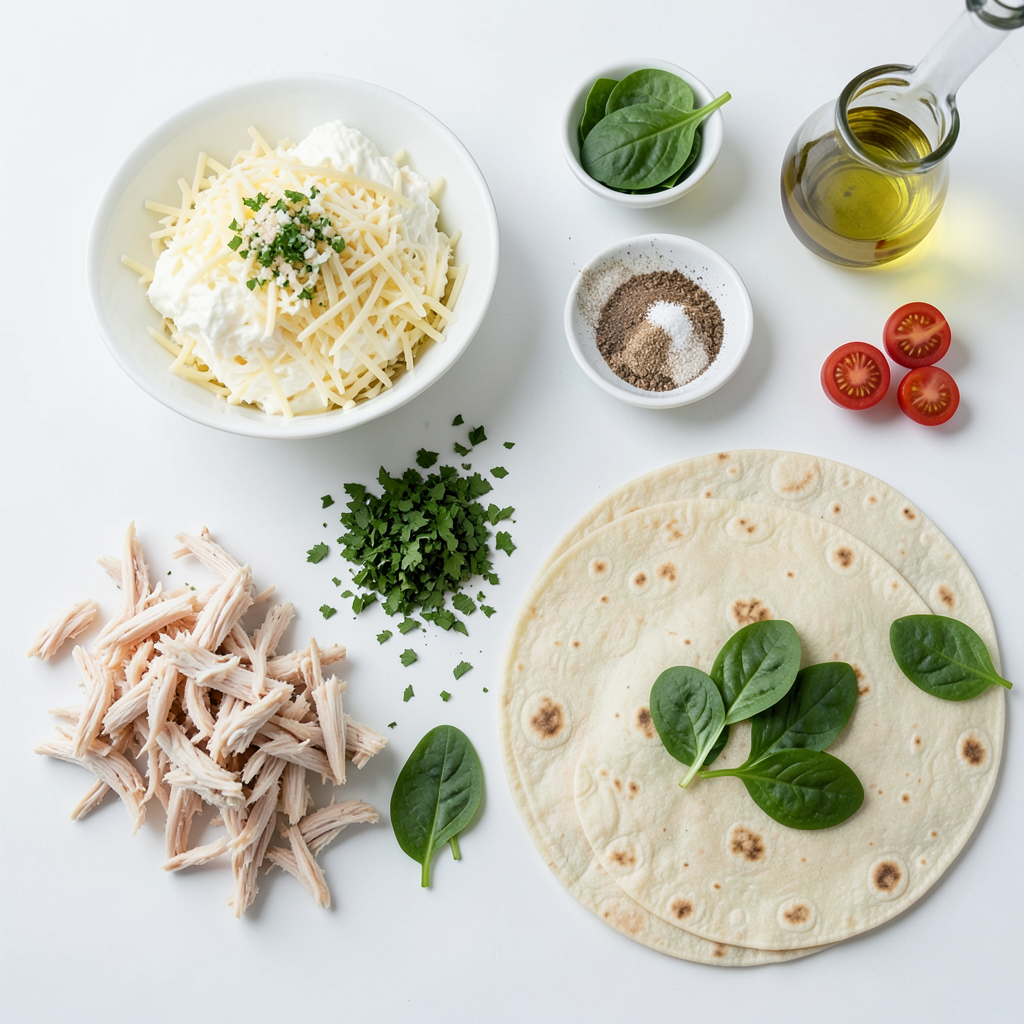
List of Ingredients
To make Cheesy Garlic Chicken Wraps, you will need:
- 2 cups cooked chicken (shredded or diced)
- 1 cup cream cheese (softened)
- 1 cup shredded mozzarella cheese
- 2 cloves garlic (minced)
- 1 tablespoon fresh parsley (chopped, or 1 teaspoon dried)
- 1 teaspoon onion powder
- Salt and pepper (to taste)
- 4 large tortillas
- 1 cup fresh spinach leaves
- 1/2 cup cherry tomatoes (halved)
- Olive oil (for brushing)
Ingredient Substitutions
You can swap ingredients for your taste:
- Use Greek yogurt instead of cream cheese for a lighter option.
- If you don’t have mozzarella, try cheddar or pepper jack.
- Substitute fresh parsley with basil or cilantro for different flavors.
- For a healthier wrap, use whole wheat or spinach tortillas.
- Cherry tomatoes can be replaced with diced bell peppers or cucumbers.
Tips for Choosing Fresh Ingredients
Fresh ingredients make a big difference. Here are some tips:
- Choose chicken that smells fresh and has a firm texture.
- Look for cream cheese that is smooth with no lumps.
- When buying garlic, pick firm bulbs with tight skin.
- For spinach, select leaves that are bright green and crisp.
- Choose cherry tomatoes that are firm and have a shiny skin.
These choices help ensure your Cheesy Garlic Chicken Wraps taste amazing!
Step-by-Step Instructions
Preparation of Chicken Mixture
To start, gather your ingredients. You need cooked chicken, cream cheese, and mozzarella. Add minced garlic, parsley, onion powder, salt, and pepper. In a mixing bowl, combine the chicken and cream cheese. Mix them well until smooth. Then, fold in the mozzarella and garlic. Next, add parsley, onion powder, salt, and pepper. Make sure everything blends nicely. This mixture should look creamy and delicious.
Assembling the Wraps
Now, lay out your tortillas on a flat surface. This step makes it easy to fill them. Take a generous amount of the chicken mixture and spread it on each tortilla. Leave about an inch around the edges. This space helps with rolling. On top of the chicken, add fresh spinach leaves and halved cherry tomatoes. These will add color and crunch. Carefully roll each tortilla from one end to another. Tuck in the sides to make a sealed wrap. Ensure they are tightly rolled for the best look.
Cooking the Wraps to Perfection
Next, preheat your skillet over medium heat. Brush the outside of each wrap with olive oil. This step gives them a nice crisp. Once the skillet is hot, place the wraps seam-side down. Cook them for about 3-4 minutes on each side. Look for a golden brown color to know they are ready. After cooking, take them out and let them cool for a minute. Then, cut each wrap in half diagonally. This gives you a beautiful presentation. Enjoy!
Tips & Tricks
How to Achieve a Crispy Exterior
To get that perfect crispy wrap, brush the outside with olive oil. This small step adds flavor and helps the wrap brown nicely. Make sure your skillet is hot before placing the wraps in. Cook them seam-side down first. This keeps everything inside while they crisp up. Flip them carefully to avoid spilling the filling. Cook until they are golden brown, about 3-4 minutes per side.
Flavor Enhancements and Seasoning Suggestions
You can enhance the flavor of your wraps easily. Add a pinch of smoked paprika for a nice smoky touch. A dash of cayenne pepper can bring heat if you like spice. Fresh herbs like basil or cilantro can add bright flavor. Try mixing in some diced bell peppers for crunch and color. If you love garlic, add an extra clove or two for a stronger taste.
Common Mistakes to Avoid
One common mistake is overfilling the wraps. If you add too much filling, they will be hard to roll. Always leave some space at the edges for a tight seal. Another mistake is not cooking the wraps long enough. They need time to get crispy and warm all the way through. Lastly, don’t skip brushing the outside with oil. It makes a big difference in texture and flavor.
Pro Tips
- Use Leftover Chicken: This recipe is a great way to use up leftover rotisserie chicken or any cooked chicken you have on hand, saving time and reducing waste.
- Customize Your Fillings: Feel free to add other vegetables like bell peppers or onions for extra flavor and nutrition, or swap the cheeses based on your preferences.
- Control the Crispiness: Adjust the cooking time on the skillet to achieve your desired level of crispiness; longer cooking will yield a crunchier wrap, while shorter will keep it softer.
- Serve with Dips: Pair these wraps with your favorite dips, such as ranch, guacamole, or a spicy salsa, to enhance the flavor and make it more enjoyable.
Variations
Vegetarian Version
You can easily make cheesy garlic wraps vegetarian. Simply swap the chicken for veggies. Use a mix of bell peppers, mushrooms, and zucchini. Sauté them lightly for extra flavor. The creamy cheese blend pairs well with these fresh veggies. It keeps the wrap tasty and satisfying.
Spicy Cheesy Garlic Wraps
Want some heat? Add spicy elements to your wraps. Mix in diced jalapeños or crushed red pepper flakes. You can also use pepper jack cheese instead of mozzarella. This gives your wraps a spicy kick. Adjust the spice based on your taste. It adds a fun twist to the classic recipe.
Different Cheese Options
Cheese makes these wraps extra delicious. You can try different cheeses for variety. Instead of mozzarella, use cheddar or gouda. Each cheese brings its own flavor. Mixing cheeses like mozzarella and parmesan can create a rich taste. Experiment with your favorites for a new experience.
Storage Info
Best Practices for Storing Leftovers
To keep your cheesy garlic chicken wraps fresh, let them cool first. Place them in an airtight container. Store in the fridge for up to three days. If you want to keep them longer, consider freezing.
Reheating Tips
When you want to eat your leftovers, heat them in a skillet. This method keeps the wrap crispy. Cook for about three minutes on each side. You can also use a microwave, but the wrap may become soft. If using a microwave, cover the wrap with a damp paper towel to avoid dryness.
Freezing Instructions
To freeze, wrap each cheesy garlic chicken wrap tightly in plastic wrap. Then, place them in a freezer bag. They will stay good for about three months. When ready to eat, thaw them in the fridge overnight before reheating.
FAQs
Can I use raw chicken instead of cooked?
No, you cannot use raw chicken. The recipe needs cooked chicken for safety. Cooking raw chicken first ensures it is safe to eat. You can use rotisserie chicken or leftover chicken. This saves time and makes the wraps easy to prepare.
What can I use instead of cream cheese?
You can use Greek yogurt or sour cream. Both options give a creamy texture. They also add a tangy flavor. If you want a dairy-free choice, try cashew cream or a nut-based spread. These alternatives keep the wraps delicious.
How can I make these wraps gluten-free?
To make the wraps gluten-free, use gluten-free tortillas. Many brands offer these in stores. Check the label to ensure they are certified gluten-free. You can also use lettuce leaves for a low-carb option. This keeps the meal fresh and light.
How long do they take to cook?
The total cooking time is about 8 minutes. Each side of the wrap takes about 3-4 minutes. You want them golden brown for the best texture. The wraps can be made in just 25 minutes, including prep time. Enjoy them hot for the best flavor!
You’ve learned about key ingredients, simple steps, and great tips to make wraps. Using fresh ingredients and avoiding common mistakes can lead to success. Explore tasty variations like vegetarian or spicy options for extra fun. Remember to store leftovers properly to enjoy later. Overall, wraps are flexible and delicious. You can adapt them to your taste and needs. Get started and impress everyone with your new skills!