If you're craving a quick and fun meal, Cheesy Pepperoni Pizza Roll-Ups are the answer! Not only are they easy to make, but they also pack all the flavors you love about pizza into a delightful bite-sized treat. In this post, I’ll share simple steps, helpful tips, and tasty variations that will impress your family and friends. Grab your apron, and let’s get rolling!
Why I Love This Recipe
- Effortless Preparation: This recipe is quick and easy to make, perfect for busy weeknights or last-minute gatherings.
- Customizable Fillings: You can easily swap out the pepperoni for your favorite toppings, making it versatile for everyone's taste.
- Perfect for Sharing: These roll-ups are great for parties or family dinners, allowing everyone to enjoy them as finger food.
- Deliciously Cheesy: The gooey melted mozzarella combined with the savory pepperoni is a crowd-pleaser that never disappoints.
Ingredients
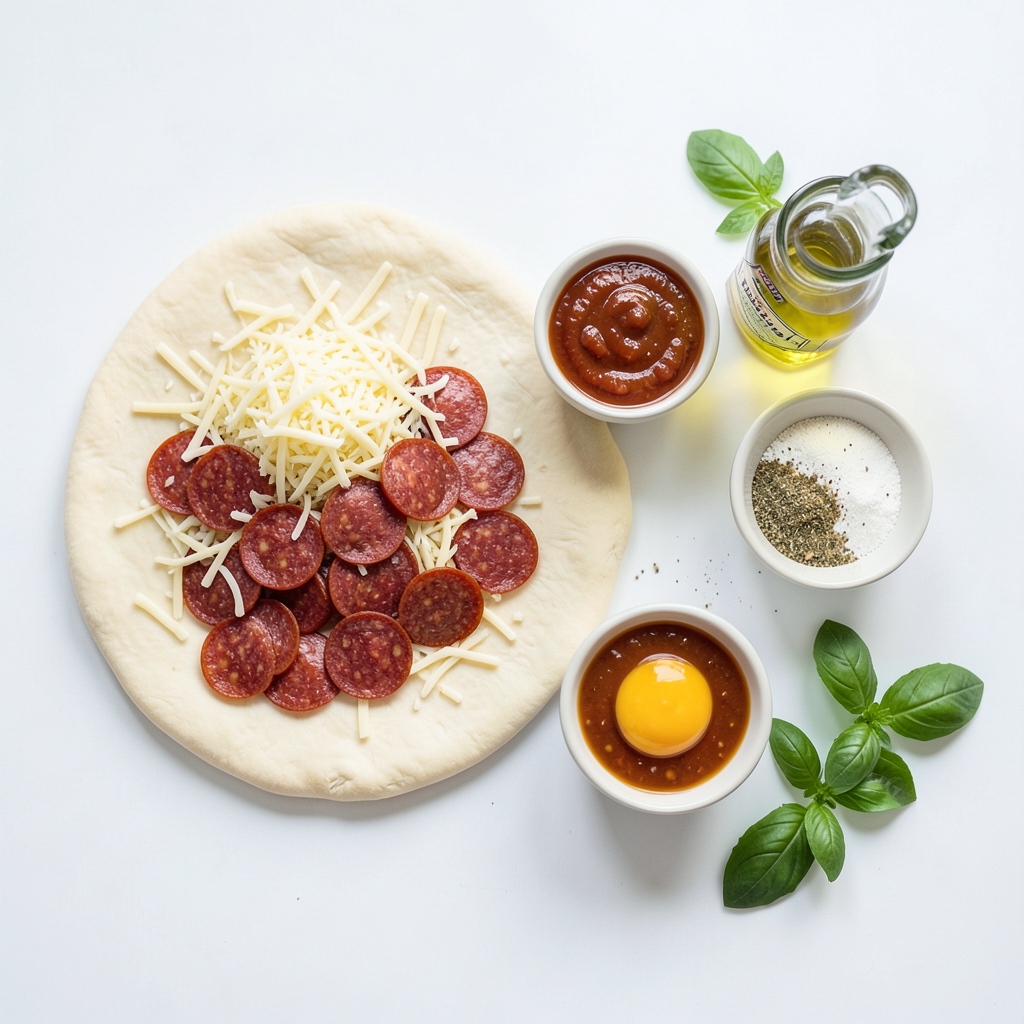
List of Ingredients
- 1 package of pizza dough (store-bought or homemade)
- 1 cup shredded mozzarella cheese
- 1 cup sliced pepperoni
- ½ cup pizza sauce (plus extra for dipping)
- 1 teaspoon Italian seasoning
- 2 tablespoons olive oil
- 1 tablespoon garlic powder
- Fresh basil leaves for garnish (optional)
- 1 egg, beaten (for egg wash)
Alternative Ingredient Options
You can swap the mozzarella cheese for cheddar or provolone. If you want a twist, try using spicy pepperoni or turkey pepperoni. For a veggie touch, add bell peppers or mushrooms. Instead of pizza sauce, use marinara or pesto for a different flavor.
Suggested Equipment Needed
- Rolling pin
- Parchment paper
- Baking sheet
- Sharp knife
- Pastry brush
- Small mixing bowl
Step-by-Step Instructions
Prepping the Oven and Baking Sheet
First, preheat your oven to 400°F (200°C). This step is key for a crispy finish. Next, line a baking sheet with parchment paper. This helps prevent the roll-ups from sticking.
Rolling Out the Dough
Now, take your pizza dough. Place it on a floured surface. Roll it out into a large rectangle. Aim for about 12x16 inches. Make sure it’s even so it bakes well.
Assembling the Roll-Ups
Grab a spatula and spread the pizza sauce. Leave a ½ inch border around the edges. This border keeps the filling in place. Next, sprinkle the mozzarella cheese over the sauce. Add the pepperoni slices on top of the cheese. Last, sprinkle the Italian seasoning for extra flavor.
Baking and Finishing Touches
Start rolling the dough from one edge. Roll it tightly into a log. Pinch the ends to seal the roll. Slice the log into 1-inch thick pieces. Place them cut-side up on the baking sheet. In a bowl, mix the egg, olive oil, and garlic powder. Brush this mix on top of the roll-ups. Bake them for 15-18 minutes. Look for a golden brown color and bubbly cheese. After baking, let them cool a few minutes. Enjoy with extra pizza sauce for dipping!
Tips & Tricks
Achieving the Perfect Roll
To get a good roll, start with the dough. Roll it out evenly on a floured surface. Aim for a rectangle about 12x16 inches. This size helps you fill it well and roll tightly. When you roll, start at one edge and keep it snug. Pinch the ends to seal the filling inside. If you roll too loosely, the filling may spill during baking.
Ensuring Even Baking
Even baking is key for great pizza roll-ups. First, use parchment paper on your baking sheet. This helps prevent sticking. Place the roll-ups cut side up to ensure they brown nicely. Keep space between each roll-up for air to circulate. Check on them after 15 minutes to avoid over-baking. You want them golden brown and bubbly, not burnt.
Flavor Enhancements
You can boost flavor easily. Add Italian seasoning for a classic pizza taste. Try mixing in some garlic powder in the egg wash. This gives a tasty crust. Consider using fresh herbs like basil or oregano for extra freshness. For a kick, sprinkle some crushed red pepper flakes before baking. These little changes make a big difference in taste!
Pro Tips
- Use a Rolling Pin: To achieve an even thickness in your pizza dough, use a rolling pin instead of your hands. This ensures that the roll-ups bake uniformly.
- Experiment with Fillings: Feel free to customize your roll-ups by adding other ingredients like bell peppers, olives, or different cheeses for a unique twist on the classic flavor.
- Monitor Baking Time: Ovens can vary in temperature, so keep an eye on your roll-ups during the last few minutes of baking to achieve that perfect golden brown color.
- Let Them Cool: After baking, let your roll-ups cool for a few minutes before serving. This allows the cheese to set slightly, making them easier to eat without spilling out the filling.
Variations
Veggie-Packed Roll-Ups
You can make veggie-packed roll-ups for a healthy twist. Start with the same dough base. Add your favorite vegetables. Good choices are bell peppers, mushrooms, and spinach. Slice them thinly to fit nicely. Spread the pizza sauce, then layer with mozzarella cheese and veggies. Finish with Italian seasoning and roll as usual. Bake them like the original recipe, and enjoy a fresh taste!
Meat Lover's Twist
For a meat lover’s twist, add more protein. Use the same pizza dough and sauce. Instead of just pepperoni, try adding cooked sausage or ham. You can mix different meats, like bacon bits or chicken. Layer the meats over the cheese for a hearty filling. Roll and bake just like before. This will satisfy anyone craving a meaty pizza flavor!
Cheese Only Options
If you want a simple cheese-only option, skip the pepperoni. Spread the pizza sauce and pile on the mozzarella cheese. You can also use other cheeses like cheddar or pepper jack for extra flavor. Mix in some herbs like oregano or basil for taste. Once rolled up, bake them until golden. These cheesy roll-ups are perfect for cheese lovers!
Storage Info
How to Store Leftovers
To store your leftover Cheesy Pepperoni Pizza Roll-Ups, let them cool first. Place them in an airtight container. Make sure to keep them in the fridge. They will stay fresh for up to three days. If you want to keep them longer, consider freezing them.
Reheating Tips
When you're ready to enjoy your leftovers, reheating is simple. Preheat your oven to 350°F (175°C). Place the roll-ups on a baking sheet. Cover them loosely with foil to keep them moist. Bake for about 10-15 minutes. You can also use the microwave for quick reheating. Just heat them for about 30-60 seconds, but they might get a bit soggy.
Freezing Instructions
To freeze your pizza roll-ups, wrap each one in plastic wrap. Then, put them in a freezer-safe bag or container. Make sure to squeeze out as much air as you can. They can last up to three months in the freezer. When you're ready to eat, thaw them in the fridge overnight before reheating. This keeps them tasty and fresh!
FAQs
Can I use homemade pizza dough?
Yes, you can use homemade pizza dough. Just make sure it is rolled out evenly. This helps the roll-ups bake nicely. Homemade dough can add a personal touch to your meal. Use your favorite recipe for a fun twist!
How do I prevent the roll-ups from getting soggy?
To prevent soggy roll-ups, do not overload the filling. Too much sauce can make them wet. Ensure you spread the pizza sauce thinly. Also, let them cool for a few minutes after baking. This helps keep them crispy.
What can I serve with Cheesy Pepperoni Pizza Roll-Ups?
These roll-ups go well with many sides! Serve them with extra pizza sauce for dipping. You can also add a fresh salad or some crunchy veggies. Garlic bread and marinara sauce make great partners too.
How can I make these roll-ups ahead of time?
To make these roll-ups ahead, prepare them up to the baking step. Store them in the fridge for up to one day. When you are ready, bake them until golden brown. This saves time and keeps them fresh!
In this post, we covered everything about Cheesy Pepperoni Pizza Roll-Ups. We discussed key ingredients, prep steps, and essential equipment to get you started. Next, we explored tips for perfect roll-ups and tasty variations to try. Storing and reheating methods ensure your leftovers stay fresh.
In conclusion, enjoy making these fun and tasty snacks. With practice, you’ll master a great meal that’s perfect for any occasion.