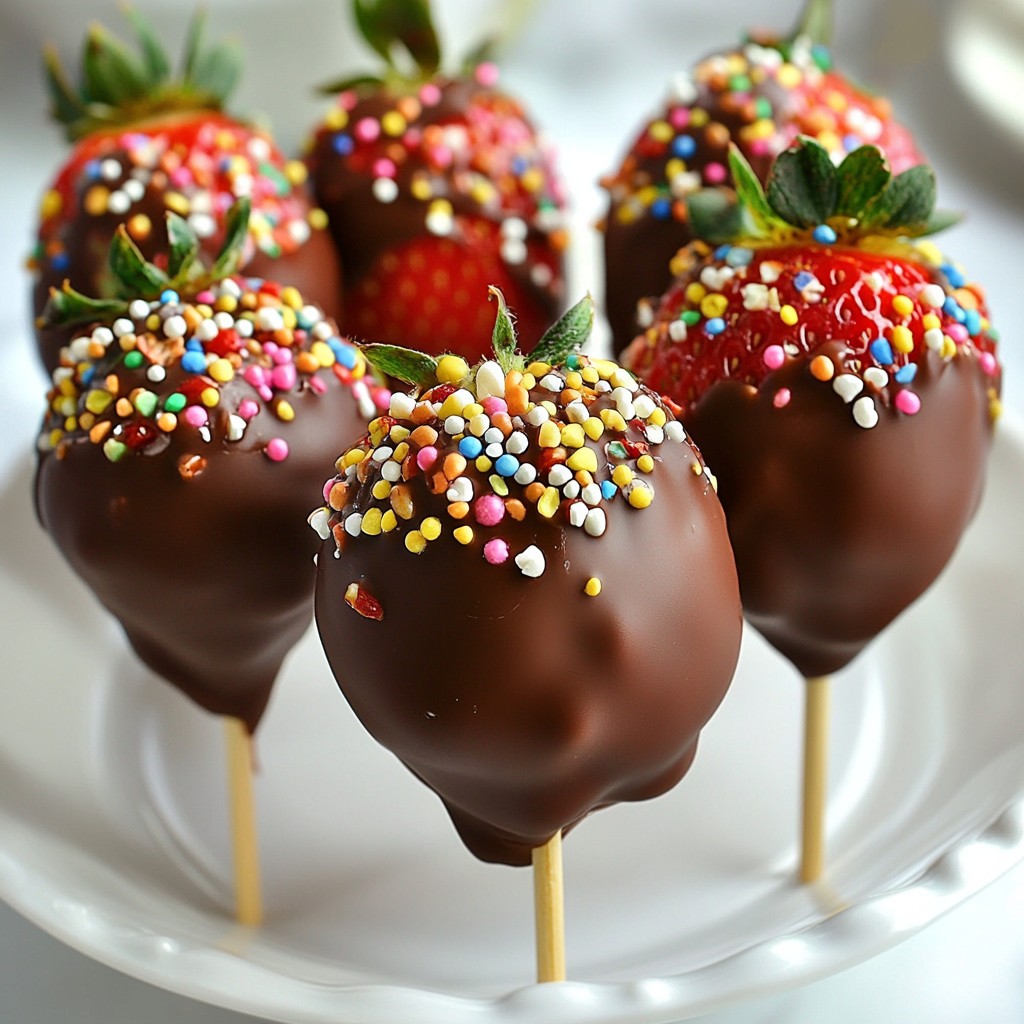
Looking for a sweet and easy treat? You’ll love making Chocolate Covered Strawberry Pops! This fun recipe will impress your friends and family, plus it only takes a few steps. You get the joy of fresh strawberries dipped in rich chocolate, with options to personalize your pops with toppings. Let’s dive into the ingredients and get started on this tasty adventure!
Why I Love This Recipe
- Simple to Make: This recipe requires minimal ingredients and just a few easy steps, making it perfect for anyone, even beginners in the kitchen.
- Customizable: You can easily customize these pops with your favorite toppings, whether it’s nuts, sprinkles, or even a drizzle of white chocolate.
- Perfect for Any Occasion: These chocolate-covered strawberry pops are ideal for parties, celebrations, or just a sweet treat at home.
- Deliciously Fresh: The combination of fresh strawberries and rich chocolate creates a delightful balance of flavors that everyone loves.
Ingredients
Fresh Strawberries
You need 1 pound of fresh strawberries. Make sure they are ripe and sweet. Rinse them well under cold water. Hull them carefully to remove the green tops. Dry them with a paper towel. This step helps the chocolate stick to the strawberries.
Chocolate and Coconut Oil
For the chocolate coating, use 1 cup of semi-sweet chocolate chips. This type of chocolate melts nicely and tastes great. You will also need 1 tablespoon of coconut oil. The oil helps the chocolate stay smooth and shiny when melted.
Optional Toppings
You can add fun toppings to your pops! Use 1/2 cup of crushed nuts like almonds or pistachios. They give a nice crunch. You can also use 1/2 cup of colorful sprinkles. These make your pops look festive and fun. Choose your favorite toppings to make them unique!

Step-by-Step Instructions
Preparing the Strawberries
Start by rinsing one pound of fresh strawberries under cold water. Make sure to clean each berry well. After rinsing, carefully dry them with a paper towel. This step is key! If the strawberries are wet, the chocolate won't stick. Take your time here to ensure they are completely moisture-free.
Inserting the Popsicle Sticks
Now it’s time to insert the popsicle sticks. Take each hulled strawberry and gently push a stick into the top. Insert the stick halfway through the berry. This creates a strong handle for dipping. Once done, set the strawberries aside on a plate or tray.
Melting the Chocolate
Next, let's melt the chocolate. In a microwave-safe bowl, combine one cup of semi-sweet chocolate chips with one tablespoon of coconut oil. The coconut oil helps the chocolate stay smooth. Microwave this mixture on medium power. Heat it for 30 seconds at a time. Be sure to stir after each interval. Keep going until the chocolate is fully melted and smooth. It should have no lumps. This process is simple but crucial for a great dip!
Tips & Tricks
Ensuring a Smooth Chocolate Coating
To get a smooth chocolate coating, use good chocolate chips. Mix in a little coconut oil. This helps the chocolate melt evenly. Microwave it slowly. Heat for 30 seconds, then stir. Repeat until the chocolate is smooth. Avoid overheating, as this can burn the chocolate.
Best Practices for Decorating
Get creative with your toppings! After dipping in chocolate, act fast. Roll the pops in nuts or sprinkle with colorful sprinkles. The chocolate sets quickly, so work fast. Use a mix of toppings to make your treats fun and fancy.
Serving Suggestions
These chocolate-covered strawberry pops look great on a platter. Arrange them in a glass or a fun container. They also make great gifts. Put them in a box for friends or family. For the best taste, serve them fresh. Store extras in the fridge for up to two days.
Pro Tips
- Choose the Right Strawberries: Look for ripe, firm strawberries that are deep red in color. They should also be free from blemishes for the best flavor and presentation.
- Use High-Quality Chocolate: For the best results, opt for high-quality semi-sweet chocolate chips. This will enhance the flavor and give a smooth finish to your chocolate coating.
- Customize Your Toppings: Experiment with different toppings such as crushed cookies, shredded coconut, or even drizzle with white chocolate for added flair and flavor.
- Store Properly: To maintain freshness, store the chocolate-covered strawberry pops in an airtight container in the refrigerator and consume within 2 days for optimal taste.
Variations
Different Chocolate Options
You can switch up the chocolate for different tastes. Try using white chocolate for a sweet twist. Dark chocolate offers a rich flavor and pairs well with berries. You can even use milk chocolate for a classic taste. Make sure you melt it just like the semi-sweet chocolate. The method stays the same, so no worries there!
Alternative Toppings
Toppings can make your strawberry pops even more fun. Crushed nuts add a nice crunch. You can use almonds, pistachios, or even walnuts. For a splash of color, sprinkle on some colorful sprinkles. Shredded coconut can also add a tropical flair. Get creative and mix different toppings for a tasty blend!
Seasonal Flavor Ideas
Change your flavors with the seasons. In spring, try adding lemon zest to the chocolate. It brightens the taste! For summer, use fresh mint leaves for a refreshing touch. In fall, a sprinkle of cinnamon can warm up the flavor. Winter calls for crushed peppermint candies for a festive treat. Each season brings new flavors to explore!
Storage Info
How to Store Chocolate Covered Strawberry Pops
Store your chocolate-covered strawberry pops in an airtight container. Use parchment paper to separate layers. This keeps them fresh and prevents sticking. Place the container in the refrigerator to maintain their coolness.
Best Practices for Freshness
To keep your pops fresh, avoid leaving them out in warm areas. If you make them ahead, chill them right after you dip them. This helps the chocolate set and stay firm. Check for any moisture in the container, as it can cause the chocolate to sweat.
Shelf Life Recommendations
These tasty treats last up to two days in the fridge. After that, the strawberries may lose their freshness. For the best flavor and texture, enjoy them within this time. If you see any signs of spoilage, it’s best to toss them out. Always trust your senses when it comes to food safety!
FAQs
How do I keep chocolate from melting on strawberries?
To stop chocolate from melting, dry the strawberries well. Water makes chocolate slide off. Use fresh berries that are cold. Cold berries help the chocolate set faster. You can also add a bit of coconut oil to the chocolate. This makes it thicker and helps it stay on better.
Can I use white chocolate instead of semi-sweet?
Yes, you can use white chocolate! It melts well and gives a sweet taste. Just follow the same steps to melt it. If you like, add a little vanilla extract to boost the flavor. White chocolate pairs nicely with colorful sprinkles too!
What other fruits can I use for pops?
You can use many fruits for pops. Try bananas, pineapple, or apple slices. These fruits are great for dipping in chocolate. Just remember to keep them fresh and dry. Experiment with your favorites for fun flavor combinations!
You learned how to make chocolate-covered strawberry pops today. We talked about fresh ingredients, step-by-step instructions, and helpful tips. Don't forget to explore variations and how to store your pops for later.
The fun part is trying new toppings and flavors. With the right methods, you'll impress everyone. Enjoy making and sharing these treats with friends and family. Happy cooking!