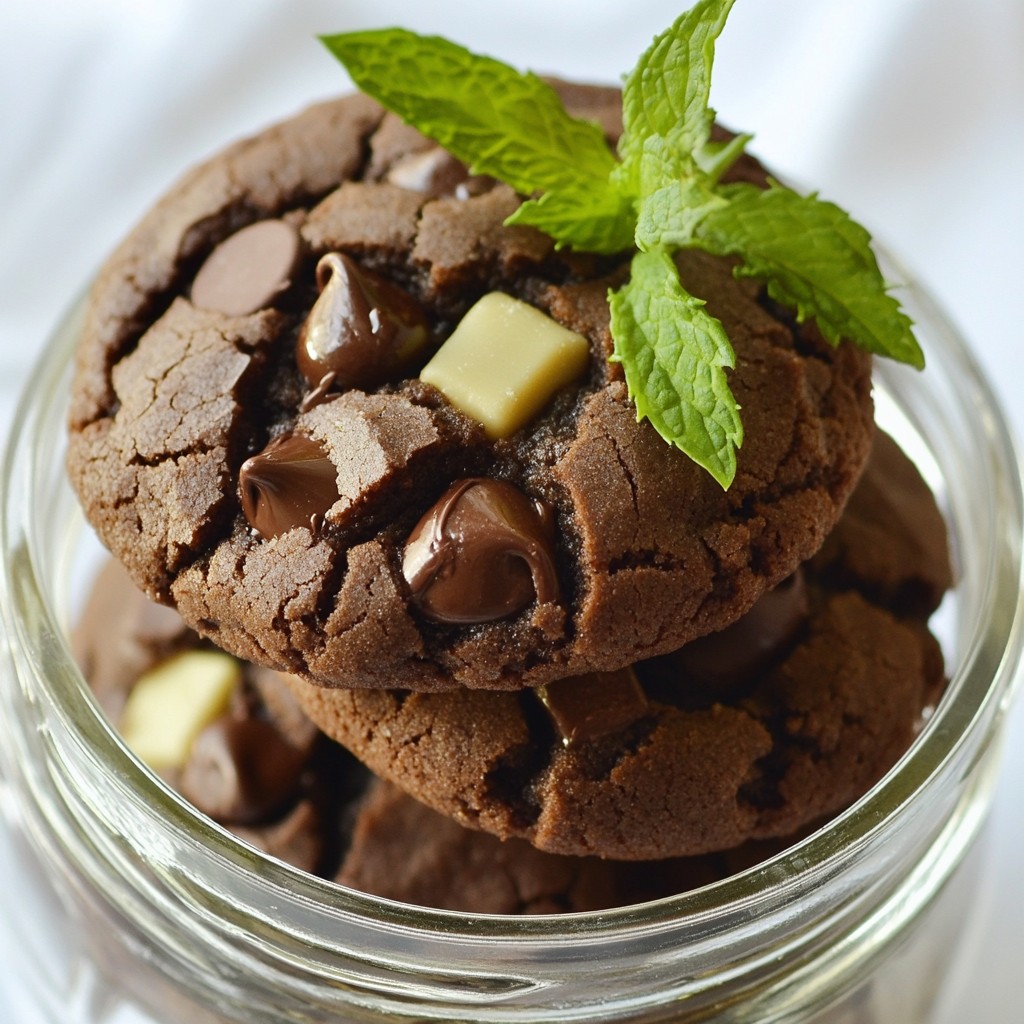
Looking for a sweet, minty treat? My simple and tasty chocolate mint cookies will hit the spot! Perfect for any occasion, these cookies are easy to make and sure to please. In this post, I’ll share all the steps, ingredients, and tips you need to create mouthwatering cookies that are big on flavor. Let’s dive into this delicious treat that you can whip up in no time!
Why I Love This Recipe
- Decadent Flavor: The combination of rich chocolate and refreshing mint creates a delightful balance that satisfies sweet cravings.
- Easy to Make: This recipe is straightforward and requires common ingredients, making it perfect for bakers of all skill levels.
- Perfect for Any Occasion: Whether it's a holiday gathering or a simple treat, these cookies are sure to impress guests and family alike.
- Customizable: Add your favorite mix-ins or adjust the mint flavor to suit your taste, making these cookies uniquely yours.
Ingredients
List of Essential Ingredients
To make these chocolate mint cookies, you will need:
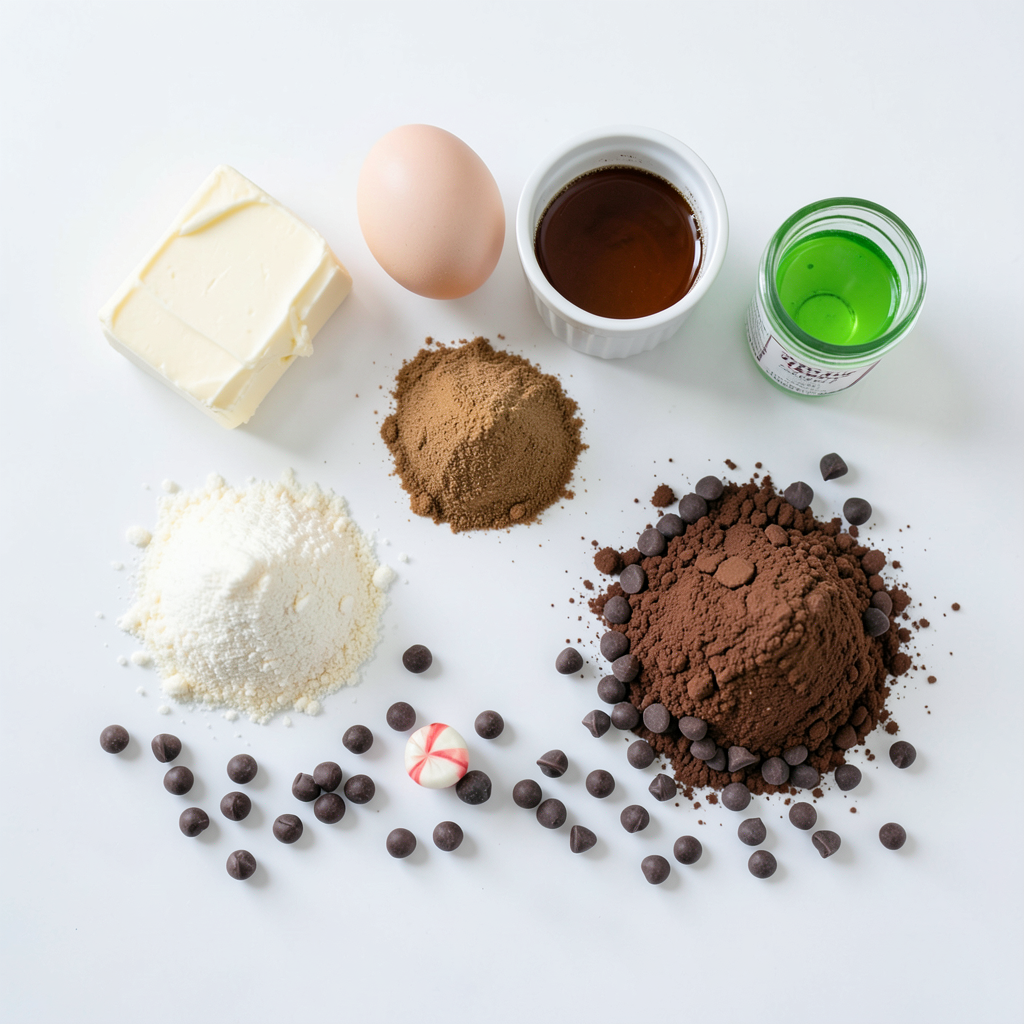
- 1 cup unsalted butter, softened
- 1 cup granulated sugar
- 1 cup packed brown sugar
- 2 large eggs
- 2 teaspoons vanilla extract
- 2 ¾ cups all-purpose flour
- ¾ cup unsweetened cocoa powder
- 1 teaspoon baking soda
- ½ teaspoon salt
- 1 cup semi-sweet or dark chocolate chips
- 1 teaspoon peppermint extract
These ingredients create a rich, minty flavor that everyone loves.
Optional Ingredients for Color and Flavor
You can enhance your cookies with:
- Green food coloring
- Extra chocolate chips for topping
Adding green food coloring makes the cookies look festive. The extra chocolate chips add a sweet touch.
Substitutions for Common Dietary Needs
If you have dietary needs, here are some substitutes:
- Use coconut oil instead of butter for a dairy-free option.
- Substitute gluten-free flour for all-purpose flour to make it gluten-free.
- Maple syrup can replace granulated sugar for a healthier sweetener.
These swaps help you enjoy the cookies no matter your diet.
Step-by-Step Instructions
Preparation Steps (Preheating Oven, Preparing Baking Sheets)
First, preheat your oven to 350°F (175°C). This step is key for even baking. While the oven heats, grab two baking sheets. Line them with parchment paper. This helps the cookies not stick and makes cleanup easy.
Mixing Wet Ingredients (Creaming Butter and Sugars)
In a large bowl, add 1 cup of softened butter. Then, mix in 1 cup of granulated sugar and 1 cup of packed brown sugar. Use an electric mixer on medium speed. Cream these together until it looks light and fluffy. This should take about 2-3 minutes. Next, add 2 large eggs, one at a time. Make sure each egg blends in well. Then, mix in 2 teaspoons of vanilla extract and 1 teaspoon of peppermint extract. If you want a minty green color, add a few drops of green food coloring and mix well.
Combining Dry Ingredients and Mixing Dough
In another bowl, whisk together 2 ¾ cups of all-purpose flour, ¾ cup of unsweetened cocoa powder, 1 teaspoon of baking soda, and ½ teaspoon of salt. This helps to mix the dry ingredients evenly. Slowly add this dry mix to the wet mixture. Use low speed on the mixer. Mix just until combined. Be careful not to overmix. It keeps the cookies tender. Finally, gently fold in 1 cup of semi-sweet or dark chocolate chips using a spatula.
Baking and Cooling Cookies
Using a cookie scoop or a tablespoon, drop rounded balls of dough onto your prepared baking sheets. Place them about 2 inches apart. For a nice touch, press a few extra chocolate chips on top of each dough ball. Now, bake in the preheated oven for 10-12 minutes. The edges should be set, but the centers can look a bit soft. They will firm up as they cool. After baking, let the cookies cool on the sheets for about 5 minutes. Then, move them to a wire rack to cool completely. This helps them keep their shape.
Tips & Tricks
Ensuring Perfect Cookie Texture
To get the best texture, mix the butter and sugars well. You want the mix to be light and fluffy. This process adds air, making your cookies soft. Avoid overmixing the dough after adding flour. Overmixing can lead to tough cookies. Bake them just until the edges set. They will continue to cook on the sheets while cooling.
Best Practices for Measuring Ingredients
Measuring ingredients accurately is key to good cookies. Use dry measuring cups for flour and cocoa powder. Level off with a knife for exact amounts. For sticky ingredients like butter, use a scale for precision. When using liquids, like eggs and extracts, use a measuring spoon or cup. This ensures your cookies turn out just right every time.
Decoration Ideas for Presentation
Presentation can make your cookies shine. Arrange them in a clear glass jar for a pretty display. Add a sprig of fresh mint on top for color. You can also sprinkle some extra chocolate chips on top for a rich look. For a festive touch, use green food coloring in the dough. This makes for a fun and tasty treat, perfect for any occasion.
Pro Tips
- Chill the Dough: For thicker cookies, refrigerate the dough for at least 30 minutes before baking. This helps the cookies maintain their shape and prevents spreading.
- Use Quality Chocolate: Opt for high-quality semi-sweet or dark chocolate chips for a richer flavor that complements the mint beautifully.
- Experiment with Extracts: Try mixing peppermint extract with other extracts like vanilla or almond to create unique flavor combinations.
- Storage Tips: Store cookies in an airtight container at room temperature for up to one week. Add a slice of bread to keep them soft longer.
Variations
Vegan Chocolate Mint Cookies
To make vegan chocolate mint cookies, swap the eggs for flaxseed meal. Mix 1 tablespoon of flaxseed meal with 2.5 tablespoons of water. Let it sit for about 5 minutes to thicken. Use coconut oil instead of butter. Replace regular chocolate chips with dairy-free ones. This way, you get delicious cookies without animal products.
Gluten-Free Chocolate Mint Cookies
For gluten-free cookies, use almond flour or gluten-free all-purpose flour instead of regular flour. Make sure your baking soda is gluten-free too. These cookies will still have a great texture and flavor. Add a bit of xanthan gum to help hold them together, if needed.
Unique Flavor Twists
You can add unique flavors to your chocolate mint cookies. Try mixing in chopped nuts like walnuts or pecans for a crunchy texture. You can also experiment with different extracts. Almond or orange extract can give your cookies a fun twist. If you want a spicier kick, consider adding a pinch of cayenne pepper. Each of these options can make your cookies special and exciting!
Storage Info
How to Store Cookies for Freshness
To keep your chocolate mint cookies fresh, store them in an airtight container. This helps prevent them from drying out. Place a piece of bread in the container to keep them soft. The cookies will absorb moisture from the bread.
Freezing Instructions for Longer Storage
If you want to save cookies for later, freezing is a great option. First, let the cookies cool completely. Then, place them in a single layer on a baking sheet. Freeze for about one hour. Once frozen, transfer them to a freezer bag. Be sure to remove as much air as possible. They can last up to three months in the freezer.
Best Containers for Cookie Storage
Choose containers that seal well to keep your cookies fresh. Glass jars with tight lids work great. You can also use plastic containers with snap-on lids. Avoid using paper bags, as they let air in and can make cookies stale. Store the cookies at room temperature, away from direct sunlight.
FAQs
How to Make Chocolate Mint Cookies from Scratch?
To make chocolate mint cookies from scratch, follow these steps:
1. Preheat your oven to 350°F (175°C).
2. Line two baking sheets with parchment paper.
3. Cream together 1 cup of softened unsalted butter, 1 cup of granulated sugar, and 1 cup of brown sugar until light and fluffy.
4. Add in 2 large eggs, 2 teaspoons of vanilla extract, and 1 teaspoon of peppermint extract.
5. Optional: Mix in green food coloring for a minty look.
6. In another bowl, whisk 2 ¾ cups of flour, ¾ cup of cocoa powder, 1 teaspoon of baking soda, and ½ teaspoon of salt.
7. Slowly add the dry mix to the wet mix.
8. Fold in 1 cup of chocolate chips.
9. Drop rounded dough balls onto the sheets and press more chocolate chips on top.
10. Bake for 10-12 minutes and cool on a wire rack.
Can I use different types of chocolate chips?
Yes, you can use different types of chocolate chips. Semi-sweet, dark, or even white chocolate chips work great. Each type adds a unique taste. If you love dark chocolate, go for dark chips. For a sweeter touch, use white chocolate. Mixing different types can create fun flavors too!
What is the best way to reheat leftover cookies?
The best way to reheat leftover cookies is to use the oven. Preheat the oven to 300°F (150°C). Place the cookies on a baking sheet. Heat them for about 5-10 minutes. This warms them up and keeps them soft. You can also use a microwave for a quick fix. Heat for about 10-15 seconds. Just don't overdo it!
Where can I buy the best chocolate mint cookies?
You can find great chocolate mint cookies at local bakeries or specialty shops. Many grocery stores also carry them in their bakery sections. If you prefer online shopping, check out popular baking websites or local delivery services. For homemade options, try my recipe!
You learned about making chocolate mint cookies from scratch. We covered the essential and optional ingredients, plus dietary swaps. You now know each step, from mixing to baking. I shared tips for great texture and decoration ideas. You also explored fun variations like vegan or gluten-free cookies. Proper storage helps keep cookies fresh longer.
Now, enjoy your baking journey! Your tasty cookies await, ready for sharing.