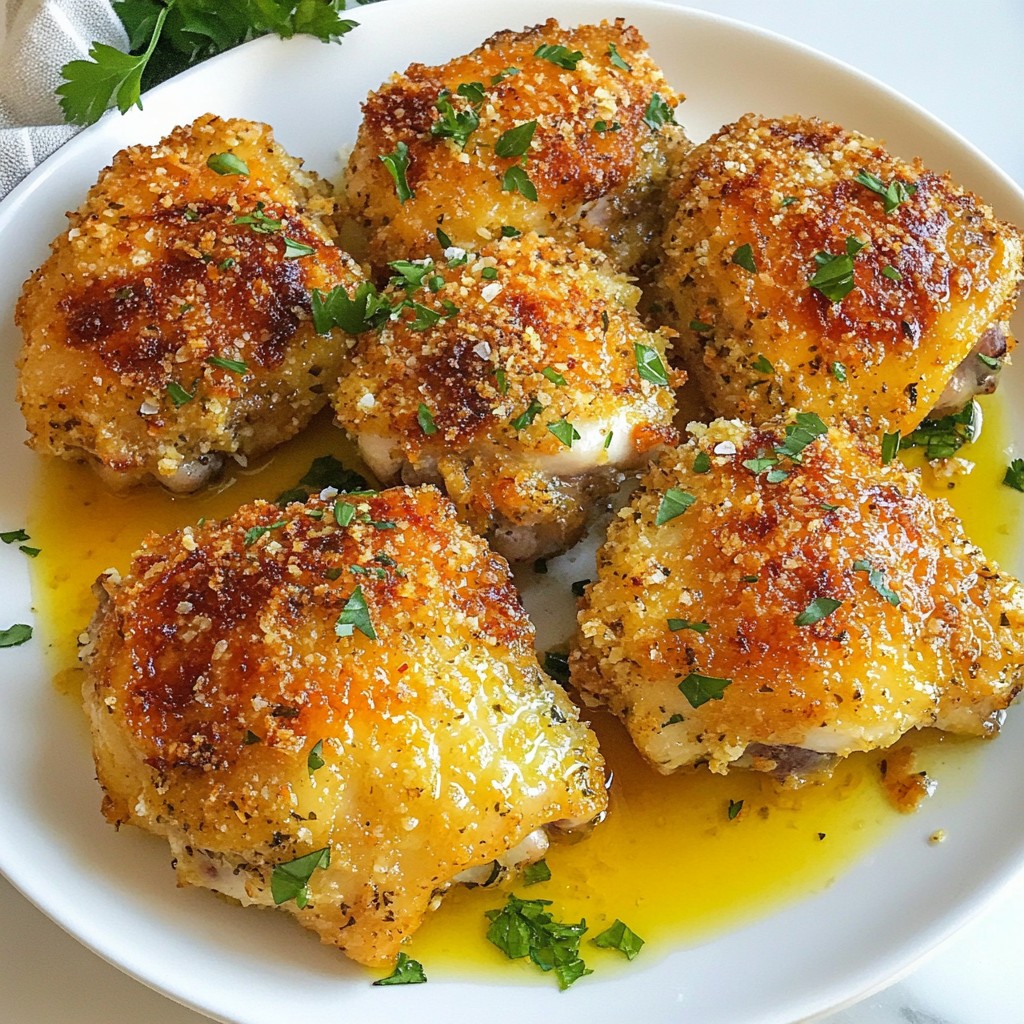
Are you ready for a quick and tasty meal? These Crispy 15-Minute Garlic Parmesan Chicken Thighs will wow your taste buds and impress your family. With juicy chicken thighs, a crunchy coating, and just the right seasonings, you'll want to make this dish again and again. Follow my simple steps, and soon you’ll have a delicious meal that's perfect for any night of the week. Let's get cooking!
Why I Love This Recipe
- Quick and Easy: This recipe comes together in just 15 minutes, making it perfect for busy weeknights.
- Super Crispy: The combination of panko breadcrumbs and Parmesan cheese creates an irresistibly crunchy coating.
- Flavor Packed: The garlic and Italian seasoning infuse the chicken with delicious, robust flavors in every bite.
- Versatile: These crispy chicken thighs are great on their own or can be served over salads, pasta, or rice for a complete meal.
Ingredients
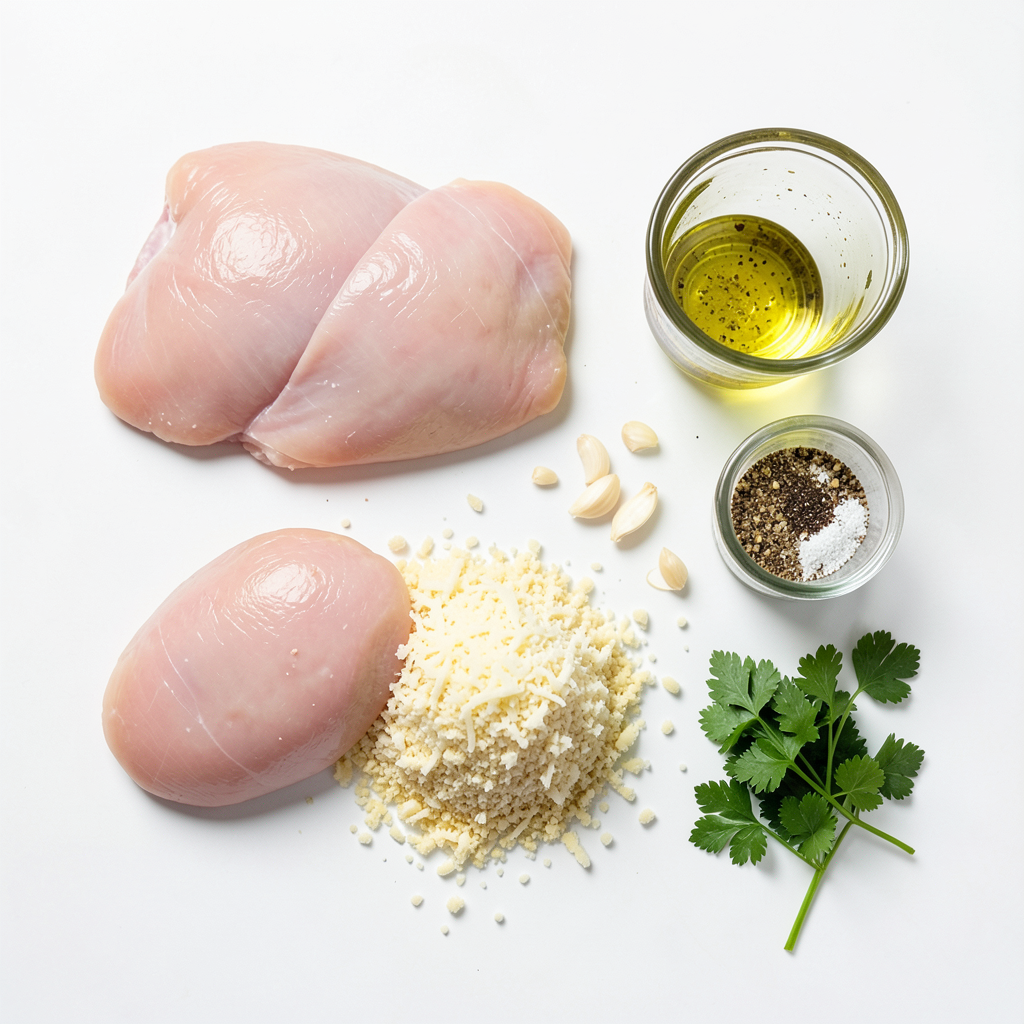
Main Ingredients
- 4 boneless, skinless chicken thighs
- 1/4 cup grated Parmesan cheese
- 1/4 cup panko breadcrumbs
Seasonings
- 3 cloves garlic, finely minced
- 2 tablespoons olive oil
- 1 teaspoon Italian seasoning
- 1/2 teaspoon salt
- 1/4 teaspoon freshly ground black pepper
Garnishing
- Fresh parsley, chopped
The main ingredients are simple but crucial. Boneless, skinless chicken thighs provide a juicy base. I love using grated Parmesan cheese for a rich, savory taste. Panko breadcrumbs add the perfect crunch. They help make the chicken crispy, which is a must for this dish.
For seasonings, minced garlic is the star. It brings a bold flavor that pairs perfectly with chicken. Olive oil helps to fry the chicken and gives a nice golden color. Italian seasoning adds depth, while salt and black pepper bring balance to all the flavors.
Finally, fresh parsley is not just for looks. It adds a pop of color and freshness that brightens the dish. This combination makes the Crispy 15-Minute Garlic Parmesan Chicken Thighs a delight for your taste buds. You can easily find these ingredients at your local store.
Step-by-Step Instructions
Preparing the Coating
First, grab a medium bowl. In it, mix together the grated Parmesan cheese, panko breadcrumbs, minced garlic, Italian seasoning, salt, and black pepper. Make sure to stir well. You want every bite to have flavor.
Preheating the Skillet
Next, place a large skillet on the stove over medium-high heat. Pour in the olive oil and let it heat up until it shimmers. This step is key. A hot skillet ensures that your chicken gets crispy.
Coating the Chicken
Now, take your chicken thighs and pat them dry with paper towels. This helps remove extra moisture. A dry chicken thigh will crisp up better. Coat each thigh generously with the breadcrumb mixture. Press down firmly. You want the coating to stick well.
Cooking the Chicken
Carefully place the coated chicken thighs into the hot skillet. Let them cook without moving for about 5-6 minutes. Look for a golden brown color. Once the first side looks great, flip each thigh gently using tongs. Cook for another 5-6 minutes. The chicken should reach an internal temperature of 165°F (75°C).
Final Touches
After cooking, remove the chicken from the skillet. Let it rest on a plate for a minute. This helps keep the juices inside. Finally, garnish with freshly chopped parsley. It adds color and freshness to your dish. Serve and enjoy your crispy chicken thighs!
Tips & Tricks
Achieving the Crispiest Chicken
To get the crispiest chicken, start by drying the chicken thighs. Moisture keeps the skin from becoming crunchy. Use paper towels to pat them dry.
Next, when you coat the chicken, press the breadcrumb mixture on firmly. This helps it stick better and makes the crust thicker. You want every bite to be bursting with flavor.
Cooking Techniques
When frying, choose a heavy skillet. A cast-iron or non-stick skillet works great. They heat evenly, helping the chicken cook perfectly.
If you use thicker chicken thighs, adjust the cooking time. They may need a few extra minutes to ensure they cook through. Always check that the internal temperature is 165°F for safe eating.
Serving Suggestions
For a complete meal, pair your chicken thighs with sides like a fresh salad or roasted vegetables. You can also serve them with rice or mashed potatoes for a filling dish. Add some extra Parmesan on top for a tasty finish. Enjoy your meal!
Pro Tips
- Pat the Chicken Dry: Ensure the chicken thighs are completely dry before coating. This helps the breadcrumb mixture adhere better and results in a crispier finish.
- Don't Overcrowd the Pan: Cook the chicken thighs in batches if necessary. Overcrowding can lower the skillet's temperature, preventing that beautiful golden crust from forming.
- Use Fresh Garlic: Freshly minced garlic provides a stronger and more aromatic flavor compared to pre-minced or powdered garlic. It enhances the overall taste of the dish.
- Let it Rest: Allow the chicken to rest for a few minutes after cooking. This helps the juices redistribute for a more tender and flavorful bite.
Variations
Flavor Boosters
You can easily change the flavor of your crispy chicken. Adding spices and herbs to the breadcrumb mix gives it a fun twist. Try adding paprika for a smoky taste or cayenne pepper for heat. Fresh herbs like thyme or rosemary can also add a fresh touch. Experiment with what you like!
Alternative Protein Options
If you want to switch things up, use chicken breasts or thighs with skin. Skin-on chicken gives more flavor and crispiness. Just adjust the cooking time, as thicker cuts may need longer. Enjoy the juicy results!
Gluten-Free Options
If you need a gluten-free meal, don’t worry! You can substitute gluten-free breadcrumbs for panko. The texture remains crispy and delicious. Check labels to find a brand that works for you. Your chicken will still taste amazing!
Storage Info
Short-Term Storage
To store leftovers, let the chicken cool first. Place them in an airtight container. Make sure to seal it tightly. You can keep the chicken thighs in the refrigerator for up to three days. This keeps them fresh and tasty.
Reheating Instructions
The best way to reheat chicken thighs is in the oven. Preheat your oven to 350°F (175°C). Place the chicken thighs on a baking sheet. Heat for about 10 to 15 minutes. This method helps keep them crispy. You can also use a microwave, but it may not keep the crispiness.
Freezing Guidelines
If you want to freeze the chicken, wait until it's completely cool. Wrap each thigh tightly in plastic wrap. Then, place them in a freezer bag. You can keep them in the freezer for up to three months. To thaw, place them in the fridge overnight before reheating. This way, you can enjoy your crispy chicken anytime!
FAQs
How long can I store leftover crispy chicken thighs?
You can store leftover crispy chicken thighs in the fridge for up to three days. Keep them in an airtight container. This helps to keep them fresh and tasty. If you want to keep them longer, consider freezing them. They can stay good in the freezer for up to three months.
Can I make the coating ahead of time?
Yes, you can prepare the coating ahead of time. Mix the Parmesan cheese, panko, garlic, and seasonings in a bowl. Store this mix in an airtight container. Just make sure to use it within a week for the best flavor and texture.
What can I serve with crispy garlic parmesan chicken thighs?
Crispy garlic parmesan chicken thighs pair well with many sides. You can serve them with a simple salad, roasted vegetables, or mashed potatoes. They also go great with rice or pasta. Adding a light sauce can enhance the meal too.
How do I know when the chicken is fully cooked?
To check if the chicken is fully cooked, use a meat thermometer. The internal temperature should reach 165°F (75°C). If you don’t have a thermometer, cut into the thickest part of the chicken. The meat should be white, not pink.
Can I use regular breadcrumbs instead of panko?
Yes, you can use regular breadcrumbs instead of panko. However, panko gives a crispier texture. If you use regular breadcrumbs, you might not get the same crunch. For the best results, try to stick with panko for this recipe.
Crispy garlic Parmesan chicken thighs are simple and delicious. We covered the key ingredients, including chicken, cheese, and seasonings. You learned how to prepare, cook, and garnish your dish. I shared tips for getting that perfect crisp and ideas for serving.
With these steps, you'll impress anyone at your table. Enjoy your cooking and the tasty results!