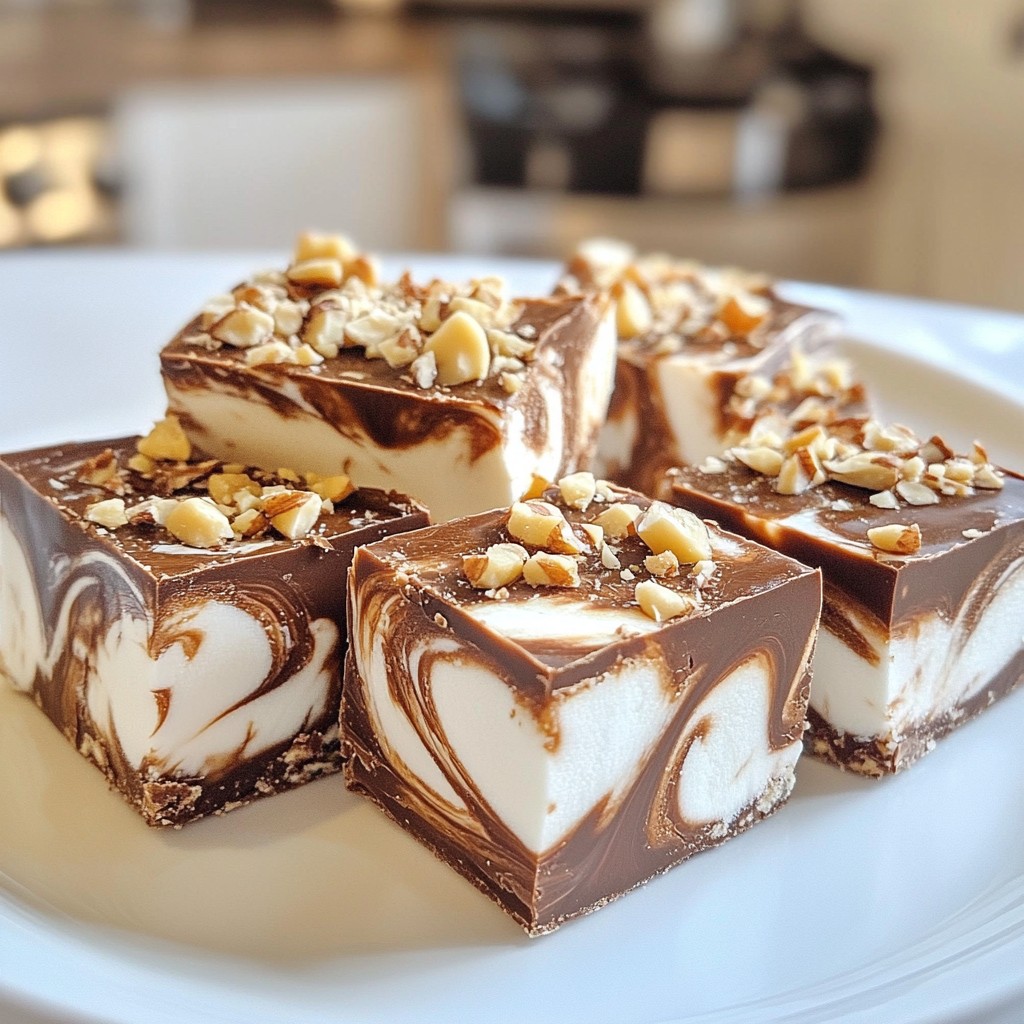
Are you ready to indulge in a sweet treat that’s both easy and delicious? This Marshmallow Swirl Fudge recipe combines rich chocolate with fluffy marshmallow in a fun, marbled delight. With simple ingredients and quick steps, you can whip up this decadent dessert in no time. Let’s dive into the details, so you can impress your family and friends with this tasty treat!
Why I Love This Recipe
- Decadent Flavor: This fudge combines the rich taste of chocolate with the lightness of marshmallow, creating a delightful treat for any chocolate lover.
- Easy to Make: With minimal ingredients and straightforward steps, this recipe is perfect for both novice and experienced bakers looking for a quick sweet fix.
- Customizable: Feel free to add your favorite nuts or even some colorful sprinkles for a festive touch, making each batch uniquely yours.
- Great for Sharing: Cut into squares, this fudge is perfect for parties, gifts, or just to enjoy with family and friends, spreading joy with every bite.
Ingredients
List of Main Ingredients
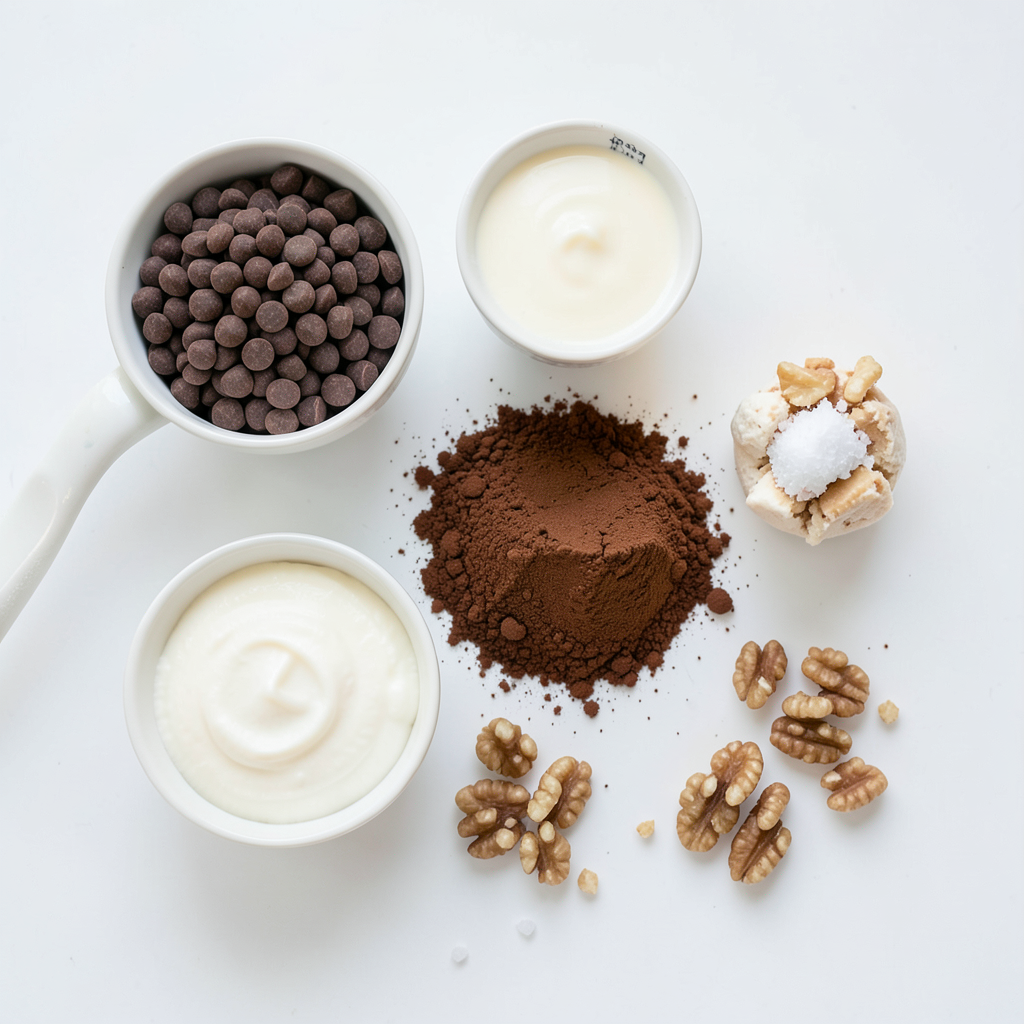
- 2 cups semi-sweet chocolate chips
- 1 cup sweetened condensed milk
- 1/2 cup unsweetened cocoa powder
- 1 teaspoon vanilla extract
- 1 cup marshmallow fluff
- 1/2 cup chopped nuts (walnuts or pecans, optional)
- 1/2 teaspoon sea salt
When making marshmallow swirl fudge, these ingredients are key. The semi-sweet chocolate chips give a rich flavor. The sweetened condensed milk adds creaminess. Cocoa powder enhances the chocolate taste. Vanilla extract brings warmth and depth. Marshmallow fluff creates that fun swirl. You can add chopped nuts for crunch, but it's optional. A hint of sea salt balances the sweetness.
Suggested Tools and Equipment
- Medium saucepan
- Wooden spoon or spatula
- 8x8 inch baking dish
- Parchment paper
- Cooking spray
Having the right tools makes this recipe fun. A medium saucepan helps melt the chocolate smoothly. A wooden spoon or spatula is perfect for mixing. You’ll need an 8x8 inch baking dish to set the fudge. Lining it with parchment paper ensures easy removal. A light spray of cooking spray keeps it from sticking. These tools make the process simple and enjoyable!
Step-by-Step Instructions
Prepare Your Pan
Start by lining an 8x8 inch baking dish with parchment paper. Let some paper hang over the edges. This makes it easy to lift the fudge out later. Lightly grease the lined parchment with cooking spray. This step keeps the fudge from sticking.
Melting the Chocolate
In a medium saucepan, combine 2 cups of semi-sweet chocolate chips and 1 cup of sweetened condensed milk. Set the heat to low. Stir the mix with a wooden spoon or spatula. Keep stirring until the chocolate chips melt fully. This helps avoid scorching. The mixture should become rich and smooth.
Mixing the Ingredients
Once the chocolate is melted, take the pan off the heat. Sift in 1/2 cup of unsweetened cocoa powder. This helps avoid clumps. Then, add 1/2 teaspoon of sea salt. Stir well to mix everything. Now add 1 teaspoon of vanilla extract and mix it in. This gives the fudge a lovely flavor.
Creating the Marshmallow Swirl
Gently fold in 1 cup of marshmallow fluff into the chocolate mix. Use a spatula to fold carefully. Avoid overmixing; you want to see ribbons of marshmallow. This creates a beautiful marbled effect in your fudge.
Optional Add-ins
If you want a crunch, add 1/2 cup of chopped nuts, like walnuts or pecans. Fold them into the mixture now. Make sure they are evenly spread out for the best taste.
Finalizing and Setting the Fudge
Carefully pour the fudge mixture into your prepared baking dish. Use a spatula to spread it out evenly. Smooth the top to make it look nice. Refrigerate the fudge for at least 2 hours. This helps it firm up. Once set, lift the fudge out using the parchment overhang. Place it on a cutting board and cut into squares.
Tips & Tricks
Ensuring a Perfect Texture
To melt chocolate well, use low heat. This slow method keeps the chocolate smooth. Stir often with a wooden spoon. This prevents scorching. You want a rich and shiny mixture.
When you add the marshmallow fluff, fold it gently. Use a spatula to mix, but don’t overdo it. You want to see ribbons of fluff in your fudge. This swirl looks beautiful and tastes amazing.
Serving Suggestions
For a lovely presentation, cut the fudge into neat squares. Place them on a colorful platter. Drizzle some melted chocolate on top for flair. A sprinkle of chopped nuts adds a nice crunch. This makes your dessert stand out.
Pair your fudge with a glass of cold milk or hot coffee. The chocolate flavor matches well with these drinks. You can also serve it with vanilla ice cream for a fun treat.
Common Mistakes to Avoid
One common mistake is overheating the chocolate. If it gets too hot, it can seize up. Keep the heat low and stay attentive.
Another mistake is overmixing the marshmallow fluff. This can make the fudge too dense. Aim for a marbled look instead of a uniform color. This gives you the best texture and taste.
Pro Tips
- Use Quality Chocolate: Opt for high-quality semi-sweet chocolate chips for a richer flavor and smoother texture in your fudge.
- Chill Properly: Allow the fudge to chill for the full recommended time to ensure it sets properly and achieves the ideal texture.
- Experiment with Flavors: Feel free to add a dash of peppermint extract or espresso powder for a unique twist on the classic fudge flavor.
- Storage Tips: Store leftover fudge in an airtight container in the refrigerator for up to two weeks for optimal freshness.
Variations
Flavor Variations
You can easily change the flavor of your fudge. Try adding different extracts. Almond or mint extract can create a fun twist. Just add a teaspoon of your chosen extract while mixing the main ingredients.
You can also use flavored chocolate. Dark or white chocolate can give your fudge a new taste. Swap out semi-sweet chocolate chips for your favorite flavor. This simple change makes your fudge unique.
Dietary Modifications
If you need gluten-free options, you’re in luck! All the main ingredients are naturally gluten-free. Just check that your chocolate chips are labeled gluten-free.
For vegan substitutes, use coconut milk instead of sweetened condensed milk. You can find vegan chocolate chips too. This way, everyone can enjoy your delicious fudge.
Seasonal Twists
Seasonal themes can make your fudge even more fun. For the holidays, add peppermint extract or festive sprinkles. This will turn your fudge into a perfect treat for any celebration.
In summer, try adding fruit or nuts to the mix. Chopped strawberries or crushed nuts can add a fresh taste. These fun twists keep your fudge exciting all year round!
Storage Info
Best Practices for Storing Fudge
To keep your marshmallow swirl fudge fresh, store it in an airtight container. This helps stop air from drying it out. Place the container in a cool, dark spot. Ideal storage temperature is around 65 to 70 degrees Fahrenheit. Keep it away from direct sunlight and humidity, as these can change the texture.
Shelf Life
At room temperature, fudge can last about 1 to 2 weeks. If you put it in the fridge, it can last up to 3 weeks. Refrigeration slows down spoilage. Just remember to wrap it tightly to avoid moisture. If you notice any changes in smell or texture, it’s best to toss it out.
Freezing Options
You can freeze your marshmallow swirl fudge for longer storage. Cut it into squares first. Wrap each piece in plastic wrap, then place them in a freezer bag. This prevents freezer burn. To thaw, place the fudge in the fridge overnight. This keeps it soft and tasty. Avoid using the microwave, as it may change the texture. Enjoy your fudge even after weeks of freezing!
FAQs
What is marshmallow fluff made of?
Marshmallow fluff is a sweet, sticky spread. It has simple ingredients: sugar, water, corn syrup, and egg whites. These combine to create a light, airy texture. The fluff is smooth and easy to mix into recipes. It adds a sweet touch to desserts. You can find it in jars at most stores.
Can I use marshmallows instead of marshmallow fluff?
Yes, you can use marshmallows! Just remember, there are pros and cons. Whole marshmallows need to melt down. This can change the texture of your fudge. If you want a smooth mix, fluff is best. But if you like a chewy bit, marshmallows add fun! Chop them small before mixing in for better results.
How do I fix grainy fudge?
Grainy fudge can happen if sugar does not dissolve fully. To fix it, you can gently reheat the fudge. Stir it slowly while heating until smooth. If it is still grainy, try adding a bit of milk. Heat and stir until it blends well. This should help to save your fudge!
Is marshmallow swirl fudge safe to make ahead?
Yes, you can make fudge ahead of time! It stays fresh when stored properly. After it cools, cut it into squares. Place the pieces in an airtight container. Keep it in the fridge for up to two weeks. This way, you can enjoy your fudge later without losing flavor.
How do I add toppings to fudge?
Adding toppings is easy and fun! You can sprinkle nuts, like walnuts or pecans, on top. This adds crunch and flavor. Another great idea is to drizzle melted chocolate over the fudge. For a colorful touch, use sprinkles or crushed candy. Add toppings before chilling to set them in place. Enjoy customizing your fudge!
This blog post shows you how to make delicious marshmallow swirl fudge. We covered key ingredients like chocolate chips and marshmallow fluff, as well as tools needed, such as a saucepan and baking dish. Follow the steps to melt, mix, and swirl your way to fudge perfection. I shared tips for texture and avoiding common mistakes. You can also explore fun variations and storage tips. Now, it’s time to enjoy your sweet creation. Get ready to impress friends and family with your tasty fudge!