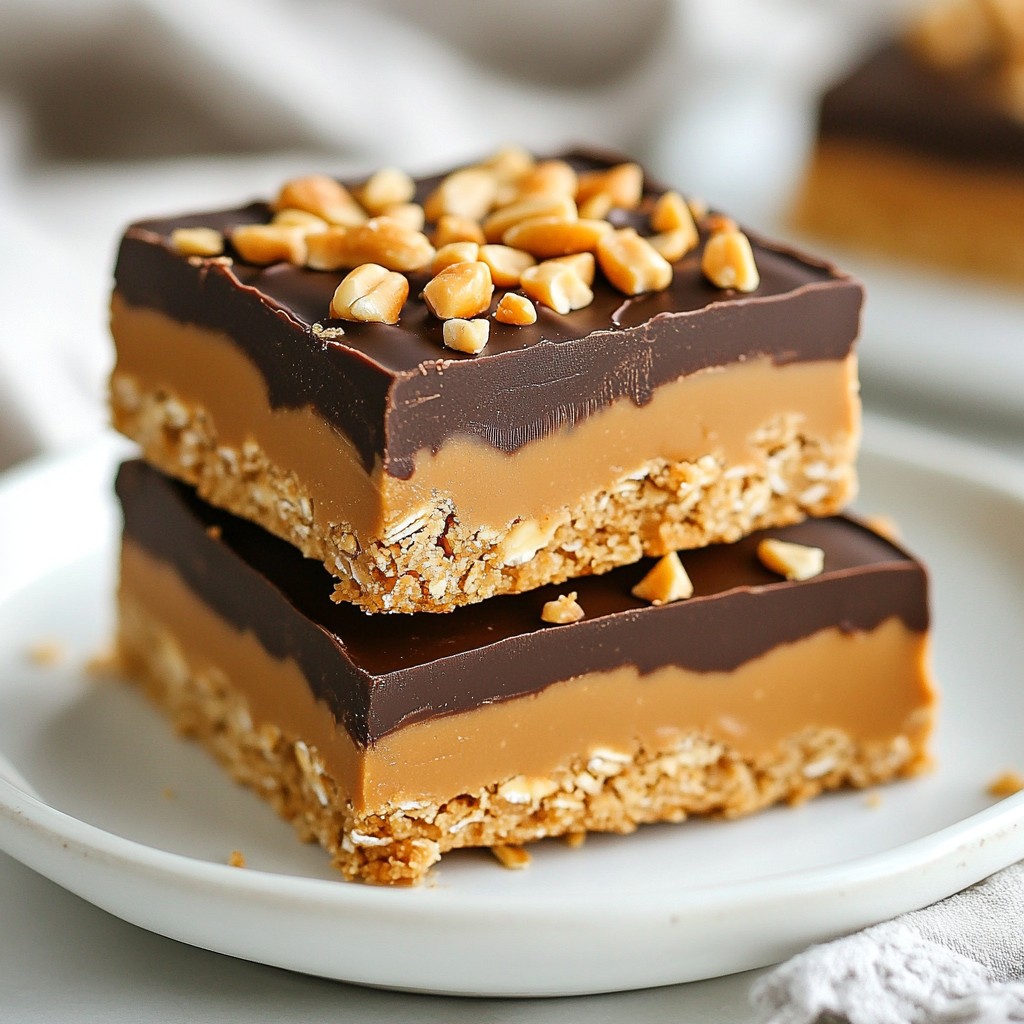
If you love simple, tasty treats, you’ll adore these No-Bake Peanut Butter Bars! They’re quick to make and require no oven at all. With just a few ingredients, you can create a delicious snack that satisfies your sweet tooth. Whether you want a quick dessert or a tasty energy boost, these bars are perfect. Let’s dive into how to whip up this easy recipe!
Error: Connection error.
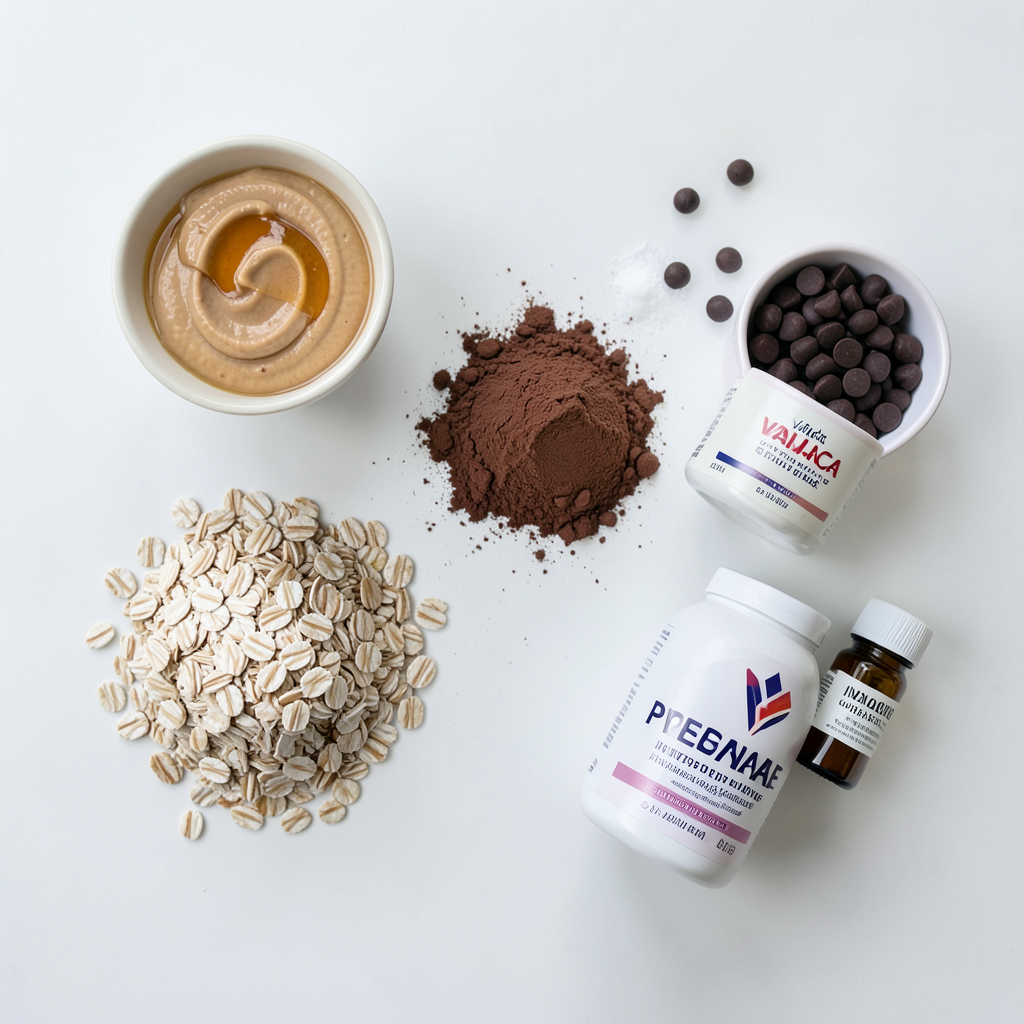
Ingredients
Primary Ingredients for No-Bake Peanut Butter Bars
To make these tasty bars, gather these core items:
- 1 cup creamy peanut butter
- 1/2 cup honey or maple syrup
- 1 cup rolled oats
- 1/2 cup unsweetened cocoa powder
- 1/4 cup coconut oil, melted
- 1/4 teaspoon salt
- 1/2 teaspoon vanilla extract
- 1/3 cup dark chocolate chips (for a dreamy topping)
These ingredients form the base of your bars. The peanut butter gives a creamy texture, while honey or syrup adds sweetness. The cocoa powder gives rich chocolate flavor, and oats provide a hearty bite. Coconut oil helps bind everything together.
Optional Ingredients for Enhanced Flavor
For a little extra kick, consider adding:
- 1/2 cup vanilla protein powder (for a protein boost)
This optional ingredient can help you feel full longer. It also adds a creamy texture that blends well with the bars. You can skip it if you prefer a simpler taste.
Key Substitutions for Dietary Preferences
You can easily adjust this recipe to fit different diets. Here are some swaps:
- For a vegan version, use maple syrup and substitute coconut oil with almond or olive oil.
- Use gluten-free oats if you need a gluten-free option.
- Swap peanut butter for almond or sunflower seed butter for nut-free bars.
These substitutions keep the bars delicious while catering to your dietary needs. Enjoy making this no-bake treat your own!
Step-by-Step Instructions
Mixing the Peanut Butter Base
Start by grabbing a large mixing bowl. Add 1 cup of creamy peanut butter and 1/2 cup of honey or maple syrup. Use a spatula to mix them well. Keep stirring until the blend is smooth. This step is key for the best flavor. Next, slowly add 1 cup of rolled oats, 1/2 cup of cocoa powder, and 1/4 cup of melted coconut oil. If you want extra protein, add 1/2 cup of vanilla protein powder. Don't forget 1/4 teaspoon of salt and 1/2 teaspoon of vanilla extract. Mix everything until it becomes thick and sticky.
Preparing the Baking Pan
Now, let's prepare the baking pan. Take an 8x8 inch pan and line it with parchment paper. Make sure to leave some paper hanging over the sides. This will help you lift the bars out easily later. A well-prepared pan makes a big difference!
Adding the Chocolate Topping
For the chocolate topping, grab a microwave-safe bowl. Put in 1/3 cup of dark chocolate chips. Heat them in the microwave for 20 seconds. Stir them after each round. Be careful not to overheat. Once smooth, drizzle the chocolate over the peanut butter mix. Use a spatula to spread it evenly. This topping adds a sweet finish.
Chilling and Cutting the Bars
Now, place the pan in the refrigerator. Chill the bars for at least 2 hours. This makes them firm and easy to cut. Once set, lift them out using the parchment paper. Move the bars to a cutting board. Cut them into squares or rectangles as you like. Enjoy your delicious no-bake peanut butter bars!
Tips & Tricks
Ensuring Perfect Consistency
To get the best texture, mix the peanut butter and honey well. The thicker the mix, the better the bars will hold together. When adding oats and cocoa, stir gently but firmly. Make sure everything combines fully. Press the mixture tightly into the pan. This step helps keep the bars from crumbling later. If the mix feels too dry, add a bit more honey or coconut oil.
Storing the Bars for Freshness
Keep your bars in an airtight container. You can store them in the fridge for up to a week. If you want them to last longer, freeze them. Just wrap each bar in plastic wrap or foil. This way, they stay fresh for up to three months. When you want to enjoy one, let it thaw for a few minutes before eating.
Enhancing Flavor Profiles
Want to boost flavor? Try adding a pinch of cinnamon or nutmeg. You can also swap the dark chocolate for white chocolate or even caramel drizzle. For a nutty crunch, fold in chopped nuts or seeds. Another fun idea is to mix in dried fruit like cranberries or raisins. These little changes can make your no-bake bars even more exciting!
Error: Connection error.
Variations
Gluten-Free Options
You can easily make these no-bake peanut butter bars gluten-free. Simply use gluten-free rolled oats. Check the label on your oats to ensure they are certified gluten-free. This small swap keeps the bars tasty and safe for those with gluten sensitivities.
Vegan Alternatives
To make these bars vegan, substitute honey with maple syrup. Both options sweeten the bars well. You should also choose dairy-free chocolate chips for the topping. This way, you can enjoy a delicious treat that fits your plant-based diet.
Additional Flavor Add-Ins
Want to spice things up? You can add fun flavors to the base. Consider mixing in:
- 1/2 cup of shredded coconut for texture
- 1/4 cup of chopped nuts for crunch
- 1/4 cup of dried fruit for natural sweetness
These add-ins make the bars even more delightful. Don't hesitate to experiment with different combinations to find your favorite!
Storage Info
Best Practices for Storage
To keep your no-bake peanut butter bars fresh, store them in an airtight container. This helps maintain their taste and texture. Place a piece of parchment paper between layers of bars, so they don't stick. Store them in the fridge for up to one week.
Freezing for Longer Shelf Life
If you want to keep these bars longer, freezing is a great option. Wrap each bar in plastic wrap and place them in a freezer-safe bag. They can last up to three months in the freezer. Make sure to label the bag with the date for easy tracking.
How to Revive Frozen Bars
When you're ready to enjoy your frozen bars, take them out of the freezer. Let them sit at room temperature for about 10-15 minutes. This softens them and brings back their delicious texture. Enjoy them as a quick snack, and you'll love the taste just as much as fresh!
FAQs
Can I use alternative sweeteners for this recipe?
Yes, you can use alternative sweeteners. Agave syrup or stevia work well. They will add sweetness without using honey or maple syrup. Adjust the amount to taste for the best results.
How long do no-bake peanut butter bars last?
No-bake peanut butter bars can last about one week in the fridge. Store them in an airtight container to keep them fresh. If you want them to last longer, you can freeze them for up to three months.
What can I substitute for coconut oil?
You can replace coconut oil with unsalted butter or any neutral oil. These substitutes keep the texture smooth and creamy. Just melt the butter or oil before mixing it in.
Is it possible to make these bars without protein powder?
Yes, you can make these bars without protein powder. They will still taste great and hold together nicely. You can add more oats or nut flour for extra texture.
How to serve no-bake peanut butter bars for a party?
Serve the bars on a nice platter. Cut them into small squares or rectangles for easy eating. You can add a sprinkle of crushed peanuts or a drizzle of chocolate on top for a pretty touch.
No-bake peanut butter bars are easy and fun to make. We covered the key ingredients and shared step-by-step instructions. You learned how to mix, chill, and serve your bars. Tips on storage and variations help you fit this treat to your needs.
Keep this recipe handy for quick snacks or dessert. With a few tweaks, you can adapt it for any occasion. Enjoy your bars and feel proud of your tasty work!