Looking for a sweet treat that’s easy and delicious? You’ve found it! These No Bake Peanut Butter Cheesecake Balls are a joy to make and even better to eat. With simple ingredients, you can whip up a delightful dessert in no time. Get ready to impress your friends and family with these creamy, chocolate-covered bites. Let’s dive in and see how easy it is to create this tasty snack!
Why I Love This Recipe
- Easy to Make: This no-bake recipe requires minimal effort and time, making it perfect for quick desserts.
- Delicious Flavor: The combination of creamy peanut butter and rich chocolate creates a delightful taste that everyone loves.
- Customizable: You can easily adjust ingredients, like using different nut butters or chocolates, to suit your preferences.
- Perfect for Any Occasion: Whether it's a party, holiday, or just a sweet treat for yourself, these cheesecake balls are always a hit!
Ingredients
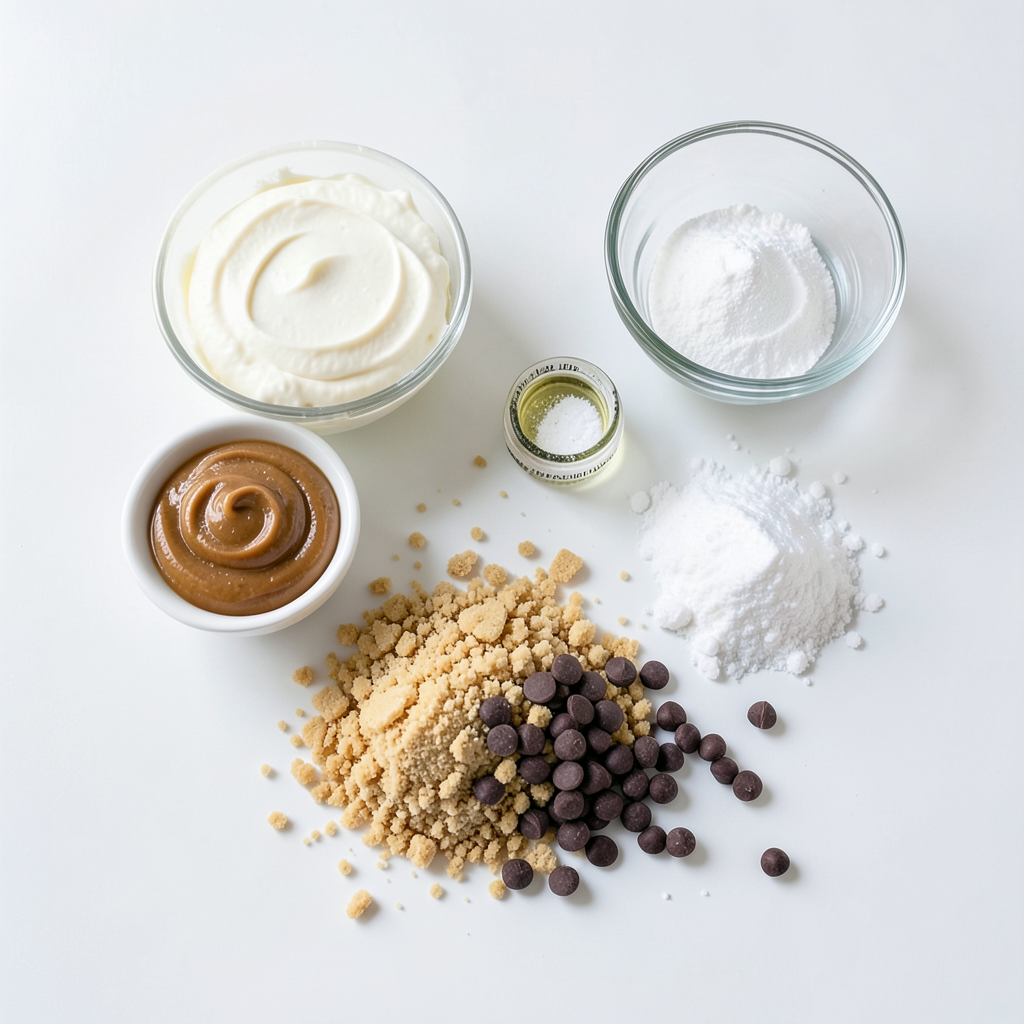
Required Ingredients
- 1 cup cream cheese
- 1/2 cup peanut butter
- 1/3 cup powdered sugar
- 1 teaspoon pure vanilla extract
- 1 cup graham cracker crumbs
- 1/2 cup semisweet chocolate chips
- Pinch of salt
The key to a great no-bake dessert lies in its ingredients. Each one plays a role in flavor and texture.
First, I use cream cheese for that rich, creamy base. It gives the cheesecake its smooth texture. Next, I add peanut butter. You can pick smooth or chunky based on your taste. The powdered sugar adds sweetness, balancing the creaminess. A touch of vanilla extract enhances the overall flavor.
The graham cracker crumbs form the crust-like element. They bring a nice crunch and a hint of sweetness. Lastly, I use chocolate chips to coat the balls. This adds a delicious outer layer that makes each bite even better. The pinch of salt rounds everything out, bringing out all the flavors.
Suggested Equipment
- Mixing bowl
- Hand mixer or spatula
- Cookie scoop
- Parchment paper
- Microwave-safe bowl
When making these delightful treats, having the right tools is important. A mixing bowl helps you blend all the ingredients. A hand mixer or spatula makes mixing easy.
Use a cookie scoop for even balls, so they look nice. Parchment paper is great for lining your tray. It helps with easy removal later. Lastly, a microwave-safe bowl is needed to melt the chocolate.
Gathering these ingredients and tools will set you up for success. You’ll be ready to create a fun and tasty treat that everyone will love!
Step-by-Step Instructions
Mixing the Base
In a big mixing bowl, blend together the cream cheese, peanut butter, powdered sugar, and vanilla extract. Use a hand mixer or a spatula to mix well. You want to achieve a smooth and creamy consistency. This step is key for a rich flavor.
Incorporating Dry Ingredients
Next, gradually fold in the graham cracker crumbs and a pinch of salt. Be gentle and avoid over mixing. This keeps the mixture fluffy and light. Mixing too much can make it dense, and we want a nice texture for our cheesecake balls.
Chilling and Shaping
Now, cover the bowl with plastic wrap and refrigerate the mixture for about 30 minutes. This chilling step helps firm it up. After chilling, use a cookie scoop to shape the mixture into small, even balls, about 1 inch wide. Place them on a tray lined with parchment paper for easy removal.
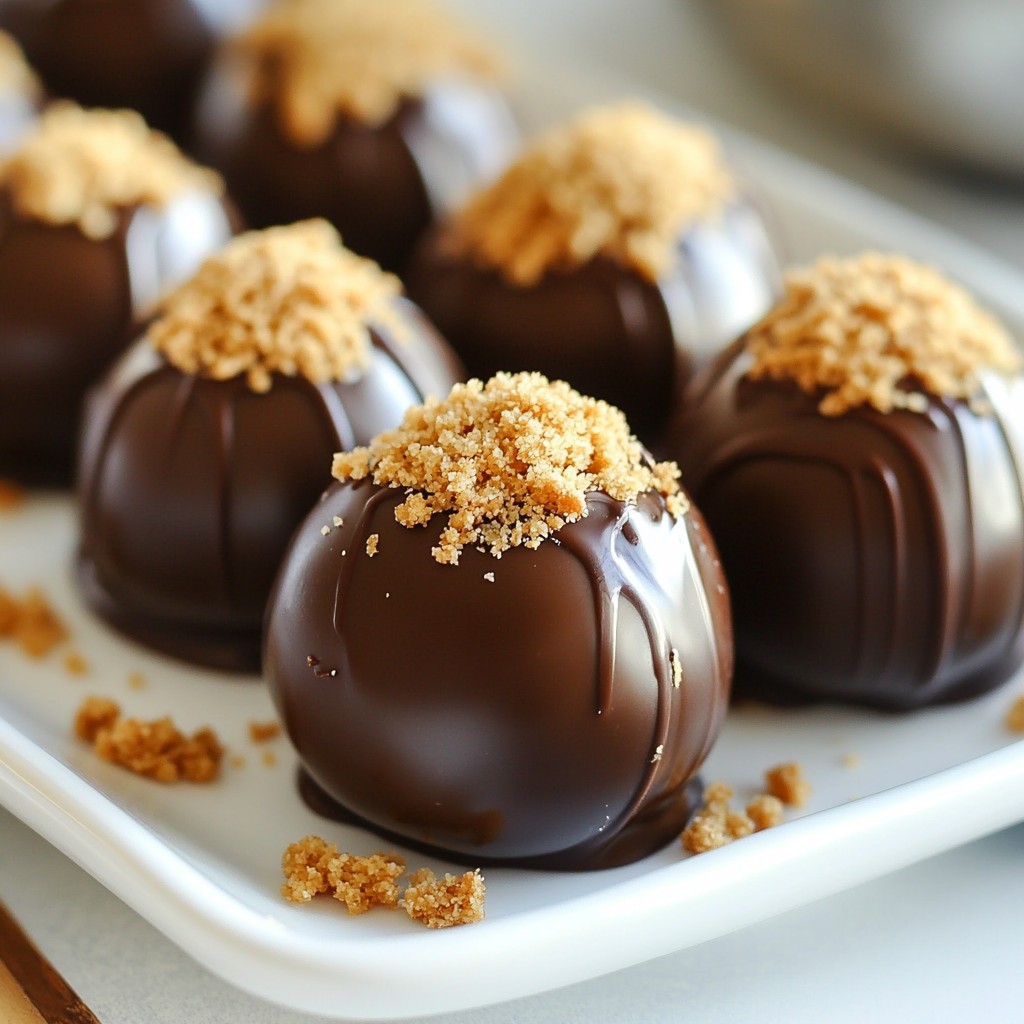
Coating with Chocolate
In a microwave-safe bowl, melt the semisweet chocolate chips. Heat in 30-second intervals, stirring well until smooth. Once melted, take each peanut butter cheesecake ball and dip it into the chocolate. Let any excess chocolate drip back into the bowl. This gives a nice, even coating.
Setting the Cheesecake Balls
Finally, return the chocolate-covered balls to the refrigerator. Allow them to set for another 30 minutes. This helps the chocolate harden, making each bite a delightful treat. Enjoy these chilled for the best experience!
Tips & Tricks
Perfecting the Texture
To get a smooth mix, start with room temperature cream cheese. This helps it blend well with peanut butter. Mix slowly at first, then speed up as the ingredients combine. You want a creamy texture without lumps.
Chilling the mixture is key. After mixing, cover the bowl and refrigerate for about 30 minutes. This firming step makes it easier to form balls. If you skip this, the mixture may be too soft to shape.
Serving Suggestions
When serving, arrange the cheesecake balls on a nice platter. You can add a sprinkle of crushed peanuts on top for crunch. A drizzle of melted chocolate also looks great. It adds a sweet touch and makes them pop.
Pair these treats with a glass of cold milk or a hot cup of coffee. The rich flavors of peanut butter and chocolate play well with these drinks.
Common Mistakes to Avoid
One common mistake is over mixing the ingredients. This can make the texture dense and chewy. Mix just until combined for a light, fluffy bite.
Another mistake is not chilling the mixture enough. If it’s too soft, shaping becomes messy. Always follow the chilling step to ensure perfect balls.
Pro Tips
- Choose Your Peanut Butter: Depending on your texture preference, you can opt for smooth or chunky peanut butter. Smooth will give a creamier texture, while chunky adds delightful crunch.
- Chill for Easy Handling: Refrigerating the mixture before shaping the balls makes them easier to handle and helps maintain their shape during the chocolate coating process.
- Melting Chocolate Tips: When melting chocolate, do it in small increments and stir in between to prevent burning. Adding a teaspoon of coconut oil can help achieve a smoother consistency.
- Make Ahead and Store: These cheesecake balls can be made ahead of time and stored in an airtight container in the fridge for up to a week, making them a perfect treat for gatherings!
Variations
Flavor Variations
You can change the flavor of these cheesecake balls. Try using different types of nut butter. Almond or cashew butter adds a nice twist. You can also add flavor extracts. A drop of almond or coconut extract gives a unique taste.
Dietary Alternatives
Want a vegan option? Use coconut cream instead of cream cheese. You can also swap peanut butter for almond or sunflower seed butter. For gluten-free choices, use gluten-free graham cracker crumbs. These swaps keep the treats tasty for everyone.
Coating Alternatives
Coating makes these balls even better. You can use white chocolate instead of semisweet. Melt it the same way. For a fun twist, drizzle caramel over them. Another idea is to roll them in crushed nuts or colorful sprinkles. This adds crunch and a pop of color.
Storage Info
Refrigeration Tips
To keep your leftover cheesecake balls fresh, store them in an airtight container. Place a piece of parchment paper between layers to avoid sticking. They stay good in the fridge for about five days. Make sure to check for any signs of spoilage before eating.
Freezing Instructions
To freeze the cheesecake balls, first, place them in a single layer on a tray. Put the tray in the freezer for about an hour until they harden. Once firm, transfer them to a freezer bag or container. They can last up to three months in the freezer.
When you're ready to enjoy them, take the balls out and let them thaw in the fridge. This keeps them creamy and tasty. You can also serve them straight from the freezer for a cool treat!
FAQs
Can I make these cheesecake balls in advance?
Yes, you can make these cheesecake balls ahead of time. They stay fresh in the fridge for about five days. Store them in an airtight container for the best results.
What type of peanut butter is best for this recipe?
I recommend using smooth peanut butter for a creamy texture. Chunky peanut butter adds fun bits, but it can change the texture. Choose based on your taste!
Can I use a different type of chocolate?
You can use milk chocolate or white chocolate for coating. Dark chocolate gives a rich taste, while milk chocolate is sweeter. Experiment with what you like best!
How do I know when the peanut butter cheesecake balls are ready?
Check if the balls are firm to the touch after chilling. The chocolate coating should also be hard, not sticky. These signs mean they are ready to enjoy!
These peanut butter cheesecake balls are easy to make and fun to eat. You learned about the ingredients and equipment needed, plus the simple steps to create this treat. Remember to chill the mixture for the best texture. You can try different flavors and coatings to make them your own. Store them well for lasting freshness, and avoid common mistakes to ensure tasty results. Enjoy making and sharing these delicious bites—they're sure to impress!