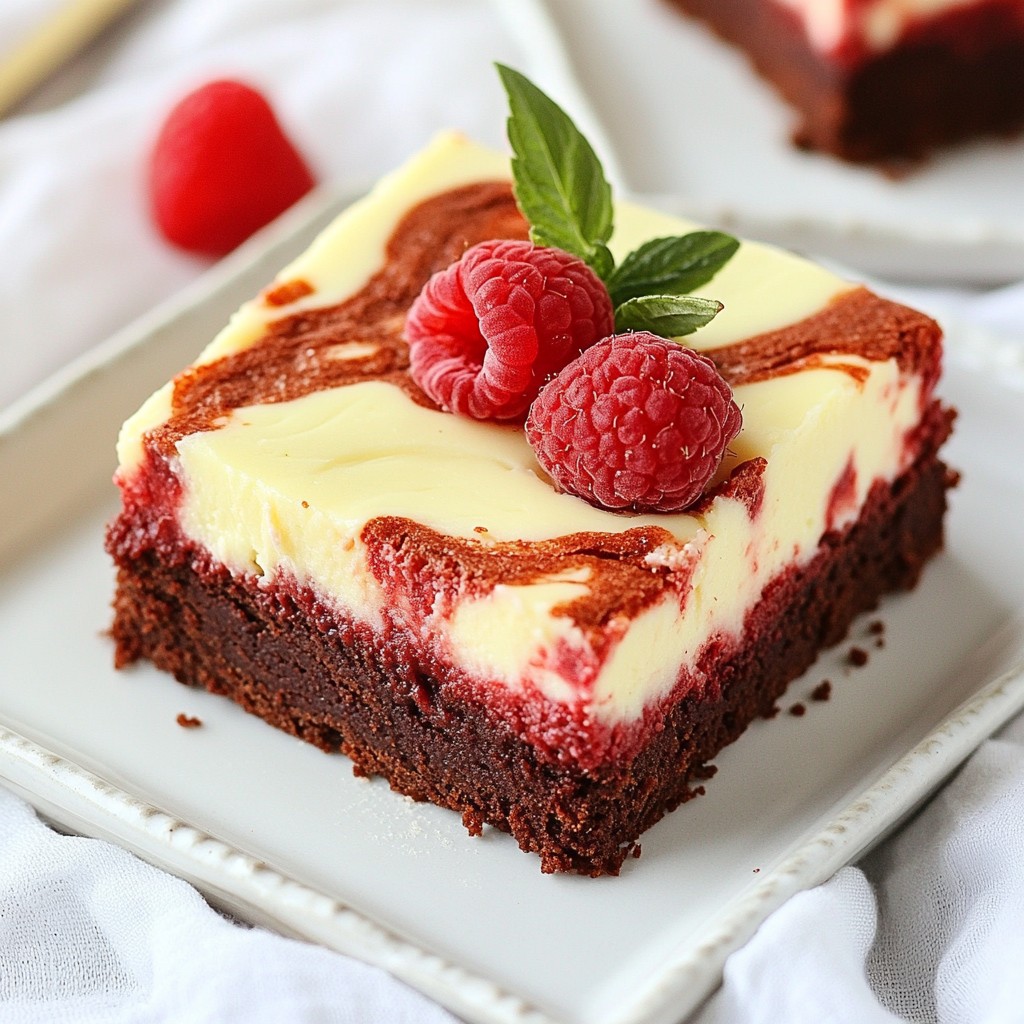
Craving a dessert that turns heads and delights taste buds? You’re in the right place! These Red Velvet Cheesecake Brownies are a sweet twist on two classic treats. Imagine fudgy brownies with a rich, creamy cheesecake layer that melts in your mouth. I’ll guide you through every step, from choosing the right ingredients to stunning presentation tips. Get ready to impress your friends and family with this irresistible treat!
Why I Love This Recipe
- Deliciously Decadent: The combination of rich red velvet and creamy cheesecake creates a dessert that is truly indulgent and satisfying.
- Visual Appeal: The striking red and white marbled layers make these brownies an eye-catching treat, perfect for celebrations.
- Easy to Make: With straightforward steps and simple ingredients, this recipe is accessible for bakers of all skill levels.
- Perfect for Any Occasion: Whether for a birthday, holiday, or just a cozy night in, these brownies are a crowd-pleaser that suits any event.
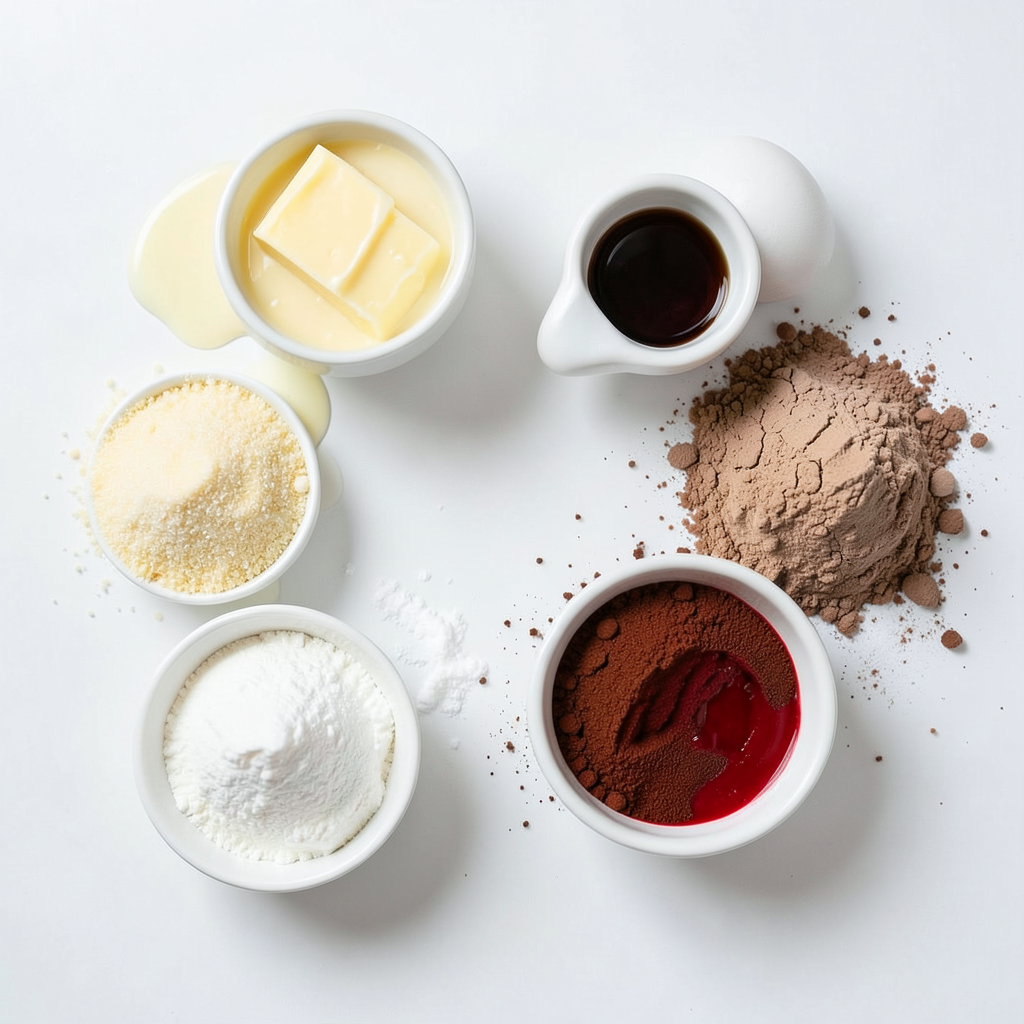
Ingredients
Brownie Base Ingredients
- ½ cup unsalted butter, melted
- 1 cup granulated sugar
- 2 large eggs
- 1 teaspoon vanilla extract
- 1 cup all-purpose flour
- 2 tablespoons unsweetened cocoa powder
- 1 teaspoon red food coloring
- ½ teaspoon baking powder
- ½ teaspoon salt
The brownie base is rich and fudgy. The melted butter adds a deep flavor. Sugar gives sweetness, while eggs provide structure. Vanilla extract adds warmth. Flour and cocoa powder create the perfect texture. Red food coloring makes it pop, giving that classic red velvet look. Baking powder helps it rise, and salt balances the sweetness.
Cheesecake Layer Ingredients
- 8 oz cream cheese, softened
- ⅓ cup granulated sugar
- 1 large egg
- 1 teaspoon vanilla extract
The cheesecake layer is creamy and smooth. Softened cream cheese gives it a rich taste. Sugar sweetens it just right. The egg binds everything together. Vanilla enhances the flavor, making it even better.
Optional Decoration Ingredients
- Melted white chocolate
- Cream cheese frosting
- Fresh raspberries
- Edible gold leaf
To make your brownies stand out, you can drizzle melted white chocolate on top. Cream cheese frosting adds extra creaminess. Fresh raspberries give a nice tart contrast. Edible gold leaf adds a touch of elegance, making it perfect for special occasions.
Step-by-Step Instructions
Preparing the Oven and Pan
First, preheat your oven to 350°F (175°C). This step is key for even baking. Next, grab an 8x8 inch baking pan. Lightly grease it with a bit of butter or cooking spray. Then, line the pan with parchment paper. Make sure some paper hangs over the edges. This will help you lift the brownies out later.
Making the Brownie Batter
In a large mixing bowl, add ½ cup of melted butter. Then, mix in 1 cup of granulated sugar. Stir until the mixture is smooth. Next, add 2 large eggs and 1 teaspoon of vanilla extract. Mix well until combined. In another bowl, whisk together 1 cup of all-purpose flour, 2 tablespoons of cocoa powder, ½ teaspoon of baking powder, and ½ teaspoon of salt. Gradually add the dry mix to the wet mix. Stir until just combined. Don’t overmix! Finally, gently stir in 1 teaspoon of red food coloring. This gives your brownies that lovely red hue.
Preparing the Cheesecake Filling
In a separate bowl, combine 8 oz of softened cream cheese with ⅓ cup of granulated sugar. Mix until smooth and creamy. Then, add 1 large egg and 1 teaspoon of vanilla extract. Beat the mixture until it is well blended. The texture should be silky and inviting.
Layering and Baking the Brownies
Pour half of the brownie batter into the lined baking pan. Spread it evenly across the bottom. Now, spoon the cheesecake mixture on top. Spread it gently to cover the brownie layer. Finally, dollop the remaining brownie batter over the cheesecake. Use a knife to swirl the two layers together. This creates a beautiful marbled effect. Place the pan in your preheated oven and bake for about 30-35 minutes. To check if they are done, insert a toothpick into the center. It should come out with a few moist crumbs.
Cooling and Slicing the Brownies
Once your brownies are baked, let them cool in the pan for at least 20 minutes. Use the parchment paper to lift them out of the pan. Allow the brownies to cool completely on a wire rack. Once cool, slice them into squares. Enjoy the rich and creamy goodness of your red velvet cheesecake brownies!
Tips & Tricks
Ensuring Perfect Moisture Levels
To keep your brownies moist, do not overbake them. Bake for 30-35 minutes. Check doneness with a toothpick; it should have a few moist crumbs. If it comes out clean, they may be dry. Cooling them in the pan for 20 minutes helps set their texture. This step locks in moisture, making each bite rich and soft.
Swirling Techniques for Cheesecake and Brownie
Swirling the brownie and cheesecake layers is fun and easy. After adding the cheesecake layer, use a knife to create swirls. Make gentle, looping motions to mix them slightly. Avoid overmixing, as you want distinct layers. This gives your brownies a beautiful marbled look, adding visual appeal and flavor depth.
Presentation Tips for Serving
Make your brownies stand out! Drizzle melted white chocolate on top for extra sweetness. You can also add cream cheese frosting for a rich finish. For a fancy touch, top with fresh raspberries or a sprinkle of edible gold leaf. These simple tips enhance the look and taste, making your brownies a showstopper.
Pro Tips
- Use Room Temperature Ingredients: Allow your cream cheese and eggs to come to room temperature before mixing. This helps create a smoother cheesecake filling without lumps.
- Don't Overmix the Batter: When combining the wet and dry ingredients, mix just until combined. Overmixing can lead to dense brownies instead of light and fudgy ones.
- Check for Doneness: For perfect brownies, insert a toothpick into the center; it should come out with a few moist crumbs. This ensures the brownies remain soft and chewy.
- Swirl for Aesthetic Appeal: When dolloping the brownie batter over the cheesecake layer, use a knife or toothpick to swirl gently. This creates a beautiful marbled effect that's visually stunning.
Variations
Adding Nuts or Chocolate Chips
You can change the texture of your brownies by adding nuts or chocolate chips. Chopped walnuts or pecans add a nice crunch. If you love chocolate, mix in some chocolate chips. They melt and create gooey pockets of chocolate. Just fold them into the brownie batter before layering. Aim for about half a cup for a great balance.
Different Flavors for the Cheesecake Layer
The cheesecake layer can shine with your favorite flavors. For a twist, add lemon or orange zest to the cream cheese. This brightens the flavor and adds a refreshing kick. You can also use flavored extracts, like almond or mint. Just replace the vanilla extract with the one you choose. Experiment to find your perfect match!
Gluten-Free or Vegan Adaptations
You can make these brownies gluten-free by swapping all-purpose flour for a gluten-free blend. Be sure to check that the blend works well in baking. For a vegan version, use plant-based butter and a flax egg instead of regular eggs. Mix one tablespoon of flaxseed meal with three tablespoons of water and let it sit. This will create a great egg substitute. Enjoy these brownies in various ways!
Storage Info
How to Store Leftover Brownies
After you enjoy your Red Velvet Cheesecake Brownies, you may have some left. To keep them fresh, store them in an airtight container. This will help maintain their soft texture and rich flavor. Place a piece of parchment paper between the layers if you stack them. Keep the container in a cool, dry place for up to four days. You can also refrigerate them to extend their life for about a week.
Freezing Instructions for Long-term Storage
If you want to save your brownies for later, freezing is a great option. First, let the brownies cool completely. Then, cut them into squares. Wrap each piece tightly in plastic wrap. After that, place the wrapped brownies in a freezer-safe bag or container. Label the bag with the date. They can stay frozen for up to three months. When you're ready to enjoy, just thaw them in the fridge or at room temperature.
Reheating Tips for Enjoyment
To enjoy your brownies warm, you can reheat them easily. Place a brownie on a microwave-safe plate. Heat it for about 15-20 seconds. Check to ensure it doesn't get too hot. You can also warm them in an oven. Preheat the oven to 350°F (175°C) and place the brownies on a baking sheet. Heat for about 5-10 minutes. This method keeps them soft and gooey, just like fresh out of the oven!
FAQs
Can I make these brownies ahead of time?
Yes, you can make these brownies ahead of time. They taste great after a day in the fridge. Just keep them covered to stay fresh. When you are ready to serve, let them sit at room temperature for a little while. This helps bring back their soft texture.
What can I substitute for cream cheese in the cheesecake layer?
If you need a substitute for cream cheese, use Greek yogurt or ricotta cheese. These options provide a nice creaminess. You can also use a dairy-free cream cheese if you want a vegan option. Just remember that the flavor might change a bit.
How do I know when the brownies are done baking?
To check if the brownies are done, insert a toothpick into the center. If it comes out with a few moist crumbs, they are ready. If the toothpick is clean, you may have overbaked them. Aim for that perfect balance of moist and chewy.
Where can I purchase Red Velvet Cheesecake Brownies?
You can find Red Velvet Cheesecake Brownies at many bakeries or cafes. Some grocery stores also sell them in their bakery section. If you want a special treat, check online for local shops that deliver. You can even order them from dessert specialty websites.
This blog post covered all the key steps for making Red Velvet Cheesecake Brownies. We explored the right ingredients, simple instructions, and helpful tips. Adding your own twist can make these brownies even more special. Remember, perfect brownies come from practice. Store them well, and enjoy them later. I hope you feel ready to bake something delicious! Now, go create your tasty treats!