Go Back
To make homemade rock candy, you need just a few simple ingredients. These ingredients will help you create the sweet crystal delights everyone loves. - 2 cups granulated sugar - 1 cup water - ½ teaspoon food coloring (your choice) - 1 teaspoon flavor extract (e.g., vanilla, peppermint) - Wooden skewers or string - Clean glass jars or containers Each ingredient plays a key role in forming those beautiful sugar crystals. The sugar provides the base, while the water helps dissolve it. The food coloring adds a fun twist to your candy. The flavor extract gives your candy its unique taste. You can use wooden skewers or string to help the crystals form. Finally, the clean jars hold your candy as it grows. {{ingredient_image_2}} To start, gather your ingredients. You need 2 cups of granulated sugar and 1 cup of water. 1. In a medium saucepan, mix the sugar and water. 2. Place the pan over medium heat. Stir gently until the sugar fully dissolves. 3. Once smooth, stop stirring and let it boil. Simmer for about 8-10 minutes. This thickens the syrup. 4. Remove the pan from heat. Add food coloring and your chosen flavor extract. Stir gently to combine everything well. Next, let the syrup cool for around 15 minutes. During this time, prepare your jars. - Clean them thoroughly. - Make sure they are completely dry. Once the syrup is cool, slowly pour it into each jar. Fill them about halfway. This leaves space for sugar crystals to form. Now, it's time to prepare your skewers. - Dip one end of each wooden skewer into the syrup. - Let a thick coating form. - Roll the coated end in granulated sugar. This helps kickstart the crystallization. Carefully insert the skewers into the jars. Ensure the sugared end is in the syrup but does not touch the bottom. If you use string, tie one end to a pencil. Balance the pencil across the jar top, letting the string hang down. Cover each jar with a cloth to keep dust away. Place them in a cool, undisturbed spot. Check back after 7-10 days. You will see beautiful sugar crystals forming! Once they look good to you, gently take out the skewer or string. Allow it to dry fully before serving. Enjoy your homemade rock candy! To make rock candy, you want to dissolve the sugar well. Here are some tips: - Use a medium saucepan for even heat. - Stir the sugar into the water slowly. - Keep stirring until the sugar fully dissolves. - Do not rush; let it come to a boil gently. - Avoid stirring once it starts to boil. This helps create a smooth syrup. If sugar remains, crystals may not form well. Flavor extracts make your rock candy unique. Here’s how to choose: - Start with one teaspoon of your favorite extract. - Common choices are vanilla, peppermint, or almond. - Use clear extracts for vibrant colors. - Experiment with combinations for fun flavors. - Try seasonal flavors like pumpkin spice or cherry for variety. Choosing the right extract enhances the taste and makes it special. Sometimes, things may not go as planned. Here are some tips to fix problems: - If crystals do not form, the syrup may be too hot. - Ensure your jars are clean and dry before pouring the syrup. - If the syrup becomes cloudy, it may have too much moisture. - Check the location where the jars sit; keep them still and cool. - If using string, make sure it’s not touching the jar's bottom. These tips can help you create perfect rock candy every time! Pro Tips Choose the Right Flavor: Opt for strong flavor extracts, as the sugar can mute the taste. Vanilla and peppermint are classic choices! Temperature Matters: Ensure your syrup reaches the correct temperature to create the perfect crystal structure. A candy thermometer can help achieve this. Cleanliness is Key: Make sure all your utensils and jars are thoroughly cleaned to prevent any unwanted bacteria that could disrupt crystallization. Patience Pays Off: Allow the crystals to form undisturbed for the best results. Avoid moving the jars during the crystallization process. {{image_4}} You can make rock candy in many fun flavors. Here are some ideas: - Vanilla: A classic choice. - Peppermint: Refreshing and cool. - Almond: Sweet and nutty. - Lemon: Bright and zesty. - Cinnamon: Warm and spicy. Mix and match flavors to create your own unique blend. Use one or two flavors for every batch. You can also add a few drops of extract for a stronger taste. Color makes rock candy even more fun! You can choose any color you like. Here are some popular options: - Red: Perfect for strawberry or cherry. - Blue: Great for blueberry or cotton candy. - Green: Ideal for lime or mint. - Yellow: Nice for lemon or banana. - Purple: Works well for grape or lavender. Feel free to blend colors for a rainbow effect. Just add a little more food coloring for brighter shades. How you show off your rock candy can make it special. Here are some ways to present it: - Use clear jars to show off the crystals. - Tie colorful ribbons around jars for a festive look. - Place pieces on a nice plate and add sprinkles for extra flair. - Wrap them in small bags for gifts. - Make a candy bouquet by sticking skewers in floral foam. Get creative and let your personality shine through in your presentation! To store your finished rock candy, place it in a clean glass jar. Make sure the jar is dry before putting the candy inside. Seal the jar tightly to keep out moisture and dust. If you want to share, you can also wrap the candy in plastic wrap or put it in small bags. Homemade rock candy lasts a long time. When stored properly, it can last for several months. However, for the best taste and texture, try to eat it within three months. Over time, it may lose its crunch and become chewy. Store your rock candy in a cool, dry place. Avoid direct sunlight and humidity, as they can affect the candy's texture. A pantry or cupboard works well. Keep the jars away from heat sources to ensure the candy stays fresh and crisp. Making rock candy takes about 10 days. You need this time for the sugar crystals to form. Start by preparing the syrup, which takes only 15 minutes. After pouring it into jars, wait patiently as the magic happens! Yes, you can use alternative sweeteners. However, the texture may change. Some sweeteners do not crystallize like sugar. Experiment with options like honey or agave syrup. Keep in mind that results may vary. If you don't have skewers, use string instead. Tie one end of the string to a pencil. Balance the pencil across the top of the jar. Let the other end hang into the syrup. This works well for growing crystals too! To prevent stickiness, let your candy dry fully after you remove it from the jar. Store it in a cool, dry place. If you see moisture, place it in a bowl of rice for a few hours. This helps absorb extra moisture. Rock candy is safe for young children to eat. However, be cautious of choking hazards. Always supervise them while enjoying this treat. Cut the candy into smaller pieces if needed. This way, everyone can enjoy it safely! Homemade rock candy is fun and easy to make. You need simple ingredients like sugar and water. Following the steps ensures perfect results. Tips help you avoid common mistakes, and variations let you get creative. Store your candy right for long-lasting enjoyment. With this guide, you can make tasty treats and impress loved ones. Enjoy the sweet rewards of your labor!

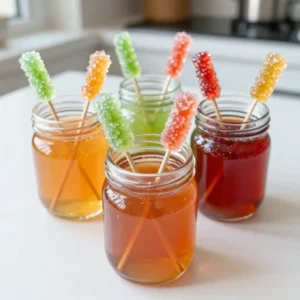
Sweet Crystal Delights

A delightful candy recipe for creating beautiful sugar crystals.
Prep Time 15 minutes
Cook Time 10 minutes
Total Time 10 days
Course Dessert
Cuisine Confectionery

Ingredients
  

  • 2 cups granulated sugar
  • 1 cup water
  • 0.5 teaspoon food coloring (your choice)
  • 1 teaspoon flavor extract (e.g., vanilla, peppermint)
  • 1 unit wooden skewers or string
  • 1 unit clean glass jars or containers

Instructions
 

  • In a medium saucepan, combine the granulated sugar and water. Place it over medium heat and stir gently, ensuring that the sugar dissolves completely into the water.
  • Once the mixture has reached a smooth consistency, stop stirring and allow it to come to a boil. Let it simmer for approximately 8-10 minutes, enabling the syrup to thicken slightly and become syrupy.
  • After simmering, carefully remove the saucepan from the heat. Incorporate your chosen food coloring and flavor extract into the syrup, stirring gently to blend everything evenly.
  • Allow the syrup to cool for around 15 minutes. During this time, prepare your jars or containers by thoroughly cleaning them and ensuring they are completely dry before use.
  • Slowly pour the cooled syrup into each jar, filling them about halfway to allow room for the sugar crystals to form.
  • If using wooden skewers, dip one end of each skewer into the syrup, allowing a generous coating to form. Next, roll the coated end in granulated sugar, as this will help kickstart the crystallization process.
  • Carefully insert the skewers into the jars, ensuring that the sugared end is submerged in the syrup without touching the bottom of the jar. For string, tie one end to a pencil and balance the pencil across the top of the jar, letting the string hang into the syrup.
  • To keep your creation safe, cover the jars with a cloth to protect them from dust. Place them in a cool, undisturbed location where they won’t be disturbed.
  • After about 7-10 days, check back to find stunning sugar crystals forming on the skewer or string, creating your delightful candy!
  • Once the crystals have developed to your liking, gently remove the skewer or string from the jar. Allow it to dry fully before serving or presenting.

Notes

Showcase your rock candy on an elegant plate or package them in small bags for a charming treat. Add flair by tying colorful ribbons around the bags for an extra festive touch!
Keyword candy, rock candy, sugar crystals